Item
Name
Explanation
Bi-D
Alignment
Adjusts differences in the print
position for bi-directional printing
for each color. It takes about 9 to 13
minutes to complete the
adjustments. The time required
varies depending on the menu
selected.
E
Select Auto or Manual.
When you select Auto, go to step 6.
When you select Manual, go to step 7.
Item
Name
Explanation
Auto
The sensor reads the adjustment
pattern printed on the paper, and
automatically registers the optimum
adjustment value to the printer. This
method is normally recommended.
Manual
Visually check the adjustment
patterns printed on the paper, and
enter the optimal adjustment values.
Use this if you cannot perform auto
adjustment, or if you are not satisfied
with the adjustment results when
using Auto.
F
Press
Start
to start adjusting the position of the
print head.
The sensor reads the adjustment pattern while it
is printing, and automatically registers the
optimum adjustment value to the printer.
When adjustment is complete, you are returned
to the screen displayed before head alignment
was performed. Check the adjustment results to
confirm if graininess or misalignment recurs in
the printed image.
If you are not satisfied with the results of the
adjustment, try adjusting manually.
G
Press
Start
to start adjusting the position of the
print head.
The adjustment pattern is printed on the loaded
paper.
Note:
Multiple adjustment patterns are printed for cut
sheets. Once printing the first sheet is complete,
load the next sheet of paper.
H
Check the printed adjustment pattern, and then
enter the set value into the control panel.
Uni-D Alignment
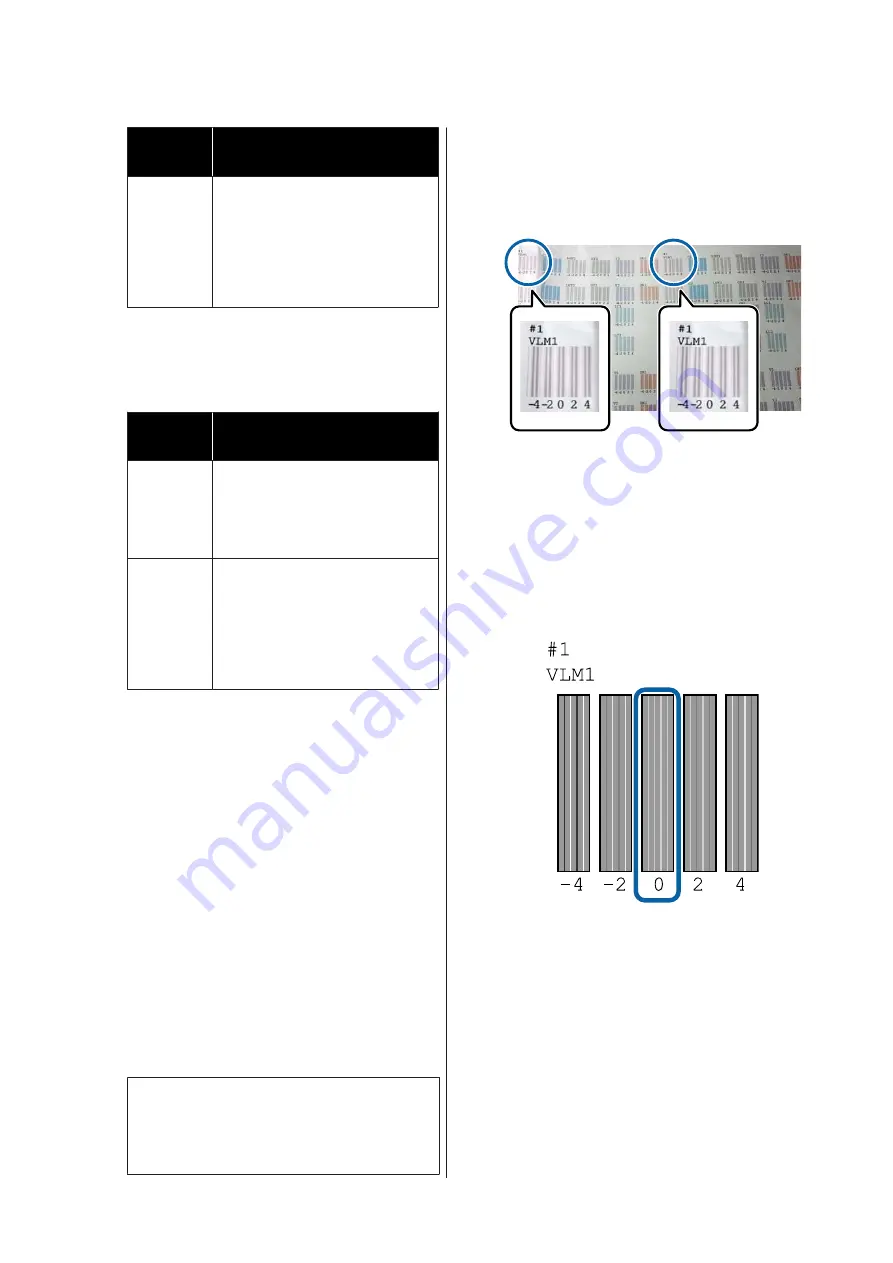
(1) Check the adjustment position for #1 VLM1.
In the photo above, you can see #1 VLM1 in two
places, but the number printed varies depending
on the paper width.
(2) Note the numbers of the patterns with the
fewest white lines or in which the white lines are
most evenly spaced.
In the following example image, "0" is the best
choice.
SC-P9500 Series/SC-P7500 Series User's Guide
Maintenance
120


