


Viewing and Managing Your Photos
34
R4CC960
User
’s G
uid
e
Rev
. G
VIE
W.FM
A5 s
ize
10/12/04
R
Proof Sign-off:
ABE S. Yamamoto
, H. Honda
T. T
ak
aha
sh
i
S. Halvo
rso
n
3
3
3
3
3
3
3
3
3
3
Note:
❏
When the battery is running low
, the
(battery) icon
appears above
the JO
G dial
icon.
❏
When the
JOG
dial
is in the rai
sed
position, the
icon turns g
reen in
th
e
botto
m le
ft corn
er
of the screen. When th
e JOG
dial is in the unraised
pos
ition, the
icon turns gr
een.
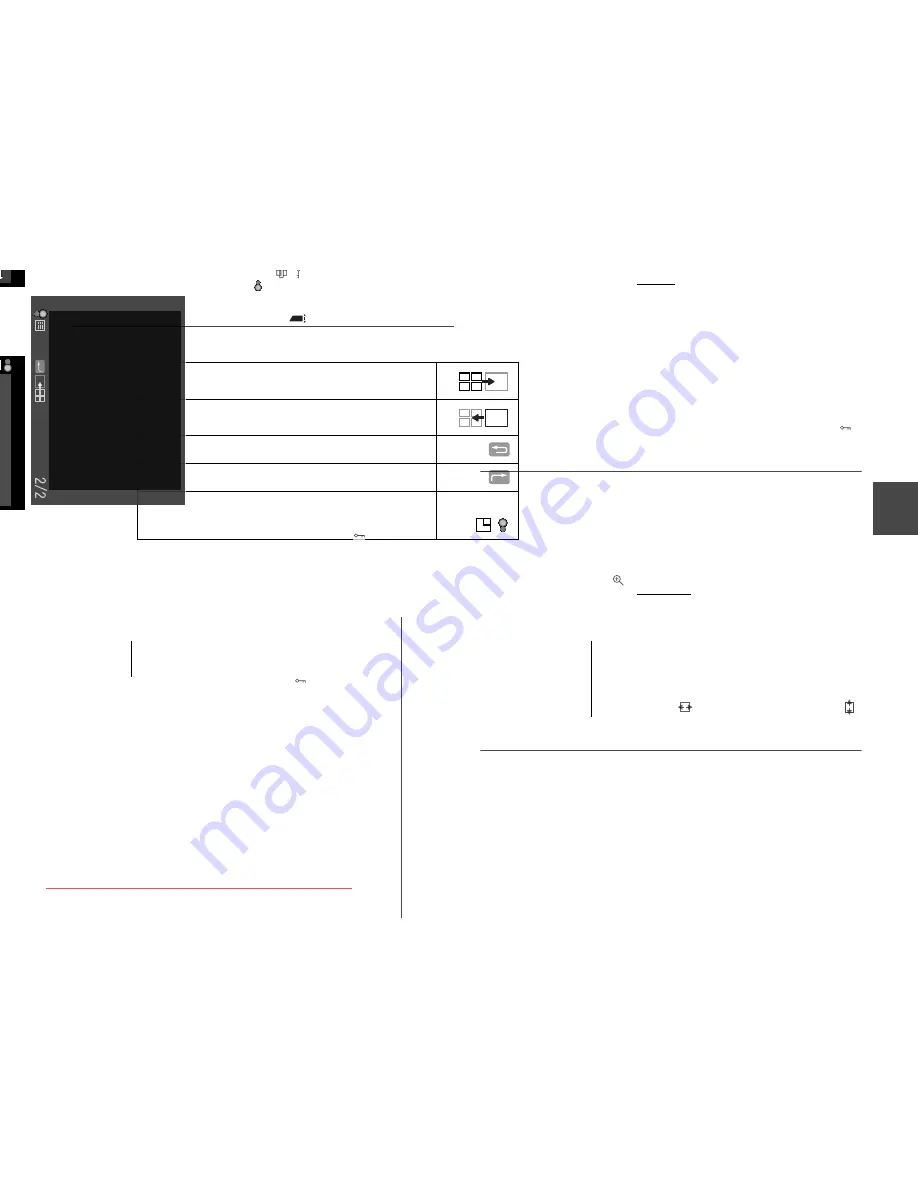
Information provided in display modes
Th
is se
ction de
scribes the
in
formation
pr
ovided
in each
of the disp
lay
mode
s.
❏
Nu
mb
er of curren
t photo/total numb
er o
f ima
ges (9
999 ma
ximu
m)
❏
Nu
mb
er of curren
t photo/total numb
er o
f ima
ges (9
999 ma
ximu
m)
❏
Date an
d time of
ph
oto
❏
File number
❏
Phot
o q
ual
ity
❏
Lock (
) ico
n (dis
played o
nly
when the
im
age is
lo
cked)
Indica
te
s you ca
n magni
fy
or shrink a
photo b
y rot
ati
ng
the JO
G dial
cloc
kwis
e or c
ou
nte
rclock
wise
in the
un
raised
posi
tion (d
ispla
ye
d in t
he
Ma
gnify
mode
).
Appea
rs w
hen t
he
EN
TE
R b
utt
on is
avai
lab
le.
Appea
rs
wh
en th
e CANCEL but
ton i
s a
vai
la
ble.
Appe
ars whe
n the
current
photo
displ
ay
style
is f
ull
sc
reen.
Appe
ars wh
en
th
e curre
nt ph
oto disp
lay st
yle is
4-photo
disp
lay.
Downloaded from ManualsCamera.com Manuals
36
R4CC960
U
ser
’s
G
u
id
e
R
ev
.
G
VI
E
W
.FM
A
5 s
ize
10/12/04
R
Pr
oof Sign-off:
ABE S. Yamamot
o
, H. Honda
T.
T
a
k
a
ha
sh
i
S. Hal
vo
rs
o
n
3
3
3
3
3
3
3
3
3
3
❏
P
h
ot
o qual
ity
❏
Sh
utte
r s
p
ee
d (whe
n the pictur
e is
ta
ken wit
h
au
to e
x
posu
re
, “
A
E
”
an
d the
expos
u
re
com
p
ens
ation
value a
re
di
spla
yed. e
.g.,
AE+1.3)
❏
ISO
s
ens
itivity
❏
Whi
te ba
lan
ce
❏
Film setti
n
g
❏
Lock (
) icon
(displ
ayed o
n
ly
when
the im
age
is
lo
ck
ed
)
❏
Prin
t (
) icon with
number
o
f prin
ts
(displa
y
ed on
ly
wh
en DPO
F
se
ttin
gs ha
ve be
en ma
de)
❏
Color
(co
lor/
m
on
ochro
m
e) setting. When
mon
o
chr
o
me is
se
t, th
e
filter colo
r is al
so displa
yed.
❏
N
u
mb
er of curr
ent p
h
oto/total numb
er of
im
ages
(on
ly for
the
selected pho
to)
Viewing Your Photos in a Slide Show
You
can
pl
ay
b
ack
im
ages
i
n
an au
to
ma
tic sli
d
e sh
ow wi
th
a
n
int
erval
of a
b
out 3 se
co
nds between
im
age
s.
1.
Pres
s the
ME
NU
b
u
tton
in p
la
y
b
ac
k
m
o
d
e. T
h
e
Main
m
enu
is
displa
yed.
2.
U
se the
JOG
di
al to se
lect
Slid
e S
h
ow
an
d pr
ess
th
e
EN
TE
R
butt
on
.
3.
U
se
th
e JOG dia
l to select th
e direction
for vie
w
in
g the
sli
d
e
sho
w
.
❏
When
you r
o
ta
te
th
e JOG
dia
l clockwis
e in
the
rais
ed pos
iti
on,
the
sl
ide
s
h
ow starts
with
th
e fir
st s
to
red im
age.
T
h
e
playb
ack
(
r
) icon is
dis
p
layed in th
e botto
m
of the scr
een.
❏
When
you ro
ta
te the JO
G di
al coun
te
rclockwis
e i
n
th
e rai
sed
pos
ition
, th
e sli
d
e s
h
ow
star
ts
with
the las
t s
tor
ed
im
age. The
re
v
er
se pl
ayb
ack
(
l
) icon
is displa
yed in
the
b
o
ttom
of th
e
sc
reen
.
4.
Pres
s the
EN
TER
b
u
tton. The s
lide sho
w
s
ta
rts.
Note:
❏
To
st
op the slide
sh
ow
, pres
s
the
EN
TER
button. To r
esta
rt,
press
the
EN
TE
R
butt
on again.
❏
To
re
turn to
the Main menu,
press the
CA
NC
EL
butt
on.
Downloaded from ManualsCamera.com Manuals
38
R4CC960
User’s Guide
Rev. G
VIEW.FM
A5 size
10/12/04
R
Proof Sign-off:
ABE S. Yamamoto, H. Honda
T. Takahashi
S. Halvorson
3
3
3
3
3
3
3
3
3
3
Locking Images
This function is used to protect images from accidental deletion.
Note:
After locking images, they become read only.
Locking an image
1.
In playback mode, display the image you want to lock and press
the
MENU
button. The Main menu is displayed.
2.
Use the JOG dial to select
Lock
, and press the
ENTER
button. The
Lock menu is displayed.
Note:
If the selected image has already been locked, the lock (
) icon is displayed
in the top right corner of the image.
3.
Raise the JOG dial, then select
Lock/Unlock 1 image
and press the
ENTER
button.
Note:
❏
If you want to lock additional images, rotate the JOG dial in the
unraised position to display the next image.
❏
The menu item “Lock/Unlock 1 image” changes depending on
whether the selected image is locked.
❏
When the image is locked, the lock (
) icon is displayed in the top
right corner of the image.
Locking all images
1.
Press the
MENU
button in playback mode. The Main menu is
displayed.
2.
Use the JOG dial to select
Lock
, then press the
ENTER
button. The
Lock menu is displayed.
3.
Select
Lock all images
and press the
ENTER
button.
All the images in the SD memory card are locked.
c
Caution:
When you format an SD memory card, all the data on the card is erased,
including locked images.
Unlocking all images
To unlock all images in the SD memory card, raise the JOG dial and
select
Unlock all images
, then press the
ENTER
button. The lock (
)
icon no longer appears on unlocked images.
Magnifying Images
You can zoom in on an image displayed in the LCD display.
1.
Press the
MENU
button in playback mode. The Main menu is
displayed.
2.
Use the JOG dial to select
Magnify
, then press the
ENTER
button.
The Magnify mode(
) icon is displayed on the top left corner of
the screen.
3.
Rotate the JOG dial (unraised position) clockwise to enlarge an
image. To reduce an image, rotate the JOG dial (unraised position)
counterclockwise.
Note:
Rotate the JOG dial (raised position) and press the
ENTER
button to switch
the direction from vertical to horizontal, or vice versa. The current
direction setting is indicated by the
(holizontal direction) icon or
(vertical direction) icon in the bottom left corner of the screen.
LCD Brightness Settings
You can select 8 levels of brightness for the LCD display. (default
setting is 5).
Downloaded from ManualsCamera.com Manuals


