


Taking Pictures
24
R4CC960
User’s Guide
Rev. G
TAKE.FM
A5 size
10/12/04
R
Proof Sign-off:
ABE S. Yamamoto, H. Honda
T. Takahashi
S. Halvorson
2
2
2
2
2
2
2
2
2
2
Setting Photo Quality
Before taking photos using the camera, photo quality (image format,
size, and compression ratio) must be specified. Set photo quality
according to how you plan to use your image data.
Photo quality setting
When taking photos using the camera, images are saved in JPEG or
RAW format. The following table shows image formats and their
compression ratios (RAW format cannot be compressed).
Follow the steps below to set photo quality.
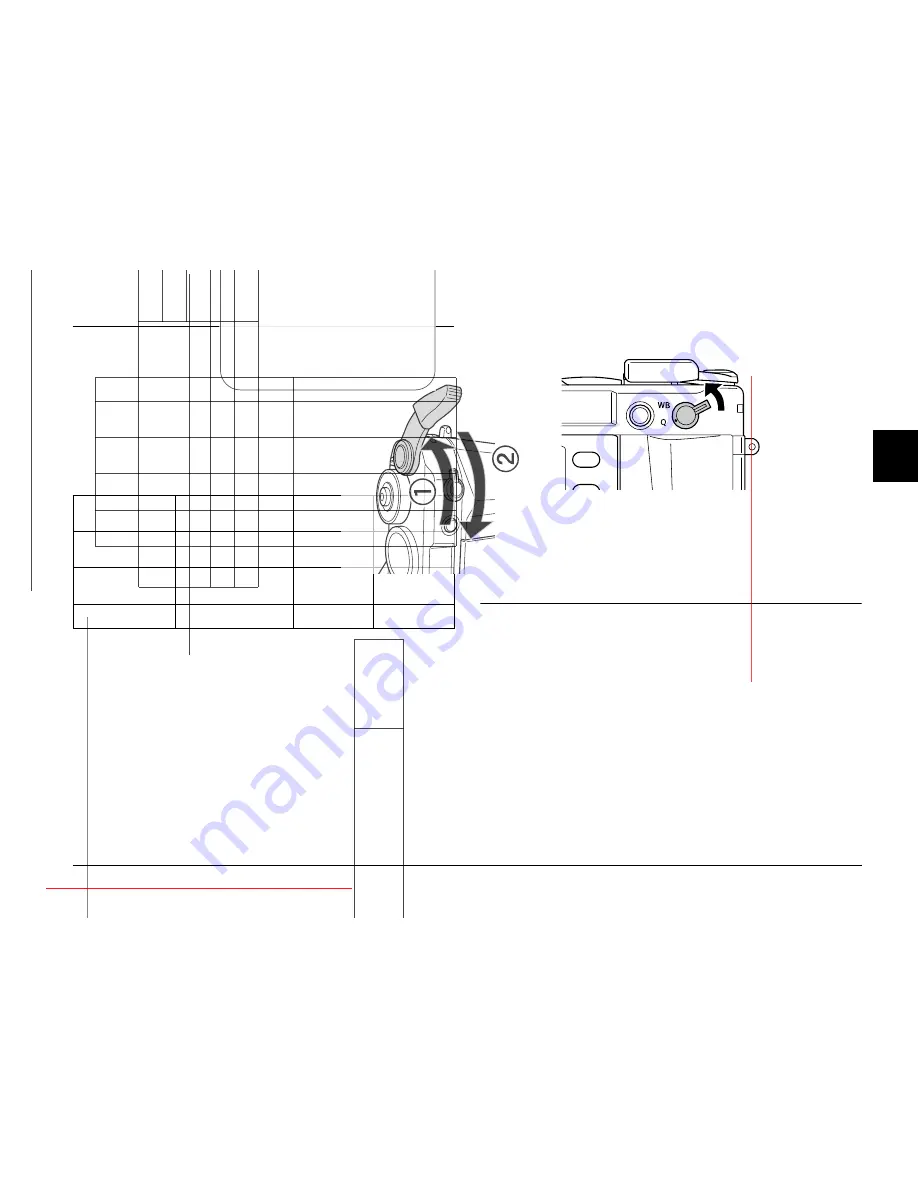
1.
Switch the Photo quality/WB lever to the Q position.
2.
Rotate the JOG dial to select your desired photo quality.
The selected photo quality is indicated on the status gauge (the
short needle on the right-side of the gauge). For details, see “About
the Status Gauge” on page 23.
3.
Return the Photo quality/WB lever to the center position.
Setting White Balance
The white balance function adjusts the camera for different kinds of
lighting. It makes white look the same color in any situation. The
camera has two white balance modes: automatic and manual. In
manual mode you can adjust the setting to suit the subject and
environment. Follow the steps below to adjust white balance manually.
Image format and
size
Compression ratio
Status gauge
setting
Average file
size
2240
×
1488
(JPEG)
1/4 (unchangeable)
N
about 1.5MB
3008
×
2000
(JPEG)
1/4 (unchangeable)
H
about 3MB
CCD-RAW
-
R
about 10MB
Downloaded from ManualsCamera.com Manuals
26
R4CC960
U
ser
’s
G
u
id
e
R
ev
.
G
TA
KE.
F
M
A
5 s
ize
10/12/04
R
Pr
oof Sign-off:
ABE S. Yamamot
o
, H. Honda
T.
T
a
k
a
ha
sh
i
S. Hal
vo
rs
o
n
2
2
2
2
2
2
2
2
2
2
Set
ting Auto Exposure (Aperture)
Wh
en you set th
e aperture, th
e mos
t
appr
opria
te
sh
utter
s
p
eed s
ettin
gs
ar
e automa
tica
lly sele
cted. Foll
ow
th
e
st
ep
s b
elow
to
s
et
th
e
aper
tu
re
fo
r a
ph
ot
o.
1.
Rot
at
e th
e sh
ut
ter
speed
dia
l to
AE
.
2.
Rotate th
e aperture rin
g
to se
lect the de
sir
ed value.
3.
Pul
l
th
e s
h
utter
ch
arge
lever
b
ack a
n
d r
elea
se
it.
4.
Fo
cus on
th
e
su
bject.
5.
Pres
s the sh
utter button
a
ll th
e w
ay
down
.
Sh
utter spe
ed is
auto
maticall
y
se
t at a
n
appr
opria
te ex
posure, an
d
a pi
cture
is
taken
.
Note:
W
hen you
se
t NR
(Noise Red
u
ction) to
Hi (High)
in
th
e Film
Sett
ings
sc
re
en
and set th
e exp
osur
e
at more
th
an
2 seconds, noise reducti
on is
automat
ically per
formed aft
er
taking a
phot
o.
While t
he no
ise
re
duct
ion
is be
in
g
performed
, do not turn the power o
ff until th
e
SD
card acces
s
lig
ht
go
es ou
t. If you turn the
power off be
fore the noise r
eduction p
roced
ure is
comp
lete
, the image
is saved
without
noise red
u
ction.
For b
righ
ter
subjects,
fa
st
m
oving sub
jects or
high
er sp
eed
fil
m
, a
high
er
sh
utter sp
eed is recommend
ed.
You can tak
e ph
ot
os lockin
g the ap
ertu
re value m
anu
ally
. For
detai
ls
, see
“Manually
Locking
th
e Ap
ert
ur
e Set
ti
ng”
on p
age
29
.
Exposure compensation
Expo
sure com
p
ens
ation
is us
ed to
al
te
r t
h
e e
x
posu
re
su
ggest
ed
by t
h
e
ca
mer
a. Expo
sure can
be se
t between
AE -2.0 EV
(underex
posure) an
d
AE
+2
.0
EV
(ov
er
exp
os
ur
e).
Downloaded from ManualsCamera.com Manuals
28
R4CC960
User
’s G
uid
e
Rev
. G
TAKE.
FM
A5 s
ize
10/12/04
R
Proof Sign-off:
ABE S. Yamamoto
, H. Honda
T. T
ak
aha
sh
i
S. Halvo
rso
n
2
2
2
2
2
2
2
2
2
2
2.
Rotate the sh
utter spe
ed dia
l to
the desi
red shutter s
peed va
lue (1
to
2000)
.
Note
:
To switch the shutte
r speed settin
g from
auto to m
anual,
ro
tate the shu
tter
speed d
ial while pre
ssing the lo
ck-release button.
3.
Pres
s th
e shut
ter bu
tton h
alf
way down. B
oth
the
op
timal sh
utte
r
sp
eed (optim
al ex
posure) a
nd cur
ren
t shutter
speed a
re dis
played
in th
e vie
wfin
der
. (The
op
timal sh
utter speed is the flus
hing
numb
er.)
4.
Rota
te th
e ap
ertur
e r
ing
until
the o
ptim
al s
hu
tte
r speed
match
es
the cur
rent
shut
ter sp
eed. T
he
optima
l sh
utter
sp
eed n
um
ber
sto
ps
flas
hing.
5.
Focus
o
n th
e subje
ct.
6.
Press the sh
utter button al
l the
way
down to take a
ph
oto.
Note:
If you se
t the
shutter s
peed
at a hig
h value,
you
can sh
oot a
fast moving
subject with
ou
t blurring.
To avoid blurring, set the
shutter sp
eed faster th
an
“1 sec./
focal le
ngt
h.”
If you se
t a sl
ow
shutter speed, a trip
od is re
comm
ended.
B (Bulb) shooting mode
Use b
ulb
sh
oo
ting mode w
hen
you need to
take picture
s at
night or in
low light conditi
ons
. T
his
m
ode
keep
s the shutter
o
pen.
1.
Rota
te the sh
utte
r speed dia
l to
B
.
2.
Rota
te the aper
ture ring to s
elect the desired
valu
e.
3.
Pull back on and r
elease th
e shutter
char
ge
leve
r.
4.
Focus on
the
su
bject.
5.
When th
e exposu
re looks
right, pr
ess th
e shutter b
utton al
l the
wa
y
down
to t
ak
e th
e picture.
Note:
When you
set NR
(Noise Red
uction) to
Hi (High) in
the Film
Settings
scre
en and set th
e exposur
e at more
than
2 seconds, noise reduction is
automatically
performed
after taking
a phot
o. Do not turn
the pow
er off
until the SD
card acces
s lig
ht goes
ou
t. If you turn
the p
ow
er off
before
the noise red
uction procedure is complete, th
e image is saved without
noise
red
uct
ion
.
When taking pho
tos in
B shooting
mode
, use a
trip
od or cable
release to
preve
nt th
e picture from
blur
ring.
Install or remove
a cable release as shown in t
he illu
stration
below.
DUMMY
Downloaded from ManualsCamera.com Manuals
30
R4CC960
U
ser
’s
G
u
id
e
R
ev
.
G
TA
KE.
F
M
A
5 s
ize
10/12/04
R
Pr
oof Sign-off:
ABE S. Yamamot
o
, H. Honda
T.
T
a
k
a
ha
sh
i
S. Hal
vo
rs
o
n
2
2
2
2
2
2
2
2
2
2
2.
S
ele
ct
Colo
r
or
Mo
noch
rome
.
If you w
ant co
lor ph
otos, us
e the JOG dial to
s
elect
Color
and
pres
s
th
e
EN
TE
R
but
ton
. Th
e
col
o
r
set
tin
g i
s saved
a
n
d
t
h
e
scre
en
ret
u
rn
s
to
th
e Cam
era
Se
tt
ings
m
enu
.
If
you
wan
t bl
ack a
n
d wh
ite
ph
oto
s,
us
e
th
e JOG
dial
to sel
ect
Mo
noch
rome
an
d pre
ss
th
e
ME
NU
butt
on
. Th
e Monoch
rom
e
Fil
ter
s
creen
is di
spla
yed. Pr
oceed
to step 3.
3.
Sel
ect o
n
e
of
th
e follo
w
ing m
o
no
ch
rom
e filters
usin
g th
e JOG
di
al,
an
d pre
ss th
e
EN
TER
butt
on
.
T
h
e s
ettin
g
i
s sa
ved a
n
d th
e scree
n
re
turn
s to th
e Ca
mera
Settin
gs
me
n
u
.
No
te
:
Whe
n
you
select
a m
o
no
ch
rom
e fil
ter
, you ca
n ta
ke mon
o
chro
me
ph
otos with
a co
lor
filter effe
ct.
Selecting Image Settings
Y
o
u can
s
elect
se
ttin
gs fo
r th
e
foll
owing ima
g
e types
:
St
an
d
a
rd
,
Fil
m
1
,
Fi
lm
2
, or
F
ilm3
.
To ma
ke
F
ilm1
,
Fi
lm2
, or
Fil
m
3
setti
n
gs
, fo
llow the steps be
low.
1.
U
se
th
e JOG dial
to
sel
ect
F
ilm Se
tti
n
g
in
th
e Ca
mer
a Settings
men
u
,
an
d pres
s the
EN
TER
button
. The Fi
lm Setti
n
g scr
een i
s d
ispl
ayed
.
Fo
r de
tai
ls o
n
usin
g th
e men
u
, se
e “
C
amer
a Setti
n
gs m
enu” o
n
page
41
.
2.
Se
lect your de
sir
ed im
age type (
Fil
m
1
,
F
ilm2
, or
Fi
lm3
) a
n
d pr
ess
th
e
ME
NU
b
u
tton
.
T
h
e men
u
for your sel
ectio
n
is
displ
ayed.
3.
U
se
the
JOG
di
al
to
s
elect the
s
ettin
g(s
) you wa
nt a
n
d pr
ess
th
e
EN
TE
R
button
.
You can s
elect
Ed
ge
En
hance
,
Saturat
ion
,
Tint
,
Con
trast
, a
n
d
NR
(
N
o
ise
R
ed
u
ct
io
n
) fo
r
ea
ch
fi
lm
ty
p
e.
4.
U
se the JO
G dia
l to se
lect
Lo
,
Me
, or
Hi
, the
n
p
ress
th
e
EN
TE
R
butt
on
.
5.
Re
pe
at
s
tep 3 an
d 4 t
o
make ad
d
iti
ona
l ch
an
ges.
6.
Wh
en you’re do
ne, sele
ct
Finis
h
and
pre
ss
t
h
e
EN
TER
butt
on.
T
h
e ne
w
values
a
re sa
ved, and th
e scree
n
retur
n
s to th
e Ca
mera
Se
ttings menu.
Using the Flash Fu
nction
An opt
ion
al f
las
h can
be us
ed
wh
en t
akin
g
ph
oto
s under poor
light
in
g
sit
u
ati
o
ns
.
1.
In
st
al
l an o
p
tion
al f
la
sh i
n
th
e came
ra’s
access
ory s
h
oe o
r X cont
act
.
2.
Pull back on an
d r
eleas
e th
e sh
utter
ch
ar
g
e l
eve
r.
3.
Se
t th
e sh
ut
te
r speed
to 1/
125
o
r les
s.
4.
Fo
cus on
th
e
su
bject an
d identify
the le
ngth
betw
ee
n th
e camer
a
le
n
s an
d th
e su
bje
ct
.
5.
S
et
th
e co
rr
es
p
o
nd
in
g
ap
er
tu
re
va
lue fro
m
the
len
g
th
an
d a
p
ertur
e
list. See
the
docum
entation
for
your
flas
h
for
de
ta
ils.
6.
Ro
ta
te th
e aper
ture ri
ng to s
elect the desir
ed
val
u
e.
St
an
da
rd
No
co
lor f
ilt
e
r is
se
le
ct
ed
.
Gr
e
e
n
Suit
ab
le for p
o
rt
rait
s.
Yell
ow
Su
it
ab
le
f
o
r
la
nd
sca
p
e
phot
os.
T
h
e
c
o
lo
r c
o
nt
rast
is
e
nhanc
ed
i
n
t
h
e
ord
e
r of
Ye
llow
, Ora
n
ge
, a
n
d
Red
.
Orang
e
Red
Stan
d
a
rd
Va
lu
es
for
Edge En
hanc
e
,
Satu
ration
,
Ti
nt
, and
Co
ntr
a
st
, are s
et to
Me
(Medium), and
NR
(N
o
ise
Reduction) is set to
Lo
(L
ow
) b
y
d
efa
u
lt.
F
ilm
1 t
o
F
ilm
3
Y
o
u
c
an s
et
y
o
u
r de
sir
ed v
alu
e f
o
r
Ed
ge
En
hanc
e
,
Satur
a
tio
n
,
Ti
nt
,
Co
ntrast
, an
d
NR
(Nois
e Reducti
o
n) us
ing the JO
G dia
l.
Downloaded from ManualsCamera.com Manuals
32
R4CC960
User’s Guide
Rev. G
TAKE.FM
A5 size
10/12/04
R
Proof Sign-off:
ABE S. Yamamoto, H. Honda
T. Takahashi
S. Halvorson
2
2
2
2
2
2
2
2
2
2
2.
Use the JOG dial to select the needle you want to adjust and press
the
ENTER
button.
The needles indicate the following:.
Note:
For details, see “About the Status Gauge” on page 23.
3.
Move the left or right arrow using the JOG dial and press the
ENTER
button. The selected needle is moved by increments of one each
time you press the
ENTER
button.
4.
Repeat step 3 until the needle returns to its original position.
5.
Select
Finish
and press the
ENTER
button.
6.
To calibrate another needle, repeat steps 2 to 5.
When you’re done, select
Finish
and press the
ENTER
button.
The settings are saved, and the screen returns to the Camera
Settings menu.
Needle
Function
E (long needle at the top of the
gauge
Number of remaining photos
R (short needle on the right-side of
the gauge)
Photo quality
E (short needle at the bottom of the
gauge)
Remaining battery power
A (short needle on the left-side of the
gauge)
White balance
Downloaded from ManualsCamera.com Manuals


