Epson r-d1 - Rangefinder Digital Camera User Manual Download Page 38

33

Viewing and Managing Your Photos

L

Proof Sign-off:
ABE S. Yamamoto, H. Honda
T. Takahashi
S. Halvorson

R4CC960
User’s Guide

Rev. G

VIEW.FM

A5 size

10/12/04

Chapter 3

Viewing and Managing Your Photos

Viewing Photos on the LCD Display

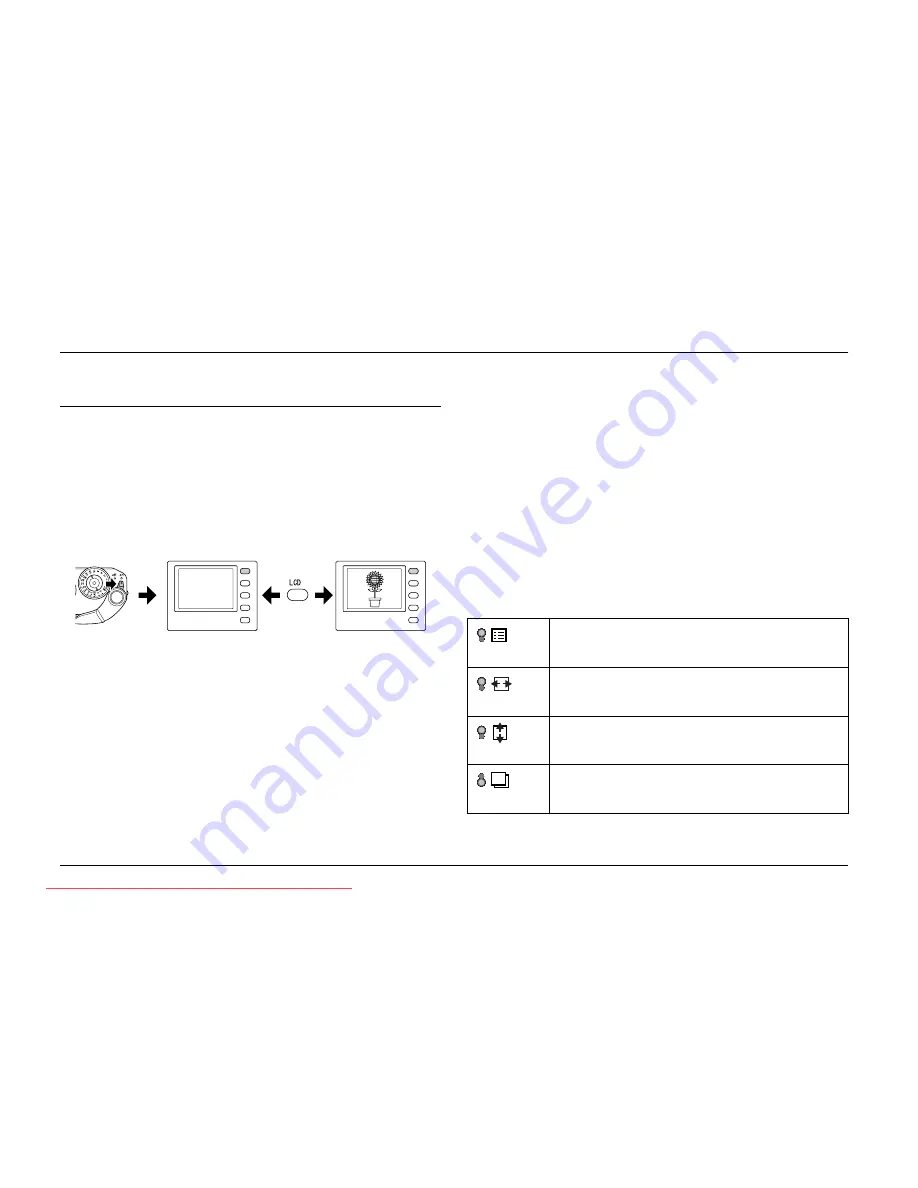
When you turn the power switch on, you’re ready to take pictures. To 
view the photos on the camera, invert the LCD display toward you and 
press the 

LCD

 button. The camera switches from picture-taking mode 

to playback mode, and the last recorded photo is displayed. For details 
about inverting the LCD monitor, see “How to Use the LCD Display” 
on page 40.

Viewing the previous or next photo

Rotate the JOG dial clockwise or counterclockwise to display the 
previous or next photo.

Switching between display modes

In playback mode, photos can be displayed in 7 modes. To switch 
between display modes, raise the JOG dial and rotate it clockwise or 
counterclockwise. 
- Standard display (default setting)
- General information display

- Histogram display
- Highlight display
- Framing guide display
- Detailed information display
- 4-photo display

Note:

When viewing a photo in playback mode for the first time, the photo is displayed 
in standard display. The next time you return to playback mode, the photo is 
displayed in the last selected display style.

Display icons

The icons displayed at the bottom of the LCD display indicate the 
following: 

Indicates you can complete the procedure by rotating 
the JOG dial clockwise or counterclockwise in the raised 
position.

Indicates you can scroll a photo horizontally by rotating 
the JOG dial clockwise or counterclockwise in the raised 
position (displayed in the Magnify mode).

Indicates you can scroll a photo vertically by rotating the 
JOG dial clockwise or counterclockwise in the raised 
position (displayed in the Magnify mode).

Indicates you can display the previous or next photo by 
rotating the JOG dial clockwise or counterclockwise in 
the unraised position.

Downloaded from ManualsCamera.com Manuals

Summary of Contents for r-d1 - Rangefinder Digital Camera

Page 1: ...Proof Sign off ABE S Yamamoto H Honda T Takahashi S Halvorson R4CC960 User s Guide Rev G FRONT FM A5 size 10 12 04 User s Guide Downloaded from ManualsCamera com Manuals ...

Page 2: ... maintenance instructions Seiko Epson Corporation shall not be liable for any damages or problems arising from the use of any options or any consumable products other than those designated as Original Epson Products or Epson Approved Products by Seiko Epson Corporation Seiko Epson Corporation shall not be held liable for any damage resulting from electromagnetic interference that occurs from the u...

Page 3: ...ving M Bayonet mount lenses 17 Mounting L mount lenses 17 Removing L mount lenses 18 Setting Up Your Camera 19 Turning the power on 19 Setting the date and time 19 Setting the date format 20 Setting the language 20 Power save timer settings 21 Assigning a function to the USER button 21 Confirming the current settings 21 Resetting the default settings 22 Releasing the Shutter 22 Full and half relea...

Page 4: ...hapter 4 Using the LCD Display How to Use the LCD Display 40 Menu structure 40 Chapter 5 Using the RAW Data Processing Software Overview 43 System Requirements 43 Installing the Software 44 EPSON PhotoRAW 44 EPSON RAW Plug In 44 Starting the Software 45 EPSON PhotoRAW 45 EPSON RAW Plug In 45 Finding More Information 45 Chapter 6 Maintenance and Troubleshooting Cleaning the Camera 46 Storing the Ca...

Page 5: ... Proof Sign off ABE S Yamamoto H Honda T Takahashi S Halvorson Viewfinder indicators 51 Internal clock 51 Power supply 51 Battery charger 51 Performance 52 File size of photos 52 About Optional Accessories 52 Index Downloaded from ManualsCamera com Manuals ...

Page 6: ...ons marked on this product and the options Warnings Cautions and Notes wWarnings must be followed carefully to avoid bodily injury cCautions must be observed to avoid damage to your equipment Notes contain important information and useful tips on the operation of your product When using the camera Follow all warnings and instructions marked on this product Do not insert objects into any openings D...

Page 7: ...oes not exceed the cord s ampere rating Never disassemble modify or attempt to repair the battery charger by yourself except as specifically explained in this guide Do not use power outlets controlled by wall switches or automatic timers Do not use power outlets on the same circuit as large motors or other appliances that may cause voltage fluctuations Avoid using outlets on the same circuit as ph...

Page 8: ... laws For North America and Canada Users When using the battery charger IMPORTANT SAFETY INSTRUCTIONS wWarning Read all relevant safety and operating instructions before using this product as misuse could result in personal injury from fire explosion leakage overheating or electric shock These safety and operating instructions should be kept for future reference Use only the Epson battery charger ...

Page 9: ...oes not exceed the cord s ampere rating Never disassemble modify or attempt to repair the battery charger by yourself except as specifically explained in this guide Do not use power outlets controlled by wall switches or automatic timers Do not use power outlets on the same circuit as large motors or other appliances that may cause voltage fluctuations Avoid using outlets on the same circuit as ph...

Page 10: ...5 Introduction Proof Sign off ABE S Yamamoto H Honda T Takahashi S Halvorson R4CC960 User s Guide Rev G INTRO FM A5 size 10 12 04 Downloaded from ManualsCamera com Manuals ...

Page 11: ...es not exceed the cord s ampere rating Never disassemble modify or attempt to repair the battery charger by yourself except as specifically explained in this guide Do not use power outlets controlled by wall switches or automatic timers Do not use power outlets on the same circuit as large motors or other appliances that may cause voltage fluctuations Avoid using outlets on the same circuit as pho...

Page 12: ...erference by one or more of the following measures Reorient or relocate the receiving antenna Increase the separation between the equipment and receiver Connect the equipment to an outlet on a circuit different from that to which the receiver is connected Consult your dealer or an experienced radio TV technician for help WARNING The connection of a non shielded equipment interface cable to this eq...

Page 13: ...oes not exceed the cord s ampere rating Never disassemble modify or attempt to repair the battery charger by yourself except as specifically explained in this guide Do not use power outlets controlled by wall switches or automatic timers Do not use power outlets on the same circuit as large motors or other appliances that may cause voltage fluctuations Avoid using outlets on the same circuit as ph...

Page 14: ...ing Your Camera Make sure that your camera box contains all of the items shown below Adobe Photoshop Elements 2 0 may not be included in some countries Camera body Lens cap Li ion battery Strap Battery charger Power cord for battery charger User s guide CD ROM EPSON PhotoRAW EPSON RAW Plug In Adobe Photoshop Elements 2 0 Downloaded from ManualsCamera com Manuals ...

Page 15: ...h external dimensions exceeding 20 5 mm cannot be used with this camera Lenses that cannot be used include HOLOGON 15 mm F8 SUPER ANGULON 21 mm F3 4 SUPER ANGULON 21 mm F4 ELMARIT 28 mm F2 8 earliest model F2 Dual Range SUMMICRON When you mount a collapsible lens d mounting it Collapsing the lens into mounting the lens while it is collapsed the lens Lenses that can be used but must n HEKTOR 50 mm ...

Page 16: ...en or photos Shutter button Half release Press the shutter button halfway down todisplaythe optimalshutterspeed i e optimal exposure value in the viewfinder Also pressing this button halfway in playback mode or Power Save Timer mode returns the camera to picture taking mode Full release Press this button fully down to take a photo Status gauge Four needles display information about the current set...

Page 17: ... dimensions exceeding 20 5 mm cannot be used with this camera Lenses that cannot be used include HOLOGON 15 mm F8 SUPER ANGULON 21 mm F3 4 SUPER ANGULON 21 mm F4 ELMARIT 28 mm F2 8 earliest model F2 Dual Range SUMMICRON When you mount a collapsible lens d mounting it Collapsing the lens into mounting the lens while it is collapsed the lens Lenses that can be used but must n HEKTOR 50 mm F2 5 ELMAR...

Page 18: ...rging the battery unplug the battery charger s plug from the outlet Note The charging time for the battery may differ depending on the temperature or the battery s remaining charge During charging the red lamp indicates the following status Inserting the battery Your camera uses the lithium ion battery EU 85 provided Only use an Epson Li ion EU 85 battery with the camera On Indicates the battery i...

Page 19: ...th external dimensions exceeding 20 5 mm cannot be used with this camera Lenses that cannot be used include HOLOGON 15 mm F8 SUPER ANGULON 21 mm F3 4 SUPER ANGULON 21 mm F4 ELMARIT 28 mm F2 8 earliest model F2 Dual Range SUMMICRON When you mount a collapsible lens d mounting it Collapsing the lens into mounting the lens while it is collapsed the lens Lenses that can be used but must n HEKTOR 50 mm...

Page 20: ...d including those locked with the camera s lock function While formatting an SD memory card do not take the card out of the camera The write protect tab The memory card is equipped with a write protect tab to prevent accidental loss of data When this tab is in the locked position photos on the memory card are locked and cannot be deleted or overwritten Installing a memory card 1 Make sure that the...

Page 21: ...l dimensions exceeding 20 5 mm cannot be used with this camera Lenses that cannot be used include HOLOGON 15 mm F8 SUPER ANGULON 21 mm F3 4 SUPER ANGULON 21 mm F4 ELMARIT 28 mm F2 8 earliest model F2 Dual Range SUMMICRON When you mount a collapsible lens d mounting it Collapsing the lens into mounting the lens while it is collapsed the lens Lenses that can be used but must n HEKTOR 50 mm F2 5 ELMA...

Page 22: ...the lens release button 2 Pull the lens straight out of the mount Mounting L mount lenses Note When you install an L mount lens you need an optional M Bayonet adapter ring There are three sizes of M Bayonet adapter rings and any one of them can be used For more information on mounting an M Bayonet adapter ring on the camera body see the M Bayonet adapter ring manual 1 Mount an optional M Bayonet a...

Page 23: ...th external dimensions exceeding 20 5 mm cannot be used with this camera Lenses that cannot be used include HOLOGON 15 mm F8 SUPER ANGULON 21 mm F3 4 SUPER ANGULON 21 mm F4 ELMARIT 28 mm F2 8 earliest model F2 Dual Range SUMMICRON When you mount a collapsible lens d mounting it Collapsing the lens into mounting the lens while it is collapsed the lens Lenses that can be used but must n HEKTOR 50 mm...

Page 24: ...and year and time hours and minutes on the LCD monitor Once these settings are made the camera automatically records the date and time each time an image is taken Note If you remove the battery from the camera the date and time settings will be erased approximately two days after the time the camera was last used After changing the battery make sure that the date and time is set correctly If neces...

Page 25: ...s camera Lenses that cannot be used include HOLOGON 15 mm F8 SUPER ANGULON 21 mm F3 4 SUPER ANGULON 21 mm F4 ELMARIT 28 mm F2 8 earliest model F2 Dual Range SUMMICRON When you mount a collapsible lens d mounting it Collapsing the lens into mounting the lens while it is collapsed the lens Lenses that can be used but must n HEKTOR 50 mm F2 5 ELMAR 50 mm F3 5 Even with the same lens the image qu diff...

Page 26: ...can assign one of the following functions to the USER button Delete Lock Magnify Print Settings current settings and Film Delete is the default setting 1 Use the JOG dial to select Assign User Button in the Camera Settings menu and press the ENTER button For details on using the menu see Camera Settings menu on page 41 2 Use the JOG dial to select a function to be assigned and press the ENTER butt...

Page 27: ...h external dimensions exceeding 20 5 mm cannot be used with this camera Lenses that cannot be used include HOLOGON 15 mm F8 SUPER ANGULON 21 mm F3 4 SUPER ANGULON 21 mm F4 ELMARIT 28 mm F2 8 earliest model F2 Dual Range SUMMICRON When you mount a collapsible lens d mounting it Collapsing the lens into mounting the lens while it is collapsed the lens Lenses that can be used but must n HEKTOR 50 mm ...

Page 28: ...umber of remaining photos 0 to 500 When an SD card is not installed in the camera or an error occurs the needle indicates E Note Although 500 is shown on the meter as the maximum number the actual maximum number of remaining photos is 999 Photo Quality The short needle on the right side of the status gauge indicates the photo quality setting N Normal 2240 1488 pixels H High 3008 2000 pixels or R C...

Page 29: ...ue you can shoot a fast moving subject without blurring To avoid blurring set the shutter speed faster than 1 sec focal length If you set a slow shutter speed a tripod is recommended B Bulb sho Use bulb shooting low light conditions 1 Rotate the shutt 2 Rotate the apert 3 Pull back on an 4 Focus on the su 5 When the expos down to take th Note When you set NR screen and set the automatically per un...

Page 30: ...r to the center position Setting ISO Sensitivity Sensitivity is a measure of how quickly the camera reacts to light You can change the light sensitivity for a specific purpose and time manually or let the camera select it automatically Follow the steps below to select ISO sensitivity manually 1 Pull up on the shutter speed dial ISO speed dial as shown 2 Rotate the ISO speed dial You can select ISO...

Page 31: ...ing subject without blurring To avoid blurring set the shutter speed faster than 1 sec focal length If you set a slow shutter speed a tripod is recommended B Bulb sho Use bulb shooting low light conditions 1 Rotate the shutt 2 Rotate the apert 3 Pull back on an 4 Focus on the su 5 When the expos down to take th Note When you set NR screen and set the automatically per until the SD card the noise r...

Page 32: ...the AE lock button The exposure is locked and remains locked while the AE lock button is held 2 Continue to press down on the AE lock button and press the shutter button You can reposition the subject in the viewfinder without affecting the exposure setting A picture is taken with the exposure set when you pressed the AE lock button Note Exposure is not locked even if you press the shutter button ...

Page 33: ...you can shoot a fast moving subject without blurring To avoid blurring set the shutter speed faster than 1 sec focal length If you set a slow shutter speed a tripod is recommended B Bulb sho Use bulb shooting low light conditions 1 Rotate the shutt 2 Rotate the apert 3 Pull back on an 4 Focus on the su 5 When the expos down to take th Note When you set NR screen and set the automatically per until...

Page 34: ...ay down to take a photo Note You can also set the aperture automatically For details see Setting Auto Exposure Aperture on page 26 Selecting a Frame You can select 28 mm 35 mm and 50 mm frames Turn the frame selector lever to the frame appropriate for the focal length of the lens you re using The parallax is automatically corrected The frame setting is displayed in the viewfinder Selecting Color o...

Page 35: ...ing subject without blurring To avoid blurring set the shutter speed faster than 1 sec focal length If you set a slow shutter speed a tripod is recommended B Bulb sho Use bulb shooting low light conditions 1 Rotate the shutt 2 Rotate the apert 3 Pull back on an 4 Focus on the su 5 When the expos down to take th Note When you set NR screen and set the automatically per until the SD card the noise r...

Page 36: ...hlight On or Off and press the ENTER button The new setting is saved and the screen returns to the Basic Setup menu Calibrating the Needles on the Status Gauge You can check the number of remaining photos photo quality remaining battery power and white balance using the status gauge on the top of the camera There are 4 needles on the gauge If any of these needles becomes inaccurate follow the step...

Page 37: ...ue you can shoot a fast moving subject without blurring To avoid blurring set the shutter speed faster than 1 sec focal length If you set a slow shutter speed a tripod is recommended B Bulb sho Use bulb shooting low light conditions 1 Rotate the shutt 2 Rotate the apert 3 Pull back on an 4 Focus on the su 5 When the expos down to take th Note When you set NR screen and set the automatically per un...

Page 38: ...rclockwise Standard display default setting General information display Histogram display Highlight display Framing guide display Detailed information display 4 photo display Note When viewinga photo in playback modeforthe first time thephoto is displayed in standard display The next time you return to playback mode the photo is displayed in the last selected display style Display icons The icons ...

Page 39: ...o stop the slide show press the ENTER button To restart press the ENTER button again To return to the Main menu press the CANCEL button R4CC960 User s Guide Rev G VIEW FM A5 size 10 12 04 Proof Sign off ABE S Yamamoto H Honda T Takahashi S Halvorson 3 3 3 3 3 3 3 3 3 3 Locking Images This function is used to protect images from accidental deletion Note After locking images they become read only Lo...

Page 40: ... of current photo total number of images 9999 maximum Histogram Highlight display Number of current photo total number of images 9999 maximum Highlight display Framing guide display Framing guide Number of current photo total number of images 9999 maximum Detailed information display Number of current photo total number of images 9999 maximum Date and time of photo File name file number and format...

Page 41: ... To stop the slide show press the ENTER button To restart press the ENTER button again To return to the Main menu press the CANCEL button R4CC960 User s Guide Rev G VIEW FM A5 size 10 12 04 Proof Sign off ABE S Yamamoto H Honda T Takahashi S Halvorson 3 3 3 3 3 3 3 3 3 3 Locking Images This function is used to protect images from accidental deletion Note After locking images they become read only ...

Page 42: ...ER button Note You cannot delete a locked images displayed with the lock icon For details see Locking Images on page 38 When an SD memory card is locked the message Cannot delete The SD card is write protected is displayed Remove the card from the camera then unlock the card and try again Formatting a memory card Format a memory card when you want to erase all the data on the card or when a messag...

Page 43: ... press the ENTER button To restart press the ENTER button again To return to the Main menu press the CANCEL button R4CC960 User s Guide Rev G VIEW FM A5 size 10 12 04 Proof Sign off ABE S Yamamoto H Honda T Takahashi S Halvorson 3 3 3 3 3 3 3 3 3 3 Locking Images This function is used to protect images from accidental deletion Note After locking images they become read only Locking an image 1 In p...

Page 44: ...POF settings when using a printer and application that support the DPOF standard Also in some countries you will find digital photo labs that support DPOF and can print using the settings in your DPOF file 1 Press the MENU button in playback mode The Main menu is displayed 2 Use the JOG dial to select Print Order then press the ENTER button 3 Select Set DPOF for one or Set DPOF for all and press t...

Page 45: ...pen the Basic Setup menu follow the steps below 1 Press the MENU button in playback mode The Main menu is displayed 2 Use the JOG dial to select Camera Settings then press the ENTER button The Camera Settings menu is displayed 3 Select Basic Setup and press the ENTER button The Basic Setup menu is displayed Calibrate Needles Displays the Needle Calibration menu to adjust the following four needles...

Page 46: ... JOG dial in the raised position pull it up as shown below Function Description Delete Delete 1 image or Delete all images Magnify Max 9 4 times for JPEG images with 3008 2000 pixels Max 2 times for RAW images Display position can be moved vertical horizontal Lock Lock Unlock 1 image Lock all images or Unlock all images Print Order Set DPOF for one Set DPOF for all 0 99 or View current DPOF Slide ...

Page 47: ...pen the Basic Setup menu follow the steps below 1 Press the MENU button in playback mode The Main menu is displayed 2 Use the JOG dial to select Camera Settings then press the ENTER button The Camera Settings menu is displayed 3 Select Basic Setup and press the ENTER button The Basic Setup menu is displayed Calibrate Needles Displays the Needle Calibration menu to adjust the following four needles...

Page 48: ...PSON RAW File files provided from DSC Digital Still Camera in a batch using optional parameters EPSON RAW Plug In Used with Adobe Photoshop 7 Photoshop CS or Adobe Photoshop Elements 2 0 to display ERF EPSON RAW File files on these applications Windows OS Microsoft Windows 98 98 Second Edition Me 2000 Professional XP Home Edition XP Professional Hardware Pentium III 1 GHz or higher Pentium IV 2 GH...

Page 49: ... EPSON Installer Program dialog box appears automatically Note To install the EPSON RAW Plug In you need administrator privileges If the EPSON Installation Program dialog box does not appear click the CD ROM icon and then select Open from the File menu Then double click EPSETUP EXE For Macintosh users Double click Ins EPSON RAW Plug In icon inside the EPSON folder Note Whenthe authentication dialo...

Page 50: ...ON RAW Plug In does not start automatically even if you select an ERF file select Open As from the File menu and select EPSON RAW Plug In from the Open as drop down list Then select your desired ERF file You cannot select an ERF file from a subfolder For Macintosh Start Adobe Photoshop 7 Adobe Photoshop CS or Adobe Photoshop Elements 2 0 and open the ERF file you want to process The main window fo...

Page 51: ...d error messages Error message Description Cannot delete The image is locked Unlock the image using the lock function in the Main menu and try again Cannot delete The SD card is write protected Release the write protect switch from the locked position and try again Cannot lock The SD card is write protected The SD card is already locked as the write protect switch is in the locked position Cannot ...

Page 52: ...established a local home page in both Chinese and English on the Internet to provide users with the following information Product information Answers to Frequently Asked Questions FAQs Latest versions of Epson product drivers Users can access our World Wide Web home page at http www epson com hk Technical Support Hotline You can also contact our technical staff at the following telephone and fax n...

Page 53: ...tatus and error messages Cannot delete The image is locked Unlock the image using the lock function in the Main menu and try again Cannot delete The SD card is write protected Release the write protect switch from the locked position and try again Cannot lock The SD card is write protected The SD card is already locked as the write protect switch is in the locked position Cannot unlock The SD card...

Page 54: ...MC Directive 89 336 EEC EN60950 EN55022 Class B EN55024 Dimensions and weight Height 88 5 mm 3 54 inches Width 142 mm 5 68 inches Depth 39 5 mm 1 58 inches Weight Approx 590 g 1 3 lb Temperature Operating 5 to 35 C 41 to 95 F Storage 20 to 60 C 4 to 140 F Humidity without condensation Operating 30 to 80 Storage 10 to 80 Memory card SD memory card Up to 1GB Power sources Lithium ion battery EU 85 R...

Page 55: ... center weighted averaged metering LCD display Type 2 low temperature polysilicon color LCD 235K pixels Status gauge Indicates current status of the following number of remaining photos photo quality remaining battery power and white balance SD card access LED On Off flashing red Memory card I F SD card I F X contact For external flash synchronizes at shutter speed downward then 1 125 sec Image si...

Page 56: ...out 360 shots compliant with the CIPA standard Shooting conditions 1 Shooting 6 pictures per minute at a regular interval then turning the camera off for one minute before turning it on again and repeating this procedure Flash is off shutter speed is set to 1 250 ISO is set to 200 image size is set to N JPEG 2240 1488 pixels and WB is set to Sunny Shooting conditions 2 Turning on the camera and wa...

Page 57: ... center weighted averaged metering LCD display Type 2 low temperature polysilicon color LCD 235K pixels Status gauge Indicates current status of the following number of remaining photos photo quality remaining battery power and white balance SD card access LED On Off flashing red Memory card I F SD card I F X contact For external flash synchronizes at shutter speed downward then 1 125 sec Image si...

Page 58: ...Customer support 47 D Date and time settings 19 Date format 20 Default settings 22 Delete deleting all images 37 deleting an image 37 Display icons 33 Display style 33 4 photo display 35 detailed information display 35 Framing guide display 35 general information display 34 highlight display 35 histogram display 35 standard display 34 DPOF 39 E ENTER button 10 EPSON PhotoRAW 43 44 EPSON RAW Plug I...

Page 59: ...matching 50 R RAW 24 S SD card access LED 10 11 SD memory card formatting 15 37 installing 14 removing 16 write protect switch 15 Setting brightness of the LCD display 38 date and time 19 date format 20 language 20 power save timer 21 white balance 24 Shutter button 10 full release 22 half release 22 Shutter charge lever 10 11 Shutter speed dial 10 11 26 Slide show 36 Software installing 44 system...

Reviews: