


Gettin
g Started
10
R4CC960
User
’s G
uid
e
Rev
. G
GET.
FM
A5 size
10/12/04
R
Proof Sign-off:
ABE S. Yamamoto
, H. Honda
T. T
ak
aha
sh
i
S. Halvo
rso
n
1
1
1
1
1
1
1
1
1
1
Camera Parts
LCD di
sp
la
y
Len
s rel
ea
se
button
AE-loc
k button
Acce
ssory sh
oe
Front view
Top view
Fra
me
se
le
ctor
lever
JOG dia
l
X contact
Shutte
r butt
on
Back view
Photo q
ua
lit
y/WB
le
ve
r
USER
button
CANCEL b
utt
on
ENTE
R b
utt
on
MEN
U b
utt
on
LCD but
ton
Shutter charge
lev
er
Shutter spe
ed
/ISO
sp
eed dial
Status gauge
Powe
r switc
h
SD
ca
rd
ac
cess L
ED
Lo
ck
-rel
ease
butt
on
Downloaded from ManualsCamera.com Manuals
12
R4CC960
U
ser
’s
G
u
id
e
R
ev
.
G
GE
T.
FM
A5 size
10/12/04
R
Pr
oof Sign-off:
ABE S. Yamamot
o
, H. Honda
T.
T
a
k
a
ha
sh
i
S. Hal
vo
rs
o
n
1
1
1
1
1
1
1
1
1
1
Attaching the Strap to Your Camera
Fo
llow th
e steps bel
o
w
to atta
ch th
e strap
to
the
cam
era
.
1.
A
ttach the protecti
ve
pa
d an
d th
e metal ri
ng to on
e side of
the
camera.
2.
Lace the s
tr
ap en
d thro
ugh
th
e ho
les
in
th
e pr
ot
ective pa
d a
n
d th
e
me
ta
l r
ing.
3.
La
ce th
e s
tr
ap
end
th
ro
u
g
h
th
e
two
p
la
st
ic f
as
ten
er
s.
4.
Re
pe
at
s
teps
1 to 3 f
o
r t
h
e ot
her
en
d of
th
e st
rap.
Using the Battery
Charging the battery
Your ca
mer
a comes
wi
th
a
li
th
ium-ion ba
ttery (EU
-8
5). Be
s
u
re
to
ch
ar
ge th
e b
atter
y befor
e usin
g th
e ca
mera
for the
firs
t tim
e or
afte
r lo
ng
perio
d
s of
di
su
se.
It t
akes
a
b
ou
t 3.
5 h
o
ur
s t
o
ch
arge
th
e ba
tt
ery when
no cha
rge rem
ain
s.
Follow the steps be
low to cha
rge th
e batte
ry.
Downloaded from ManualsCamera.com Manuals
14
R4CC960
User’s Guide
Rev. G
GET.FM
A5 size
10/12/04
R
Proof Sign-off:
ABE S. Yamamoto, H. Honda
T. Takahashi
S. Halvorson
1
1
1
1
1
1
1
1
1
1
1.
Make sure that the camera is off, and then open the battery cover
as shown below.
2.
Insert the battery.
Insert the battery into the camera until it clicks, making sure the
orientation of the battery is correct.
3.
Close the battery cover.
Note:
To check the battery’s remaining charge, see “Remaining battery power”
on page 23.
If you find that your battery has run out soon after recharging it a number
of times, make sure to discharge it completely before recharging it. Or, the
battery’s service life has ended. In that case, replace it with a new battery.
Installing and Removing a Memory Card
You cannot take photos unless an SD memory card is installed in your
camera.
Caution:
Make sure the memory card has no dirt or dust on the terminal. If
the terminal is dirty, you may not be able to write to or read from
the card.
Never insert or remove a memory card while the SD card access
LED is on. Doing so may cause data in the card to be lost or
damaged.
Avoid using or storing the card in direct sunlight, or in places that
are extremely hot, humid, or dusty.
Keep the memory card slot cover closed while the memory card is
loaded. This protects the memory card and the slot from dust and
static; otherwise data on the memory card may be lost or damaged.
Exposure of static electricity may cause the memory card to
malfunction.
Note:
To make sure you are using the memory card correctly, read the documentation
provided with the memory card. When using other devices with a memory card,
also read the documentation provided with those devices.
DUMMY
DUMMY
Downloaded from ManualsCamera.com Manuals
16
R4CC960
U
ser
’s
G
u
id
e
R
ev
.
G
GE
T.
FM
A5 size
10/12/04
R
Pr
oof Sign-off:
ABE S. Yamamot
o
, H. Honda
T.
T
a
k
a
ha
sh
i
S. Hal
vo
rs
o
n
1
1
1
1
1
1
1
1
1
1
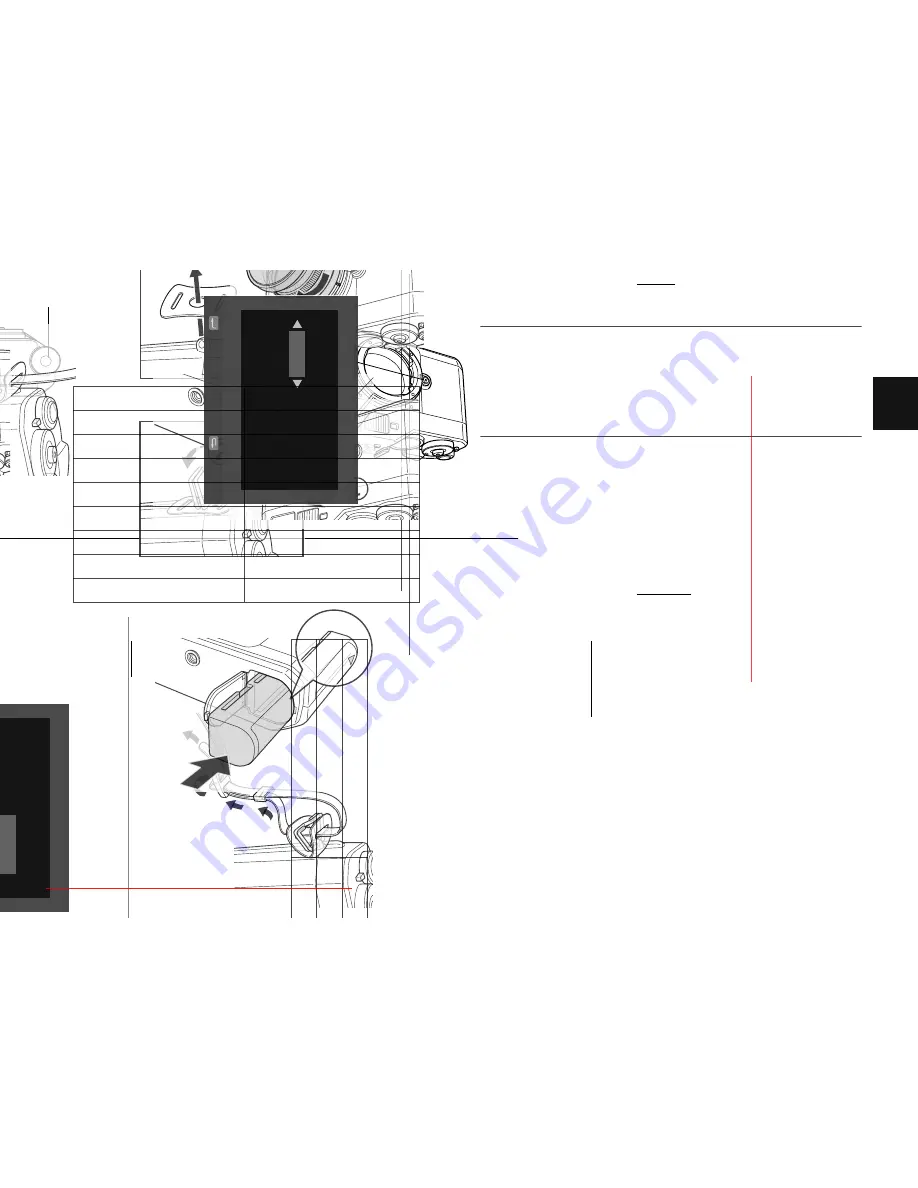
Removing a memory card
1.
Ma
k
e
su
re
th
e SD
me
mory acces
s LED is off, an
d th
en
ope
n
th
e
me
m
o
ry ca
rd
co
ve
r.
C
aution:
Neve
r rem
ove a
memory
card
while the
acces
s ligh
t
is on. Doing
so m
ay
cause data
in the card
to be lost or damage
d.
2.
Pus
h
the mem
o
ry card do
w
n
un
til
you hea
r a click. When
you
relea
se your fi
nger, th
e SD
m
emor
y
car
d
pops
out.
No
te
:
If th
e
m
emory
card is not ejecte
d,
pu
sh th
e memory
card
d
ow
n
again.
3.
Re
mo
ve
t
h
e me
m
o
ry car
d
.
4.
Clos
e
th
e m
emor
y
ca
rd cover
.
Mount
ing and Removing a Lens
Y
o
u
can
us
e M
(Ba
y
onet) m
o
un
t
le
nse
s on
t
h
e cam
era. In additi
on, you
ca
n als
o
us
e L mo
un
t len
ses
by
at
tach
ing th
e opti
ona
l M-Bayon
et
ad
apt
er ri
n
g
.
No
te
:
The optiona
l M-Bay
one
t adapter ring is no
t availa
bl
e in
all countries.
C
aution:
Some
M
/L mount lenses cann
ot be us
ed
because of th
e structure of
the camera. F
or ex
am
ple, lenses with
ex
te
rna
l dim
ensions
ex
ceeding 2
0.5 mm can
n
ot be used with
this camera.
Lens
es that c
annot be use
d
inc
lude:
- HOLOGO
N
15 mm
F8
- SUP
E
R ANGULON
21 mm F3.4
- SUP
E
R ANGULON
21 mm F4
- EL
MA
RI
T 28
m
m
F
2.
8 (e
ar
li
es
t mo
de
l)
-F2 (Dual
Range
SUMMIC
RON)
When you moun
t a
collapsible
lens, do no
t c
ollaps
e
the lens aft
er
mou
n
ting it
. Collapsing the lens int
o t
he
came
ra
by fo
rc
e or
mou
n
ting t
he lens
while
it is
co
llapsed
m
ay damage the ca
m
era o
r
th
e lens.
Lense
s that ca
n be used
bu
t
must not be
coll
apsed i
n
clu
d
e:
- HE
KTO
R
5
0 mm F2.
5
- E
L
M
A
R 5
0
mm
F3
.5
Eve
n
with t
he same lens, t
he image quality using this camera may
differ from t
ha
t of
an image
ta
ken wit
h
an an
alog camera.
Mounting M (Bayonet) mount lenses
1.
Ma
tc
h
th
e r
ed
mar
k
on
th
e c
amera
bo
dy wit
h
th
e r
ed
mar
k
on
th
e
le
ns
-b
arr
el.
C
aution:
Do
not i
n
sert y
our finger
into
the camera or EM mount.
Downloaded from ManualsCamera.com Manuals
18
R4CC960
User
’s G
uid
e
Rev
. G
GET.
FM
A5 size
10/12/04
R
Proof Sign-off:
ABE S. Yamamoto
, H. Honda
T. T
ak
aha
sh
i
S. Halvo
rso
n
1
1
1
1
1
1
1
1
1
1
2.
Turn
th
e M
-Ba
yone
t ad
apte
r ri
ng
clo
ckwi
se,
then
re
mo
ve th
e co
ver.
3.
Align the len
s mount scre
w with th
at of the M-Bayonet
ad
ap
ter
ring, and turn
the le
ns clockwise un
til i
t clicks.
Caution:
Be careful
not to t
igh
ten
the lens to
o tigh
tly.
Removing L mount lenses
1.
Tu
rn
the lens
all the way counterclockwise
an
d pu
ll the len
s
stra
ig
ht o
ut.
2.
Remove th
e M-
Bayon
et ad
apter ri
ng from th
e camer
a.
Note:
For deta
ils about
removing M-Bayonet a
dapter ri
ngs, see the manual provid
ed
with
the M
-B
ayo
net adap
ter ring.
DUMMY
Downloaded from ManualsCamera.com Manuals
20
R4CC960
U
ser
’s
G
u
id
e
R
ev
.
G
GE
T.
FM
A5 size
10/12/04
R
Pr
oof Sign-off:
ABE S. Yamamot
o
, H. Honda
T.
T
a
k
a
ha
sh
i
S. Hal
vo
rs
o
n
1
1
1
1
1
1
1
1
1
1
3.
Confir
m th
at
the yea
r is hi
gh
light
ed, an
d
ro
ta
te th
e JO
G
dia
l
clo
ckwis
e or counterclockwi
se to change the year.
No
te
:
When you turn the
JO
G dial
clockwise, the
value will
in
cre
as
e. T
o decrease
the value, turn the JO
G
di
al cou
n
terclock
wise
.
4.
Pres
s the
EN
TE
R
b
u
tto
n
.
T
h
e year
is se
t, and th
e
m
o
nth is
highli
ghted
.
5.
Re
pe
at
st
ep
s
3
an
d 4
u
n
til
yo
u f
in
ish
m
ak
in
g
a
ll
se
tti
n
gs
f
o
r d
at
e
an
d ti
m
e.
T
h
e
da
te
a
n
d time
s
ettin
g is
sa
ved, a
n
d the
s
creen
r
eturn
s
to
th
e
Ba
sic Set
u
p men
u
.
Setting the date format
Y
o
u can
s
ele
ct dis
p
lay form
at for the da
te
a
n
d
time
.
1.
S
ele
ct
Date Format
in
th
e Ba
sic Setup men
u
usin
g
the
JOG
dial
,
an
d pr
es
s th
e
EN
TER
bu
tt
on.
T
h
e Da
te Fo
rma
t scr
ee
n
a
ppe
ar
s.
For
details
on usin
g
the me
nu, s
ee “
B
asi
c Setup
me
nu” on page 42
.
2.
S
el
ec
t yo
ur
d
es
ire
d
di
sp
la
y
fo
rm
at
f
o
r t
h
e ye
ar
, m
o
nt
h,
a
n
d
da
te
us
ing th
e JOG
dia
l.
3.
Pres
s the
EN
TER
bu
tto
n
.
T
h
e Date Form
at
se
ttin
g is s
aved, an
d the s
cr
een
re
tur
n
s to th
e Ba
si
c
Se
tup menu.
Setting the language
You
ca
n se
lect a l
anguage for m
ess
ages
o
r men
u
s di
spla
y
ed on
the
LCD
dis
p
lay
.
1.
Se
lect
Lang
uag
e
in
th
e B
as
ic Setup
m
enu
us
in
g th
e JO
G
d
ial, a
n
d
pr
ess
th
e
ENT
E
R
b
u
tt
o
n
. For
d
eta
ils
o
n
usin
g th
e m
enu
, s
ee “
B
as
ic
Se
tup menu
”
on page 42.
2.
Se
lect th
e
des
ired
la
nguage usin
g
the JO
G
dial
, an
d pres
s th
e
EN
TER
bu
tt
on
.
YYYY/MM/DD
(default setti
n
g)
Yea
r/Mon
th
/
Day
DD
/MM/YYYY
Day/Month/Year
MM/D
D/YYYY
Mo
nt
h/
Da
y/
Y
ea
r
Downloaded from ManualsCamera.com Manuals
22
R4CC960
User’s Guide
Rev. G
GET.FM
A5 size
10/12/04
R
Proof Sign-off:
ABE S. Yamamoto, H. Honda
T. Takahashi
S. Halvorson
1
1
1
1
1
1
1
1
1
1
Resetting the default settings
If necessary, you can use this function to initialize all current settings
to their factory defaults, as shown below.
Follow the steps below to restore the default settings.
1.
Use the JOG dial to select
Initialize Settings
in the Camera Settings
menu, and press the
ENTER
button. The Initialize Settings screen is
displayed. For details on using the menu, see “Camera Settings
menu” on page 41.
2.
Press the
ENTER
button to select
OK
. Camera Settings are initialized,
and the screen returns to the Camera Settings menu.
Releasing the Shutter
Full and half-release
The shutter button has the following two-step function.
Focusing
To focus on a subject such as a group of people, rotate the focus ring on
the lens.
Note:
Center your eye in the viewfinder to help you focus.
When vertical lines appear in the subject, turn the focus ring until the
lines merge.
Setting
Default
Color
Color
Film
Standard
Date
YYYY/MM/DD
Power Save Timer
5 min.
Sequential Numbering
On
LCD Brightness
5/8
Language
English
USER Button
Delete
Half-release:
When you press the shutter button halfway down, the
optimal shutter speed (i.e., optimal exposure value) is
displayed in the viewfinder. Also, pressing the
shutter button halfway down in playback mode or
Power Save Timer mode returns the camera to
picture-taking mode.
Full-release:
Press the shutter button all the way down to take a
photo.
Downloaded from ManualsCamera.com Manuals


