


84
2.
Press the arrow buttons to select
Print Photos
and press the
OK
button.
3.
Select
Photo Layout Sheet
and press the
OK
button.
4.
Select one of the photo layout options and press the
OK
button.
5.
Select the paper size setting that matches the paper you loaded and press the
OK
button.
6.
Select the paper type setting that matches the paper you loaded and press the
OK
button.
7.
If you see a screen prompting you to select a layout method, do one of the following:
• To allow your product to place photos in the layout automatically, select
Automatic Layout
and
press the
OK
button. Press the left or right arrow button to scroll through your photos, and press
the
+
or
–
button to select a photo for your layout. Press the down arrow button to view additional
settings. Press the
OK
button when you're finished.
• To place photos in the layout manually, select
Place Photos Manually
and press the
OK
button.
Follow the instructions on the LCD screen to select and place photos on your layout sheet.
8.
When you see the screen to select the number of copies, press the
+
or
–
button to select the
number of copies (up to 99) and press the
OK
button.
9.
When you are ready to print, press the
start button.
Note:
To cancel printing, press the
stop button.
Parent topic:
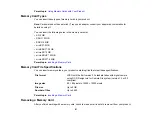
Photo Layout Options
Select the layout you want to use when printing your photos in a layout.
2-up, 4-up, 8-up, or 20-up
Print 2, 4, 8, or 20 photos on one sheet.
Upper ½ or Lower ½
Print one photo in the upper or lower half of the sheet.
Photo ID
Print 4 ID-sized photos on one sheet.
P.I.F.
Print a photo with a P.I.F frame, if a P.I.F. framed photo is on your memory card.
Parent topic:


