background image

150

Settings for NetWare Server

R4CB110
User’s Guide

Rev.C

SETNW.fm

A5 size

8/21/03

L

Proof Sign-off:
KOW  M. Arai  H. Tomizawa
K. Nishi
NOC  K. Lee

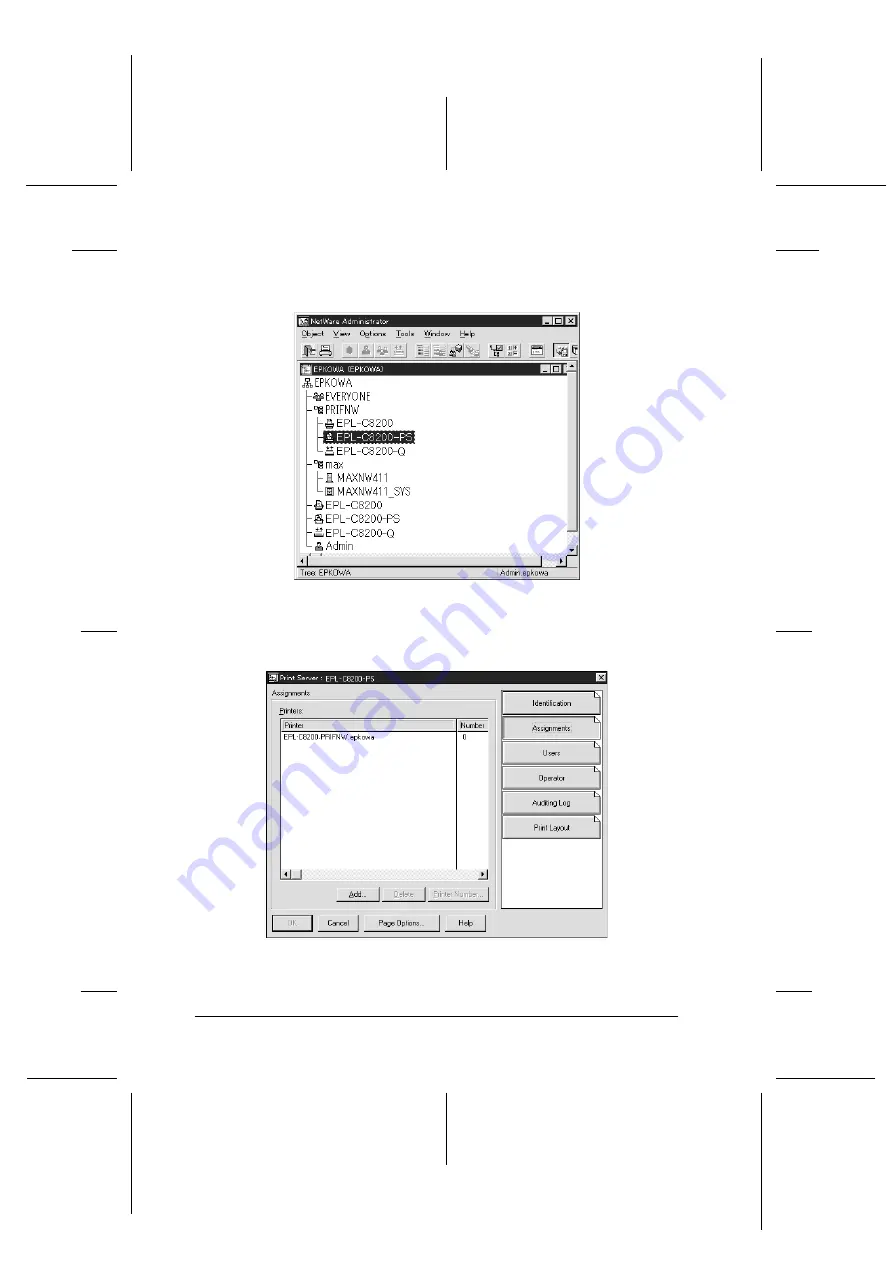
10. Double-click the Print Server Object icon in the NetWare 

Administrator screen.

11. In the Print Server dialog box that appears, click 

Assignments


and then click 

Add

.

Summary of Contents for C12C824052 (Internal Type-B 10/100Base-T High Speed Ethernet Print Server)

Page 1: ... as Original Epson Products or Epson Approved Products by Seiko Epson Corporation EPSON and EPSON ESC P are registered trademarks and EPSON Stylus is a trademark of Seiko Epson Corporation NetWare and Novell are registered trademarks of Novell Inc Apple Macintosh AppleShare LaserWriter AppleTalk LocalTalk EtherTalk OpenTransport Kanji Talk and Rendezvous are registered trademarks of Apple Computer...

Page 2: ...of the following measures Reorient or relocate the receiving antenna Increase the separation between the equipment and receiver Connect the equipment into an outlet on a circuit different from that to which the receiver is connected Consult the dealer or an experienced radio TV technician for help WARNING The connection of a non shielded equipment interface cable to this equipment will invalidate ...

Page 3: ...he representative unit tested and found to be compliant with the standards Records maintained continue to reflect the equipment being produced can be expected to be within the variation accepted due to quantity production and testing on a statistical basis as required by 47CFR 2 909 Operation is subject to the following two conditions 1 this device may not cause harmful interference and 2 this dev...

Page 4: ...iv R4CB110 User s Guide Rev C Front fm A5 size 8 21 03 L Proof Sign off KOW M Arai H Tomizawa K Nishi NOC K Lee ...

Page 5: ...and Notes 3 Package Contents 4 Operating Environment 5 Supported Epson Printers 7 Features of the Print Server 7 Print Server Operation 8 About the Software 11 Terms and Concepts 12 Overview 13 Chapter 1 Installing Components on Your Computer About Installing Components on Your Computer 15 Windows Me 98 95 15 Windows XP 18 Windows Server 2003 21 Windows 2000 23 Windows NT 4 0 26 Macintosh 30 Mac O...

Page 6: ...psonNet MacAssist 43 Chapter 3 EpsonNet WinAssist Configuration Utility About EpsonNet WinAssist 49 Menu Bar 50 Timeout option 51 Search method 52 Search options 53 Firmware update 56 Details of the Configuration Dialog Box 56 Information 56 Ethernet 58 TCP IP 59 NetWare 63 MS Network 69 AppleTalk 70 IPP 72 SNMP 73 About Password 75 Configuring the Print Server Using EpsonNet WinAssist EasySetup 7...

Page 7: ...9 Internet printing Windows Me 100 Microsoft Network Shared printing 101 Installing a printer driver 102 Using the NET USE command 103 Windows XP 104 LPR printing 104 Internet printing 107 Microsoft Network Shared printing 108 Installing a printer driver 108 Using the NET USE command 109 Windows Server 2003 110 LPR printing 110 Internet printing 114 Microsoft Network Shared printing 115 Installing...

Page 8: ...ing NetWare 137 Using Bindery Print Server NetWare 3 x 4 x 138 Using NDS Print Server NetWare 4 x 5 x 6 0 139 Using Remote Printer Mode NetWare 3 x 140 Using Bindery Remote Printer Mode NetWare 4 x 144 Using NDS Remote Printer Mode NetWare 4 x 5 x 6 0 146 Using the NDPS Gateway 152 Outline of settings 153 Making printer environment 153 Creating an NDPS Manager 154 Creating a Printer Agent 155 Conf...

Page 9: ...p Command 171 Chapter 8 EpsonNet Direct Print About EpsonNet Direct Print 173 System Requirements 174 Installing EpsonNet Direct Print 174 Setting Up Your Printer Using EpsonNet Direct Print 175 Adding a printer located in the same segment 176 Adding a printer beyond a router 178 Adding a printer from the Printers folder 180 Installing the printer driver 182 Configuring the Printer Port 184 Window...

Page 10: ...ndex 208 Menu 208 Information 209 General information 209 Configuration Network Screens 211 Ethernet 211 NetWare 211 TCP IP 213 AppleTalk 215 MS Network 215 IPP 216 SNMP 217 Time 218 Optional Screens 219 Administrator 219 Reset 219 Password 220 Chapter 11 EpsonNet WebManager About EpsonNet WebManager 221 System Requirements 222 EpsonNet WebManager Functions 223 EpsonNet WebManager Operating Struct...

Page 11: ...t Win Mac WebAssist 238 Using jumpers on the print server 238 Appendix A Tips for Administrator Selecting a Printing Method 241 Printing from Windows 241 Printing from Macintosh 242 Features of the Printing Methods 242 LPR TCP IP printing 242 Internet printing 243 Microsoft Network Shared printing 243 Setting an IP Address Using the arp ping Command 244 Checking the LAN 245 Setting and checking th...

Page 12: ...ev C UG TOC A5 size 8 21 03 L Proof Sign off KOW M Arai H Tomizawa K Nishi NOC K Lee Appendix B Specifications Print Server Specification 251 Regulatory Approvals 251 Reliability 252 Environmental 252 Network Software 252 Index ...

Page 13: ... you can print from Microsoft Windows Apple Macintosh UNIX and IBM OS 2 applications Use EpsonNet WinAssist MacAssist WebAssist the configurationutilitiesprovidedwithyourproduct toquicklyand easily configure the print server to use protocols such as TCP IP NetWare NetBEUI AppleTalk IPP and SNMP Note The EpsonNet WinAssist MacAssist WebAssist utility configures the print server to work only with pr...

Page 14: ...ildren to handle the print server When installing or uninstalling the print server be sure to remove the Ethernet cable turn off your printer and then unplug the power cord to avoid electric shock Avoid using the print server if there is smoke strange smell or strange sound otherwise this could cause fire or electric shock Instead immediately turn off the printer unplug the power cord and then con...

Page 15: ... the steps included here require detailed network knowledge and administrator rights The term network administrator refers to the person responsible for maintaining the network Administrator is synonymous with Supervisor in this guide The term print server refers totheEpsonNet 10 100 Base Tx High Speed Int Print Server in this guide Some screen shots in this guide may list a printer name other tha...

Page 16: ...re installed on this server Software CD ROM containing EpsonNet WinAssist EpsonNet MacAssist EpsonNet Direct Print EpsonNet Internet Print EpsonNet WebManager User s Guide PDF format manual Acrobat Reader for Windows only Online Guide Supplement Sheet Note You need to supply items such as a computer with an Ethernet network interface an Epson printer with an optional interface slot and an Ethernet...

Page 17: ...95 TCP IP using EpsonNet Direct Print IPP using EpsonNet Internet Print NetBEUI Windows Me TCP IP using EpsonNet Direct Print IPP NetBEUI Windows XP Home Professional Windows Server 2003 Windows 2000 Professional Server TCP IP using LPR Standard TCP IP Port or EpsonNet Direct Print IPP WindowsNT4 0with Support Pack 5 or higher TCP IP using LRP or EpsonNet Direct Print IPP using EpsonNet Internet P...

Page 18: ...or the printer Make sure the IP address is suitable for the segment incorrect IP address may generate unexpected dial up NetWare 3 x Bindery mode 4 x IntranetWare NDS mode Bindery emulation mode 5 x 6 0 NDS Queue based print system NDPS OS 2 OS 2 Warp Connect OS 2 Warp Server V3 V4 TCP IP lprportd NetBEUI UNIX Sun OS 4 1 4 or later SPARC lpr ftp SunSoftSolaris2 4 or later SPARC and x86 SCO UNIX 4 ...

Page 19: ...f the Print Server Provides high performance Connects an Epson printer equipped with an optional interface slot to the network Supports multiple protocols such as TCP IP NetWare NetBEUI AppleTalk and IPP Supports100Basefullduplex 100Basehalfduplex 10Basefull duplex and 10Base half duplex Supports DHCP Supports Automatic Private IP Addressing APIPA that assigns an IP address automatically to the pr...

Page 20: ... Proof Sign off KOW M Arai H Tomizawa K Nishi NOC K Lee Print Server Operation The status lights and status sheet provide you with important information about the operation and configuration of the print server Status light Status sheet button RJ 45 connector Data light ...

Page 21: ...light is yellow The status lights indicate the print server status as follows Status light Data light Print server status Orange On Initializing Orange and flashing On Error status Orange and green and flashing alternately Off The current value supplied from printer is too small Orange Status light and yellow Data light flashing alternately Firmware update mode Green On Ready 10M link Green Flashi...

Page 22: ...n once to print a simple status sheet or twice to print a full status sheet You cannot print a status sheet when the printer has already started printing or when it is offline or not ready to print Note If the printer does not print a status sheet make sure the printer is online and no print jobs are being processed and then wait a minute If it still does not print a status sheet turn the printer ...

Page 23: ...EpsonNet WebAssist is a web based configuration utility that allows you to configure the print server for TCP IP NetWare MS Network AppleTalk IPP and SNMP See About EpsonNet WebAssist on page 201 EpsonNet Direct Print is a utility that enables TCP IP printing for Windows Me 98 95 XP Server 2003 2000 NT 4 0 Windows XP Server 2003 2000 NT 4 0 also support OS standard LPR printing See About EpsonNet ...

Page 24: ...Talk governing Ethernet transmissions ftp a TCP IP application protocol for file transfer lpd a TCP IP remote printing protocol application Print queue a location where a print job is stored as a file until the print server sends the job to the assigned printer Protocol a rule that controls how data or information is exchanged through a network Computers and software cannot communicate with each o...

Page 25: ...h as the IP address subnet mask etc of the computer is set See Installing Components on Your Computer on page 15 for details 3 Connect the print server to the network Connecttheprintservertothenetwork See ConnectingthePrint Server to the Network on page 31 for details 4 Install EpsonNet WinAssist MacAssist on the computer Install EpsonNet WinAssist or MacAssist on the computer to configure the pri...

Page 26: ...Assist For Windows users see EpsonNet WinAssist Configuration Utility on page 49 For Macintosh users see EpsonNet MacAssist Configuration Utility on page 81 7 Select a printing method Select a printing method appropriate for your network environment and operating system If you are not sure see Selecting a Printing Method on page 241 for details 8 Install the printer driver Install the printer driv...

Page 27: ...ponents such as TCP IP NetBEUI etc and assign an IP address and subnet mask for your computer depending on the printing method you want to use See the section in this chapter appropriate for your operating system Windows Me 98 95 For Windows Me 98 95 use the following procedure to install the necessary components Note The Windows Me 98 95 CD ROM may be required during the installation When using T...

Page 28: ... the list of installed network components on the Configuration menu If they are already installed go to the next chapter The following table lists the components required for configuring the print server with EpsonNet WinAssist EpsonNet WinAssist s setting screens Necessary components TCP IP AppleTalk IPP SNMP IP trap TCP IP MS Network NetBEUI or TCP IP NetWare SNMP IPX trap Latest Novell Client d...

Page 29: ...facturers list and TCP IP from the Network Protocols list Then click OK For Microsoft Network Shared printing To use TCP IP see the description described earlier to install TCP IP To use NetBEUI select Protocol and then click Add Select Microsoft from the Manufacturers list and NetBEUI from the Network Protocols list Then click OK Select Client and then click Add Select Microsoft from the Manufact...

Page 30: ...w installed Go to the next chapter How to Set Up the Print Server on page 31 Windows XP For Windows XP use the following procedure to install the necessary components Note The Windows XP CD ROM may be required during the installation When using TCP IP or IPP for printing you need to set the IP address the subnet mask and the default gateway of the computer 1 Click Start highlight Control Panel and...

Page 31: ...onents are in the list If they are already installed go to the next chapter The following table lists the components required for configuring the print server with EpsonNet WinAssist EpsonNet WinAssist s setting screens Necessary components TCP IP AppleTalk IPP SNMP IP trap Internet Protocol TCP IP MS Network Internet Protocol TCP IP NetWare SNMP IPX trap Latest Novell Client downloaded from the N...

Page 32: ...ell Client from the Novell Web site and install it on the computer Also be sure to install IPX See the Novell Web site for detailed information 6 For LPR Internet or Microsoft Network Shared printing Double click Internet Protocol TCP IP in the Local Area Connection Properties dialog box to open the Internet Protocols TCP IP Properties dialog box Set the IP address the subnet mask etc and then cli...

Page 33: ...essary components Note The Windows Server 2003 CD ROM may be required during the installation When using TCP IP or IPP for printing you need to set the IP address the subnet mask and the default gateway of the computer 1 Click Start point to Control Panel and then select Network Connections Click Local Area Connections 2 Click the Properties button 3 Check if the following necessary components are...

Page 34: ...ient and then click Add Select Client for Microsoft Networks and then click OK For printing via NetWare server Download the latest Novell Client from the Novell Web site and install it on the computer Also be sure to install IPX See the Novell Web site for detailed information EpsonNet WinAssist s setting screens Necessary components TCP IP AppleTalk IPP SNMP IP trap Internet Protocol TCP IP MS Ne...

Page 35: ...lick OK 6 Restart the computer The necessary components are now installed Go to the next chapter How to Set Up the Print Server on page 31 Windows 2000 For Windows 2000 use the following procedure to install the necessary components Note The Windows 2000 CD ROM may be required during the installation When using TCP IP or IPP for printing you need to set the IP address the subnet mask and the defau...

Page 36: ... list If they are already installed go to the next chapter The following table lists the components required for configuring the print server with EpsonNet WinAssist EpsonNet WinAssist s setting screens Necessary components TCP IP AppleTalk IPP SNMP IP trap Internet Protocol TCP IP MS Network NetBEUI or Internet Protocol TCP IP NetWare SNMP IPX trap Latest Novell Client downloaded from the Novell ...

Page 37: ...lick Add In the Select Network Protocol dialog box select Internet Protocol TCP IP and then click OK For Microsoft Network Shared printing To use Internet Protocol see the description described earlier to install Internet Protocol TCP IP To use NetBEUI select Protocol and then click Add Select NetBEUI Protocol and then click OK Select Client and then click Add Select Client for Microsoft Networks ...

Page 38: ... then click OK 6 Restart the computer The necessary components are now installed Go to the next chapter How to Set Up the Print Server on page 31 Windows NT 4 0 For Windows NT 4 0 use the following procedure to install the necessary components Note The Windows NT 4 0 CD ROM may be required during the installation When using TCP IP or IPP for printing you need to set the IP address the subnet mask ...

Page 39: ...ecessary components are in the list If they are already installed go to the next chapter The following table lists the components required for configuring the print server with EpsonNet WinAssist EpsonNet WinAssist s setting screens Necessary components TCP IP AppleTalk IPP SNMP IP trap TCP IP MS Network NetBEUI or TCP IP NetWare SNMP IPX trap Latest Novell Client downloaded from the Novell Web si...

Page 40: ...ocols tab and then click Add Select TCP IP from the list and then click OK Set the IP address the subnet mask etc and then click OK Select the Services tab and then click Add Select Microsoft TCP IP Printing from the list and then click OK For Microsoft Network Shared printing To use TCP IP see the description described earlier to install TCP IP To use NetBEUI select the Protocols tab and then cli...

Page 41: ... 1 1 1 1 1 1 1 1 1 1 1 For printing via NetWare server Download the latest Novell Client from the Novell Web site and install it on the computer Also be sure to install IPX See the Novell Web site for detailed information 5 Restart the computer The necessary components are now installed Go to the next chapter How to Set Up the Print Server on page 31 ...

Page 42: ...erver with EpsonNet MacAssist Mac OS 8 x to 9 x 1 From the Apple menu select Control Panel and thenTCP IP 2 Set Connect via to Ethernet 3 Assign an IP address and other settings if necessary 4 Close the dialog box to save any changes Go to the next chapter How to Set Up the Print Server on page 31 Mac OS X 1 From the Apple menu select System Preferences 2 Open the Network control panel Click the T...

Page 43: ...k Follow the steps below to connect the print server to the network wWarning Before you install or uninstall the print server be sure to turn off the printer to prevent electric shock 1 Make sure the printer is turned off If you are using an ink jet printer unplug the power cord from the wall outlet 2 Insert the print server in an optional interface slot and tighten the screws For more details see...

Page 44: ...connect its other end to the network cCaution You must use a Category 5 shielded twisted pair cable to connect the print server to prevent malfunction Do not connect or disconnect the network cable when the printer is on Do not connect the print server and the computer directly Be sure to use a HUB to connect the print server to the network Note You can use both 10Base T and 100Base TX If you prin...

Page 45: ...sheet button while the orange Status light and the yellow Data light are on otherwise the print server will return to its factory default settings and the network status sheet will not print correctly as well After turning off the printer wait until the status lights go off before turning it back on or before removing the print server otherwise the print server may not work correctly Note for Mac ...

Page 46: ...sonNetWinAssist MacAssistincluded ontheSoftware CD ROM shipped with this product For Windows Install EpsonNet WinAssist on the computer to configure the print server System requirements The following table lists the system requirements of EpsonNet WinAssist Operating systems Windows Me 98 95 Windows XP Professional Home Edition Windows Server 2003 Windows 2000 Server Professional Windows NT 4 0 Se...

Page 47: ...tall EpsonNet WinAssist and then install it again 1 Insert the Software CD ROM in the CD ROM drive 2 The EPSON Installation Program starts automatically If the Installer dialog box does not appear double click SETUP EXE on the CD ROM 3 Select Install EpsonNet WinAssist and then click 4 Follow the on screen instructions to complete the installation For Macintosh Install EpsonNet MacAssist on your M...

Page 48: ...then the EpsonNet MacAssistfolder andthenthe EpsonNet MacAssist Installer icon Note When the authentication dialog box to assign administrator rights appears enter the user name and password and then click OK 3 Follow the on screen instructions to install the software 4 Restart your computer Mac OS 8 x to 9 x The MacAssistxxx folder which contains the EpsonNet MacAssist icon and the EpsonNet MacAs...

Page 49: ...e computer Make sure the printer is turned on The computer to use for the following steps must be in the same segment as the print server The sample screens are taken from Windows 98 using EpsonNet WinAssist Other systems may differ in appearance but the instructions are the same except as noted 1 Click Start point to Programs or All Programs Windows XP Server 2003 and then select EpsonNet WinAssi...

Page 50: ... by checking their MAC address which are found on the status sheet You can search printers in other segments by using Search Options from the Tool menu See Search options on page 53 for more information The Launch Browser button can be used only if a valid IP address is assigned to the printer The print server does not have a default IP address Be sure to assign a valid IP address manually or by u...

Page 51: ...hod for specifying the IP address If you select Automatic DHCP becomes available and assigns an IP address automatically If you want to set the IP address manually select Manual instead Note The network administrator must confirm any changes made to the IP address settings WhenAutomaticisselected DHCPbecomesavailable Touse the DHCP server make sure it is installed on your computer and correctly co...

Page 52: ...e check box 6 When setting an IP address using the ping command select the Set using PING check box Do not select when setting an IPaddresswithEpsonNetWinAssist MacAssist WebAssist this prevents any unexpected change of the IP address Note Be sure not toselect thecheckboxwhen not using ping this prevents an unexpected change of the IP address by EpsonNet WebManager 7 To assign an IP address manual...

Page 53: ... support the function 9 SelecttheAcquireDNSserveraddressautomaticallycheck box if you want to acquire the DNS server address using the DHCP server If you want to enter the DNS server address manually click the Add button and then enter the IP address of the DNS server Click OK 10 Select the Acquire host name and domain name automatically check box if you want to acquire the host name and the domai...

Page 54: ...iversal Plug and Play function on Windows Me or future operating systems Change the default Universal Plug and Play device name if desired This device name is used for Windows that supports the Universal Plug and Play function 13 After changing the settings click OK 14 In the TCP IP dialog box click OK The Password dialog box appears 15 Enter your password up to 20 characters and then click OK to ...

Page 55: ...wtouseEpsonNetMacAssisttoconfigure the print server Note Make sure the printer is turned on The computer to use for the following steps must be in the same segment as the print server Make sure that Ethernet is selected for Connect via in the AppleTalk and TCP IP control panels according to your network environment 1 Double click the EpsonNet MacAssist icon 2 Select the printer you want to configu...

Page 56: ... on the status sheet You can search printers in other zones just like computers by changing the zone setting See Search options on page 84 for more information The Launch Browser button can be used only if a valid IP address is assigned to the printer The print server does not have a default IP address Be sure to assign a valid IP address manually or by using the DHCP server 3 Click the TCP IP tab...

Page 57: ...urn on the printer so that you need to change the printer port setting accordingly 5 When setting an IP address using the ping command select the Set using PING check box Do not select when setting an IPaddresswithEpsonNetWinAssist MacAssist WebAssist this prevents any unexpected change of the IP address Note Besurenotto selectthe check box whennotusingping this prevents an unexpected change of th...

Page 58: ... does not support the function 9 SelecttheAcquire DNS server addressautomaticallycheck box if you want to acquire the DNS server address using the DHCP server If you want to enter the DNS server address manually click the Add button and then enter the IP address of the DNS server Click OK 10 Select the Acquire host name and domain name automatically check box if you want to acquire the host name a...

Page 59: ... or future operating systems Change the default Universal Plug and Play device name if desired This device name is used for Windows that supports the Universal Plug and Play function 13 After changing the settings click OK 14 In the TCP IP dialog box click OK The Password dialog box appears 15 Enter your password up to 20 characters and then click OK to save the settings If you are entering a pass...

Page 60: ...48 How to Set Up the Print Server R4CB110 User s Guide Rev C Start fm A5 size 8 21 03 L Proof Sign off KOW M Arai H Tomizawa K Nishi NOC K Lee ...

Page 61: ...ficially the NetBEUI protocol is not supported on Windows XP Server 2003 To set the IP address for OS 2 and UNIX use the arp and ping commands Formoreinformation see SettinganIPAddressUsing the arp ping Command on page 244 If you are using the printer in a dial up environment not running NetWare clear the Use NetWare check box on the NetWare screen If this check box is selected the extra account m...

Page 62: ...erver you have selected EpsonNet WebAssist is a utility that runs on a browser Quit Quits EpsonNet WinAssist View menu Refresh Updates to the latest information by searching for the available printers again Tool menu Timeout Set the timeout value between 2 and 120 seconds See Timeout option on page 51 for more information Search Method Selecttheconnectionsandprotocolstousetosearchforaprint server ...

Page 63: ...opic Opens EpsonNet WinAssist help About EpsonNet WinAssist Displays the copyright and version information for EpsonNet WinAssist Timeout option Set the length of time before a timeout occurs between 2 and 120 seconds The default value is 6 seconds A communication error occurs if this time is exceeded If you set a larger value it takes more time to search for the network printers Therefore change ...

Page 64: ...protocols or USB connection Select the Select All radio button to search for print servers with all the available connections and protocols or select the Select Individually radio button to select the preferred connections and protocols Select Refresh from the View menu or restart EpsonNet WinAssist for the settings to take effect Note EpsonNet WinAssist installed on Windows XP Server 2003 does no...

Page 65: ... do not affect the search parameters used for EpsonNet WinAssist EasySetup Select Refresh from the View menu or restart EpsonNet WinAssist for the settings to take effect Item Explanation Search specified address Select this check box to search for a print server located outside the router Network Address Enter the network address valid range 0 to 255 of the print server you want to find Enter 0 f...

Page 66: ...dd the same network address the This network address has already been registered message appears which indicates this address cannot be added Search Options IPX WhenyoumanagetheprintserverwithIPX NetWare andwhen you want to configure the print server outside of the local network set the network address of the print server Select Refresh from the View menu or restart EpsonNet WinAssist for the sett...

Page 67: ...event charges for any extra accounts Item Explanation Search specified addresses The display time can be reduced by selecting this check box and choosing the target networks any unnecessary or unwanted information is then not obtained Network Address List Displays all current network addresses Search Addresses Displays the network address to be searched Add button Select an address in Network Addr...

Page 68: ... update You can update the firmware and EpsonNet WebAssist Since the firmware update function is for the support purpose usually you do not need to use this function See the EpsonNet WinAssist online help for detailed information Details of the Configuration Dialog Box Information The Information menu shows the various print server parameters as described below ...

Page 69: ...u can check the MAC address on a status sheet Hardware Version Hardware version of the print server Software Version Software version of the print server Model Name Product name of the printer attached to the print server Location Enter the location of the print server Return to Default button Reverts to the factory default settings Search Path Protocol used to search for the print server OK Updat...

Page 70: ...zawa K Nishi NOC K Lee Ethernet To change the Ethernet setting use the following screen Items Explanations Link Speed Duplex Mode Select an appropriate Ethernet speed and duplex setting Normally Automatic can be selected If you select a setting other than Automatic make sure the setting corresponds to the type of hub you are using ...

Page 71: ...ty 59 R4CB110 User s Guide Rev C EPWIN fm A5 size 8 21 03 R Proof Sign off KOW M Arai H Tomizawa K Nishi NOC K Lee 3 3 3 3 3 3 3 3 3 3 3 TCP IP To use the printer in the TCP IP environment configure the print server using the following screen ...

Page 72: ...t using Automatic Private IP Addressing APIPA Assigns a private IP address automatically even when there is no DHCP server on your network It is dimmed if this function is not supported Set using PING Select this check box when setting an IP address using the ping command When not using the ping command clear this check box Note Be sure to clear the check box when not using ping this prevents any ...

Page 73: ...ns Acquire DNS server address automatically Select this check box if you want to acquire the DNS server address using the DHCP server To enter the DNS server address manually clear this check box If the DNS is not supported this check box is dimmed DNS Server Addresses Displays the DNS server address To enter the DNS server address click the Add button To edit the DNS server address select the add...

Page 74: ...two or morecharacters of the domain name supported by Dynamic DNS The total number of characters of the host name and the domain name must not exceed 251 Register the network interface s address to DNS server Select this check box if you want to register the host name and the domain name to the DNS server through the DHCP server that supports Dynamic DNS Register directly to DNS server Select this...

Page 75: ...en You can configure the print server in either the Print Server mode or the Remote Printer mode Note When you are not using NetWare be sure to select the Standby mode Log in to the NetWare server or the NDS context with supervisor privileges You cannot assign the print queue if you have not logged in to the bindery or NDS in the same mode you have selected for Mode Print Server mode To use the pr...

Page 76: ... fm A5 size 8 21 03 L Proof Sign off KOW M Arai H Tomizawa K Nishi NOC K Lee Note When you save the settings the Printer Objects named PR0 for the Bindery mode or print server name_P0 for the NDS mode are automatically created To change the printer name use PCONSOLE or NWADMIN ...

Page 77: ... the NDS context Browse button Browse the NDS context Primary File Server Name For the Bindery mode only Select the server where the print server logs in Print Server Name Select or enter the print server name up to 47 characters Print Server Password Enter the password to log in to the print server up to 20 characters See the NetWare documentation for more details Usually you do not need to set i...

Page 78: ...u can configure queue settings for a higher context than the one you specified in the NDS context box In this case you must have the supervisor privileges for the context in which you set the queue Items Explanations Queue Name Displays the queue name that is assigned to the print server by browsing the queue Browse button Click the Browse button to select a queue You can also create or delete a q...

Page 79: ...k it and then select Create Queue Enter the queue name up to 47 characters For NDS mode Select the context where you want to create a queue Right click it and then select Create Queue Type a queue name up to 47 characters Browse the context and then select the volume name from the drop down list The queue will be created under the SYS volume of the file server If you want to create a queue in anot...

Page 80: ...box when using NetWare When you use the printer only in the NetWare environment it turns on automatically Mode Select Remote Printer Frame Type Leave the default frame type as it is Primary Print Server Name Enter the primary print server name up to 47 characters which is created by PCONSOLE or NWAdmin For NDPS Gateway enter the SAP name you have set for NetWare up to 47 characters Printer Port Nu...

Page 81: ...t this check box when using Microsoft Shared Network printing This check box is selected but dimmed when the print server s information is acquired by the NetBEUI protocol Print Server Name Enter the print server name up to 15 characters Be sure to give a unique name that does not cause conflicts with any other device on the network Workgroup Name Enter the workgroup name or domain name used for t...

Page 82: ...ter in the AppleTalk environment configure the print server using the following screen Note To configure AppleTalk settings using EpsonNet WinAssist the following conditions must be maintained The print server must be assigned a valid IP address You have logged in to the NetWare server or the NDS context with supervisor privileges The shared service is installed on the computer ...

Page 83: ...omatic to specify the network number and enter an asterisk in this text box Entity Type Displays the printer s entity type Do not change the entity type unless epson appears If epson appears select an entity type by clicking the Entity Setting button to match your printer Impact Dot Matrix 24 pin EPSONLQ2 Entity Setting button Click this button and select the appropriate entity type Method of spec...

Page 84: ... use the printer in the IPP environment configure the print server using the following screen If the print server does not support the SNMP all of the items are dimmed Items Explanations IPP URL Displays the printer s URL for Internet Printing Format http IP address of print server 631 printer name set below Example http 192 168 100 201 631 EPSON_IPP_Printer ...

Page 85: ... H Tomizawa K Nishi NOC K Lee 3 3 3 3 3 3 3 3 3 3 3 SNMP You can use the SNMP menu to set the SNMP information Printer Name Enter the name of the printer to use for Internet Printing up to 127 characters Example EPSON_IPP_Printer Location Enter the name of the printer s physical location up to 64 characters Items Explanations ...

Page 86: ... both Address Enter the IP address of the server to which the trap is transmitted Community Enter the community name up to 32 characters Enable IPX Trap 1 or and 2 Enable or Disable IPX trap 1 2 or both Address Enter Network Address and Node Number MAC Address of the server to which the trap is transmitted Format Network Address Node Number Suppose Network Address is A7E00BB0 hexadecimal and Node ...

Page 87: ...ge The Administrator password dialog box appears 2 When you set a password for the first time leave the Old Password box blank and enter a password in the New Password box and in the New Password again box up to 20 characters Then click OK Passwords are case sensitive Note The same password is used for EpsonNet WinAssist MacAssist and WebAssist Since the new password becomes effective after the da...

Page 88: ...and default gateway If EpsonNet WinAssist is installed on your computer you can also run EpsonNet WinAssist EasySetup from the Start menu Click Start point to Programs or All Programs Windows XP Server 2003 and then select EpsonNet WinAssist V4 Click EpsonNet EasySetup to start it Then go to step 5 below Follow the steps below to configure the print server using EpsonNet WinAssist EasySetup 1 Turn...

Page 89: ...03 R Proof Sign off KOW M Arai H Tomizawa K Nishi NOC K Lee 3 3 3 3 3 3 3 3 3 3 3 7 Select the target printer and then click Next Note If the same printer model name appears several times on the list you can identify the printers by checking their MAC addresses which are found on the status sheet ...

Page 90: ...v C EPWIN fm A5 size 8 21 03 L Proof Sign off KOW M Arai H Tomizawa K Nishi NOC K Lee 8 Specify whether to use the Microsoft network sharing service and then click Next If you select No proceed to step 11 9 Check the print server name Change it if necessary Click Next ...

Page 91: ...W M Arai H Tomizawa K Nishi NOC K Lee 3 3 3 3 3 3 3 3 3 3 3 10 Specify whether to use TCP IP and then click Next If you select No proceed to step 12 11 Select Automatic or Manual If you select Automatic DHCP becomes available and assigns an IP address automatically If you select Manual enter the IP address Click Next ...

Page 92: ...he print server changes every time you turn on the printer so that you need to change the printer port setting accordingly To use the DHCP server make sure it is installed on your computerandconfiguredcorrectly Seeyouroperatingsystem s online help for detailed instructions 12 Check the settings and then click Send If you have set a password for the print server the Password dialog box appears Ente...

Page 93: ...et MacAssist is a Macintosh based configuration software for administrators that allows you to configure the print server for TCP IP AppleTalk and IPP Note Be sure to use EpsonNet MacAssist included on the Software CD ROM shipped with this product Menu Bar EpsonNet MacAssist provides the following menus and sub menus File menu Close Closes EpsonNet MacAssist Quit Quits EpsonNet MacAssist Edit menu...

Page 94: ...Net WebAssist is a utility that runs on a browser Refresh Updates to the latest information by searching for the available printers again Timeout Setting Set the timeout value between 3 and 99 seconds See Timeout on page 83 for more information Network Path Search Setting Select connections and protocols to use to search for a print server See Networkpathsearchsetting onpage83formore information S...

Page 95: ...d If you set a larger value it takes more time to search for the network printers Therefore change this value only if you prefer Select Refresh from the Device menu or restart EpsonNet MacAssist for the settings to take effect Network path search setting You can select the connection and protocols to use to search for a print server You can either use all the connection and protocols such as Apple...

Page 96: ... the check box if the print server is in the same zone this saves time in searching The zones obtained from the network environment are displayed on the Zone list The zones to be searched are displayed on the Search Zone list The maximum number of zones that can be displayed on the Zone and Search Zone lists is 2000 To add the zone to the Search Zone list select the zone and then click the Add but...

Page 97: ...e is located in the same segment Enter the network address and subnet mask valid range 0 to 255 Ask your network administrator for the address Then click Add You can add up to 20 addresses To remove the address from the list select the address and click Delete Select Refresh from the Device menu or restart EpsonNet MacAssist for the settings to take effect Note If you try to add an incorrect netwo...

Page 98: ...nformation The Information menu shows the various print server parameters as described below Parameters Explanations MAC Address Unique hardware address of the print server You can check the MAC address on a status sheet Hardware Version Hardware version of the print server Software Version Software version of the print server Model Name Product name of the printer attached to the print server ...

Page 99: ... of the print server Return to Default button Resets all configuration settings of the print server to their defaults Search Path Protocol used to search for the print server OK Updates the settings Cancel Cancels any changes Items Explanations Link Speed Duplex Mode Select an appropriate Ethernet speed and duplex setting Normally Automatic can be selected If you select a setting other than Automa...

Page 100: ...ss When you select Automatic an IP address subnet mask and default gateway are automatically assigned by the DHCP server Note If the Dynamic DNS function is not supported we recommend that you select Manual and then enter an IP address This is because if you select Automatic the IP address of the print server changes every time you turn on the printer so that you need to change the printer port se...

Page 101: ... your network It is dimmed if this function is not supported IP Address Enter an IP address for the print server Be sure that the IP address is unique and does not conflict with any other device on the network Subnet Mask Enter the subnet mask of the IP address Default Gateway Enter the gateway address If there is a server or a router that functions as a gateway enter the IP address of the server ...

Page 102: ...to acquire a host name and domain name from the DHCP server Host Name Enter the host name supported by the DynamicDNS between2and 63characters The total number of characters of the host name and the domain name must not exceed 251 Domain Name Leave it blank or enter two or morecharacters of the domain name supported by Dynamic DNS The total number of characters of the host name and the domain name...

Page 103: ...print server using the following screen Items Explanations Use AppleTalk Select this box when using AppleTalk Printer Name Enter the name of the printer up to 32 characters Zone Name Select or enter the network zone name up to 32 characters To have the zone selected automatically select Automatic to specify the network number and select an asterisk in this text box To enter manually select Manual ...

Page 104: ... the printer s entity type Do not change the entity type unless epson appears If epson appears select an entity type by clicking the Entity Setting button to match your printer Impact Dot Matrix 24 pin EPSONLQ2 Method of specifying the network number Select the method for acquiring the network number Automatic is usually preferred Network number for manual mode Enter a value between 0 and 65534 to...

Page 105: ...Explanations IPP URL Displays the printer s URL for Internet Printing Format http IP address of print server 631 printer name set below Example http 192 168 100 201 631 EPSON_IPP_Printer Printer Name Enter the name of the printer to use for Internet Printing up to 127 characters Example EPSON_IPP_Printer Location Enter the name of the printer s physical location up to 64 characters ...

Page 106: ...hange Password dialog box appears 2 When you set a password for the first time leave the Current Password box blank and enter a password in the New Password box and in the New Password again box up to 20 characters Then click OK Passwords are case sensitive Note The same password is used for EpsonNet WinAssist MacAssist and WebAssist Since the new password takes effect after the data is sent to th...

Page 107: ... sure the printer is turned on The computer to use for the following steps must be in the same segment as the print server When you assign an IP address manually we recommend you use EpsonNet MacAssist to set the subnet mask and default gateway Follow the steps below to configure the print server using EpsonNet MacAssist EasySetup 1 Double click the MacAssistxxx folder and then double click the Ep...

Page 108: ...ize 8 21 03 L Proof Sign off KOW M Arai H Tomizawa K Nishi NOC K Lee Note If the same printer model name appears several times on the list you can identify the printers by checking their MAC addresses which are found on the status sheet 5 Change the printer name if necessary Click Next ...

Page 109: ... H Tomizawa K Nishi NOC K Lee 4 4 4 4 4 4 4 4 4 4 4 6 Specify whether to use TCP IP and then click Next If you select No proceed to step 8 7 Select a method for specifying the IP address If you select Automatic DHCP becomes available and assigns an IP address automatically If you select Manual enter the IP address Click Next ...

Page 110: ...the print server changes every time you turn on the printer so that you need to change the printer port setting accordingly To use the DHCP server make sure it is installed on your computerandconfiguredcorrectly Seeyouroperatingsystem s online help for detailed instructions 8 Check the settings and then click Send If you have set a password for the print server the Password dialog box appears Ente...

Page 111: ... printing method you prefer LPR printing Since Windows Me 98 95 does not support LPR standard TCP IP printing cannot be used However you can print via TCP IP using the EpsonNet Direct Print utility included on the Software CD ROM First install EpsonNet Direct Print Then install the printer driver See About EpsonNet Direct Print on page 173 for more details Internet printing Windows 98 95 Internet ...

Page 112: ...ect the IPP folder 3 Double click wpnpins exe Then follow the on screen instructions 4 Click OK to restart your computer Setting up the printer Connect your computer to a printer through IPP 1 Click Start point to Settings and then select Printers 2 Click Add Printer and then click Next 3 Click Network Printer and then click Next 4 Type the URL of the printer and then click Next http IP address of...

Page 113: ...select Printers 2 Double click Add Printer in the Printer window 3 Select the Network Printer radio button and then click Next 4 Click Browse and then select the network path from the list If you cannot browse enter the following in the Network path or queue name box NetBIOS name of print server Device name of print server 5 The Add Printer wizard appears Click Next 6 See Installing a printer driv...

Page 114: ... Drives and then double click the folder named after your operating system Click OK 6 Click OK in the Install From Disk dialog box 7 Select the model name of the printer and then click Next Note If the Add Printer wizard prompts you to select either Keep existing driver or Replace existing driver be sure to select the Replace existing driver radio button 8 Click Finish and then follow the on scree...

Page 115: ...icktheNetworkNeighborhoodiconorMyNetwork Places icon and then select Properties 2 Check that Client for Microsoft Networks is in the Components list If it is not installed click Add to install it 3 Run the command prompt and then enter the following command NET USE printer port NetBIOS name of print server Device name of print server Selecting the port 1 Click Start point to Settings and then sele...

Page 116: ...EpsonNet Direct Print on page 173 for details 1 Click Start click Control Panel click Printers and Other Hardware and then click Printers and Faxes 2 Under Printer Tasks click Add a printer to start the Add Printer wizard and then click Next 3 Click Local printer attached to this computer clear the Automatically detect and install my Plug and Play printer check box and then click Next Note You mus...

Page 117: ...L fm A5 size 8 21 03 R Proof Sign off KOW M Arai H Tomizawa K Nishi NOC K Lee 5 5 5 5 5 5 5 5 5 5 5 4 Select the Create a new port radio button and then select Standard TCP IP Port from the list Click Next 5 Enter the IP address of the print server and then click Next ...

Page 118: ...3 L Proof Sign off KOW M Arai H Tomizawa K Nishi NOC K Lee 6 If an error occurs the following dialog box appears Select the Standard radio button and then select EPSON Network Printer Click Next 7 Click Finish 8 See Installing a printer driver on page 108 to install the printer driver ...

Page 119: ...d then click Next 3 Click A network printer or a printer attached to another computer and then click Next 4 Select the Connect to a printer on the Internet or on a home or office network radio button 5 Enter the URL of the target printer using the format below The URL must be the same URL you set on EpsonNet WinAssist WebAssist s IPP configuration page http IP address of printer 631 Printer name E...

Page 120: ...wse for a printer radio button and then click Next 5 Enter the following in the Printer box or select the printer you want to use from the Shared printers list box and then click Next NetBIOS name of print server Device name of print server 6 Follow the on screen instructions to set up the printer See Installing a printer driver on page 108 if necessary Installing a printer driver 1 Insert the Sof...

Page 121: ...printing in the Windows XP Server 2003 2000 NT environment see Using the NET USE command on page 109 for more details Using the NET USE command IfyouarerunningWindowsXP Server2003 2000 NTandusing NetBIOS to connect to the printer we recommend that you use the NET USE command as follows 1 Click Start click Control Panel click Network and Internet Connections and then select Network Connections 2 Un...

Page 122: ...g the NET USE command Windows Server 2003 For Windows Server 2003 the printer driver installation procedure differs depending on the printing method you prefer LPR printing Note If you are using EpsonNet Direct Print the setup procedure is different See About EpsonNet Direct Print on page 173 for details 1 Click Start and then select Printers and Faxes 2 Double click the Add Printer icon to start ...

Page 123: ...STL fm A5 size 8 21 03 R Proof Sign off KOW M Arai H Tomizawa K Nishi NOC K Lee 5 5 5 5 5 5 5 5 5 5 5 Note You must clear the Automatically detect and install my Plug and Play printer check box because the printer is attached directly to the network not to a computer ...

Page 124: ...NSTL fm A5 size 8 21 03 L Proof Sign off KOW M Arai H Tomizawa K Nishi NOC K Lee 4 Select the Create a new port radio button and then select Standard TCP IP Port from the list Click Next 5 When Add Standard TCP IP Printer Port Wizard dialog box appears click Next ...

Page 125: ...21 03 R Proof Sign off KOW M Arai H Tomizawa K Nishi NOC K Lee 5 5 5 5 5 5 5 5 5 5 5 6 Enter the IP address of the print server and then click Next 7 If an error occurs the following dialog box appears Select the Standard radio button and then select EPSON Network Printer Click Next ...

Page 126: ...inters and Faxes 2 Double click the Add Printer icon to start the Add Printer wizard and then click Next 3 Select A network printer or a printer attached to another computer and then click Next 4 Select the Connect to a printer on the Internet or on a home or office network radio button 5 Enter the URL of the target printer using the format below The URL must be the same URL you set on EpsonNet Wi...

Page 127: ...he on screen instructions to set up the printer See Installing a printer driver on page 116 if necessary Microsoft Network Shared printing 1 Click Start and then select Printers and Faxes 2 Double click the Add Printer icon to start the Add Printer wizard and then click Next 3 Click A network printer or a printer attached to another computer and then click Next 4 Select the Browse for a printer ra...

Page 128: ...stallation Program screen if it appears 3 Click the Have Disk button The Install From Disk dialog box appears 4 Click Browse 5 Select the CD ROM drive for Drives and then double click the WinXP_2K or Win2000 folder Click Open 6 Click OK in the Install From Disk dialog box 7 Select the model name of the printer and then click Next Note If the Add Printer wizard prompts you to select either Keep exi...

Page 129: ...o Control Panel and then select Network Connections Click Local Area Connections 2 Click the Properties button 3 Check that Client for Microsoft Networks is installed If necessary click Install to install it 4 Run the command prompt and then enter the following command NET USE printer port NetBIOS name of print server Device name of print server Selecting the port 1 Click Start and then select Pri...

Page 130: ... the setup procedure is different See About EpsonNet Direct Print on page 173 for details 1 Click Start point to Settings and then select Printers 2 Double click Add Printer to start the Add Printer wizard and then click Next 3 Click Local printer clear the Automatically detect and install my Plug and Play printer check box and then click Next Note You must clear the Automatically detect and insta...

Page 131: ...L fm A5 size 8 21 03 R Proof Sign off KOW M Arai H Tomizawa K Nishi NOC K Lee 5 5 5 5 5 5 5 5 5 5 5 4 Select the Create a new port radio button and then select Standard TCP IP Port from the list Click Next 5 Enter the IP address of the print server and then click Next ...

Page 132: ... then select EPSON Network Printer Click Next 7 Click Finish 8 See Installing a printer driver on page 122 to install the printer driver Internet printing 1 Click Start point to Settings and then select Printers 2 Double click Add Printer to start the Add Printer wizard and then click Next 3 Select the Network printer radio button and then click Next 4 Select the Connect to a printer on the Intern...

Page 133: ...ions to set up the printer See Installing a printer driver on page 122 if necessary Microsoft Network Shared printing 1 Click Start point to Settings and then select Printers 2 Double click Add Printer to start the Add Printer wizard and then click Next 3 Select the Network printer radio button and then click Next 4 Select the Type the printer name or click Next to browse for a printer radio butto...

Page 134: ...ve for Drives and then double click the WinXP_2K or Win2000 folder Click Open 6 Click OK in the Install From Disk dialog box 7 Select the model name of the printer and then click Next Note If the Add Printer wizard prompts you to select either Keep existing driver or Replace existing driver be sure to select the Replace existing driver radio button 8 Click Finish and then follow the on screen inst...

Page 135: ...s icon and then select Properties 2 Right clicktheLocal Area Connectionsicon andthenselect Properties 3 Check that Client for Microsoft Networks is in the Components list If necessary click Install to install it 4 Run the command prompt and then enter the following command NET USE printer port NetBIOS name of print server Device name of print server Selecting the port 1 Click Start point to Settin...

Page 136: ...t EpsonNet Direct Print on page 173 for details 1 Click Start point to Settings and then select Printers 2 Double click the Add Printers icon 3 Select the My Computer radio button and then click Next 4 Click Add Port in the Add Printer wizard dialog box 5 Select LPR Port from the Available Printer Port list and then click New Port Note You cannot use the Lexmark TCP IP Network Port with this print...

Page 137: ...all the printer driver and set the printer port See About EpsonNet Internet Print on page 189 for more details Microsoft Network Shared printing 1 Click Start point to Settings and then select Printers 2 Double click Add Printer 3 Select the Network printer server radio button and then click Next The Connect to Printer dialog box appears 4 Select the printer you want to configure from the Shared P...

Page 138: ...0 folder Click Open 6 Click OK in the Install From Disk dialog box 7 Select the model name of the printer and then click Next Note Announce the share name to your clients so that they know the share name of the printer they want to use If the Add Printer wizard prompts you to select either Keep existing driver or Replace existing driver be sure to select the Replace existing driver radio button 8 ...

Page 139: ...ing services are installed Right click the Network Neighborhood icon on the desktop and select Properties Click the Services tab and check that Server or Workstation is listed 2 If it is not installed click Add 3 Run the command prompt and enter the following command NET USE printer port NetBIOS name of print server Device name of print server Selecting the port 1 Click Start point to Settings and...

Page 140: ... that the printer driver is installed on your Macintosh before following the steps below See the manual shipped with your printer for instruction on how to install the printer driver Mac OS 8 x to 9 x AppleTalk printing 1 Open Chooser from the Apple menu 2 Click the printer icon 3 Select the zone containing the printer 4 Select the printer name from the list 5 Make sure AppleTalk is active 6 Close...

Page 141: ...older 2 Open the Utilities folder 3 Open Print Center and then click Add 4 Select AppleTalk from the drop down list 5 Select the zone from the drop down list 6 Select the printer name from the list 7 Click Add TCP IP printing 1 Open the Application folder 2 Open the Utilities folder 3 Open Print Center and then click Add 4 Select EPSON TCP IP from the drop down list 5 Select the printer model from...

Page 142: ...older 2 Open the Utilities folder 3 Open Print Center and then click Add 4 Select Rendezvous from the drop down list 5 Click the machine and then change the printer model to Epson 6 Select the model name and then click Add The Rendezvous printer appears 7 Click the printer and then click the Make Default button to set the printer as the default printer Now the printer is ready to print ...

Page 143: ...e 5 5 5 5 5 5 5 5 5 5 5 OS 2 This section explains how to configure and use the print server with an IBM OS 2 System which includes OS 2 Warp 3 and 4 OS 2 Warp Connect and OS 2 Warp Server LPR printing 1 Double click the OS 2 system folder then the System Setup folder and then double click the TCP IP Configuration icon 2 Click the Printing tab ...

Page 144: ...P address of the print server in the Remote print server box and the name of the remote print server s printer in the second text box Enter a value of 1 or greater in the Maximum number of LPD ports box 4 Click the Autostart tab 5 Select lprportd from the Services to autostart list Check the Autostart service check box and select the Detached radio button ...

Page 145: ...ialog box and restart your computer Setting up your printer 1 Double click Template from the OS 2 System folder 2 Drag Printer to your desktop to create a printer 3 Double click the Printer icon 4 Select Properties from the control menu then click the Output Port tab 5 From the Output Port list box select one from PIPE LPD0 to PIPE LPDn where n is the maximum number of LPD ports The PIPE LPD Setti...

Page 146: ...exit printer configuration NetBEUI printing 1 Be surethatIBMOS 2 NetBIOSis installed on your computer 2 To create a printer double clickthe target printer icon to open the Properties dialog box Then click the Output Port tab 3 Select the port 4 Connect to the printer from the command line Example Connect the printer to LPT1 net use LPT1 NetBIOS name of print server Device name of print server Note...

Page 147: ...onfigure the print server using EpsonNet WinAssist Supported systems Server environment NetWare 3 1 3 11 3 12 3 2 Bindery NetWare 4 1 4 11 4 2 NDS Bindery emulation IntranetWare NDS Bindery emulation NetWare 5 0 5 1 NDS NDPS NetWare 6 0 NDS NDPS Client environment The client environment must be supported by NetWare The clients are able to use the printer driver mounted on the print server The foll...

Page 148: ... up to 8 file servers simultaneously Can register up to 32 print queues Remote Printer mode A NetWare user account is not required A print server is needed to control the remote printer Can attach up to 16 printers for NetWare 3 x and up to 255 for NetWare 4 x or later Note When you turn on the printer the user account is temporarily accessed in the Remote Printer mode If there is no user account ...

Page 149: ...r SAP when NLSP with RIP SAP Compatibility is specified the print server then cannot communicate with the file server and NDS See Protocols and Bindings in NetWare s INETCFG utility Bindery and NDS You can check the bindery context path from the server console by using the SET BINDERY CONTEXT command If the bindery context path has not been set or if you want to use the printing environment of ano...

Page 150: ... the NetWare servers and IPX routers For NetWare 5 x The IPX protocol must be installed bound on the NetWare 5 x server About modes If the mode you have logged in is different from the mode you set for the print server a message appears when you try to configure the print server for NetWare If you do not want to change the current settings click Cancel and log in again using the same mode set for ...

Page 151: ...jects are already created you can also use EpsonNet WebAssist See NetWare on page 211 for details Using NDS Print Server NetWare 4 x 5 x 6 0 This section contains instructions for using the print server in the Print Server mode on NetWare 4 x IntranetWare NetWare 5 x or NetWare 6 0 with NDS mode 1 Turn on your printer 2 From any NetWare client log in to the target context of the NDS tree as an ADM...

Page 152: ...NSOLE From the Available Options screen select Print Queue Information and press Enter 3 Press the Insert key on your keyboard and enter the print queue name Press Enter Note Since your clients need the print queue name you set here when they use the printer announce the print queue name to your clients 4 From the Print Queue list select the print queue name that you just entered and press Enter F...

Page 153: ...nformation and press Enter 2 Press the Insert key on your keyboard and type the print server name Press Enter It is a good idea to write down the print server name for later use 3 From the Print Server list select the print server name that you just typed and press Enter From the Print Server Information list select Print Server Configuration and press Enter 4 Select Printer Configuration from the...

Page 154: ...rom the Configured Printers list select Not Installed port number 0 and press Enter 6 From the Printer configuration screen type the printer name Highlight Type and press Enter Select Remote Parallel LPT1 for Remote Printer mode Note Be sure to select Remote Parallel LPT1 for Remote Printer mode 7 Press Esc then press Enter to save your changes ...

Page 155: ... assign a queue to the print server port from the Available Queues list 12 Specify a priority level between 1 to 10 One is top priority 13 Press Esc to exit PCONSOLE Configuring for NetWare using EpsonNet WinAssist 1 Turn on your printer 2 Load the print server from the file server s system console which the print queue volume is set LOAD PSERVER print server name you set using PCONSOLE 3 Configur...

Page 156: ... in with Bindery connection Note If the clientusingfor thissettinghasbeenloggedinwithNDSmode press F4 key while PCONSOLE is starting to switch to the bindery mode 2 Run PCONSOLE From the Available Options screen select Print Queues and press Enter Press Insert and type the print queue name Press Enter Note Since your clients need the print queue name you set here when they use the printer announce...

Page 157: ...To assign the print queue double click the Printer object icon created in step 8 The Printer dialog box appears 10 Click Assignments and then click Add From the print queue list select the queue created in step 2 and click OK 11 Click Configuration in the Printer dialog box and select Parallel from the Printer type pull down menu 12 Click Communication The Parallel Communication dialog box appears...

Page 158: ...ng EpsonNet WinAssist 1 Turn on your printer 2 Load the print server from the file server s system console which the print queue volume is set LOAD PSERVER print server name you set using PCONSOLE 3 Configure the print server using EpsonNet WinAssist See NetWare on page 63 for details If NetWare objects are already created you can also use EpsonNet WebAssist See NetWare on page 211 for details Usi...

Page 159: ...then Printer Type the Printer name and click Create 4 Create a print server Click the directory context icon and select Create from the Object menu then Print Server Type the Print Server name and click Create 5 Create a print queue Click the directory context icon and select Create from the Object menu then Print Queue Type the Print Queue name and select the Print Queue Volume then click Create ...

Page 160: ...e 8 21 03 L Proof Sign off KOW M Arai H Tomizawa K Nishi NOC K Lee Note Since your clients need the print queue name you set here when they use the printer announce the print queue name to your clients 6 Double click the Printer Object icon in the NetWare Administrator screen ...

Page 161: ...KOW M Arai H Tomizawa K Nishi NOC K Lee 6 6 6 6 6 6 6 6 6 6 6 7 In the Printer dialog box appears click Assignments and then click Add 8 From the print queue list select the queue you created in step 5 and click OK 9 Click Configuration and select Other Unknown for the Printer type list box and click OK ...

Page 162: ... Rev C SETNW fm A5 size 8 21 03 L Proof Sign off KOW M Arai H Tomizawa K Nishi NOC K Lee 10 Double click the Print Server Object icon in the NetWare Administrator screen 11 In the Print Server dialog box that appears click Assignments and then click Add ...

Page 163: ...cts you have assigned double click the Print Server object icon Click Print Layout and check that the print server printer and print queue are connected Configuring for NetWare using EpsonNet WinAssist 1 Turn on your printer 2 Load the print server from the file server s system console which the print queue volume is set LOAD PSERVER print server name you set using NWAdmin 3 Configure the print se...

Page 164: ...ot be used with NDPS Bind the IP or both IP or IPX protocols on the NetWare server that runs NDPSM NLM and EPSONGW NLM Check the following points before starting Install the appropriate client software such as Novell Client 3 3 or higher for Windows 95 98 Me or Novell Client 4 8 or higher for Windows NT 2000 on client workstations Make sure they install NDPS When you use the print server with Bind...

Page 165: ...st 5 Set the printer on the client workstations The environment to use the settings you make and the tools to use differ depending on the printer type and connection type you choose You can create an NDPS Manager and Printer Agent in NetWare Administrator or partially via the Server Console See the Novell online documentation for more details Making printer environment 1 Select the Connection Type...

Page 166: ...NWPMW32 EXE Creating an NDPS Manager 1 Run NetWare Administrator NWADMN32 EXE on the client machine The main browser window appears 2 To create an NDPS Manager click the Directory context icon and then select Create from the Object menu 3 Select NDPS Manager from the list 4 Enter the NDPS Manager name in the NDPS Manager Name field 5 Browse the Resident Server and select where you want the NDPS Ma...

Page 167: ...lled Access Printers NDPS printers that are added to the NDS tree by NetWare Administrator They are only available to the workstation user through the NDS object list These printers can take full advantage ofthe security and management features provided by NDS 1 Select the printer type either public access printer or controlled access printer 2 Create a public access printer If you want to create ...

Page 168: ...ter the MAC Address Interrupt Select None For Remote LPR on IP connection IP Address Enter the IP address of the print server You can confirm the IP address on a status sheet For Forward jobs to Queue connection Queue Name Enter the queue name that the print server uses in legacy queue based print services either in Print Server mode or Remote Printer mode Queue User Name Type a user name who has ...

Page 169: ...kstations on page 158 if you select Remote LPR on IP or Forward jobs to Queue Configuring for NetWare using EpsonNet WinAssist Follow the steps below if you want to use the printer in IPX network Note Besurethat the oneofthefollowing clientsisinstalledonyourcomputer Novell Client 32 Novell IntranetWare Client or Novell Client 1 Turn on your printer 2 From any NetWare client log in to the target Ne...

Page 170: ...ger dialog select New from the Printer menu 3 Click Add A list of available printers appears 4 Select the printer you want and click Install The Novell Printers Install dialog appears You may modify the printer name that appears and select a pre defined configuration 5 Click OK The printer driver for that printer model is installed automatically from the Resource Management Service 6 Click Close T...

Page 171: ...d in this manual indicates a primary time server which offers time to the workstations on the network Using a dial up network in each mode Print Server mode You must use a dedicated dial up line Since polling is performed on the file server in the print server mode no vicarious response by the router is possible Therefore no dial up connection is possible in this case Remote Printer mode In Remote...

Page 172: ...nerated because access is made to a local file server first and then to a primary server This dial up is repeated at intervals of approximately 5 minutes Make the print server settings correctly to avoid this problem During normal operation standby An SPX Watchdog packet is sent according to the NetWare protocol convention Use a router with a vicarious response function to avoid a dial up During n...

Page 173: ...twork is down When there is no file server on the local network NetWare cannot be used on the local network In this case the NetWare protocol for the print server is also not available No dial up is generated under this condition When the file server on the localnetworkisrestored theprintserverisalsoautomatically restored For local networks with no file server Depending on the router settings the ...

Page 174: ...l up is generated However if the file server print server of the remote network is erroneously set as the primary server an unnecessary dial up might be generated Correct the settings to avoid this problem During normal operation standby printing Since access is made only to the primary server no dial up is generated When the primary server is down during operation Connection to the primary server...

Page 175: ...al setup utility Your printer is able to function as a remote printer on systems usingTCP IPEthernettransferwithlprremoteprintingprotocol or standard ftp file transfer protocol Note Because this printer does not convert data into the printer control language a printer driver and filter are necessary for each system lpr filters Filters for lpr are controlled by the name given to the remote printer ...

Page 176: ... remote printer name options used to invoke the different filters are as follows All other remote printer name options will be treated the same as lpb The following is an example of sending a text file txtfile via lpr with a form feed appended lpr plpaf txtfile Setting Up Different UNIX Systems Using the lpr Command The following UNIX systems can print using the standard lpr command SunSoft Solari...

Page 177: ... HOSTNAME and the name by which you want your printer to be known for Rprinter 1 Add the IP address and printer host name to the etc hosts file For example 22 33 44 55 HOSTNAME 2 Define the host name as a print server For example lpsystem t bsd HOSTNAME 3 Create the printer For example lpadmin p Rprinter s HOSTNAME aux T unknown 1 any 4 Enable the printer for use For example accept Rprinter enable...

Page 178: ... want your printer to be known for Rprinter 1 Add the IP address and printer host name to the etc hosts file For example 22 33 44 55 HOSTNAME 2 Create a spool directory For example mkdir var spool lpd PRIFx 3 Add the printer entry to the etc printcap file For example Rprinter ALCXXXX lp rm HOSTNAME rp aux sd var spool lpd PRIFx 4 To print use the lpr command For example lpt s PRPrinter Print File ...

Page 179: ...you want your printer to be known for Rprinter 1 Add the IP address and printer host name to the etc hosts file For example 22 33 44 55 HOSTNAME 2 Run smit For example smit printer 3 Set the printer name for example Rprinter in Manage Remote Printer Client Services Remote Printer Queues NAME of queue to add Set the host name for example HOSTNAME in DESTINATION HOST for remote jobs Set the port nam...

Page 180: ... which you want your printer to be known for Rprinter 1 Add the IP address and host name to the etc hosts file For example 22 33 44 55 HOSTNAME 2 Terminate the printer service For example lpshut 3 Create a printer For example lpadmin pRPrinter v dev null mrmodel ormHOSTNAME orpaux 4 Restart the print service For example lpshed 5 Enable the printer for use For example accept Rprinter enable Rprinte...

Page 181: ...ost name to the etc hosts file For example 22 33 44 55 HOSTNAME 2 Execute rlpconf to register the printer For example rlpconf 3 Enter the name of the printer For example Please enter the printer name q to quit RPrinter 4 Specify the remote printer as the printer type For example Is Rprinter a remote printer or a local printer r l r 5 Enter the name of the remote printer s host For example Please e...

Page 182: ...mple If HOSTNAME currently runs SCO OpenServer Release 5 or above it can support the extended remote line printer protocol Do you want to turn on the extended RLP protocol support flag If you are not sure answer n y n n n 8 Specify whether the created printer is to become the default printer For example Would you like this to be the system default printer y n y 9 To print use the lpr command For e...

Page 183: ...interfaces that are common for all unix systems The following is an example of printing using the ftp command the entry operations are underlined ftp open 22 33 44 55 Connected to 22 33 44 55 220 PR Ifx 22 33 44 55 ftp server ready Name 331 Password Required for No Name Password 230 User logged in 200 Type set to I ftp put binary file 200 PORT command successful 150 Opening data connection for bin...

Page 184: ...172 Settings for UNIX R4CB110 User s Guide Rev C SETU fm A5 size 8 21 03 L Proof Sign off KOW M Arai H Tomizawa K Nishi NOC K Lee ...

Page 185: ...s Me 98 95 XP Server 2003 2000 NT 4 0 By using EpsonNet Direct Print you can search both a printer located in the same segment and one located beyond a router You can select from LPR standard printing LPR extension printing or High speed printing Note Since Windows XP Server 2003 2000 NT support standard LPR printing EpsonNet Direct Print is not necessary on these operating systems We recommend th...

Page 186: ...stalling EpsonNet Direct Print version 2 x the installation program will lead you through uninstalling the older version of EpsonNet Direct Print 1 Insert the Software CD ROM in the CD ROM drive 2 The EPSON Installation Program screen opens automatically If the Installer dialog box does not appear double click SETUP EXE on the CD ROM Operating systems Windows Me 98 95 Windows XP Professional Home ...

Page 187: ... located in the same segment and one located beyond a router Note Be sure that the computer is connected to the network and TCP IP is correctly set The valid IP address must be set otherwise the printer does not appear under the Epson_lpr group icon TheEPSONStatusMonitor2utilityshippedwiththeinterfacecard models C82362 C82363 C82364 with software version 1 x and EPL N2700 N4000 printers enables EP...

Page 188: ...tart and then My Network Places Under Network Tasks click View workgroup computers Under Other Places click Microsoft Windows Network and then Entire Network Then double click the EpsonPeripheralNetwork icon Windows Server 2003 Click Start and then select Windows Explorer Click My Network Places click Entire Network and then click EpsonPeripheralNetwork Windows 2000 Double click the My Network Pla...

Page 189: ...3 R Proof Sign off KOW M Arai H Tomizawa K Nishi NOC K Lee 8 8 8 8 8 8 8 8 8 8 8 3 Select the Local Segment check box and click OK 4 Double click the Epson_lpr icon to display available printers in the same segment as your computer on the screen 5 Double click the target printer ...

Page 190: ...95 NT 4 0 Double click the Network Neighborhood icon Windows XP Click Start and then My Network Places Under Network Tasks click View workgroup computers Under Other Places click Microsoft Windows Network and then Entire Network Then double click the EpsonPeripheralNetwork icon Windows Server 2003 Click Start and then select Windows Explorer Click My Network Places click Entire Network and then cl...

Page 191: ...off KOW M Arai H Tomizawa K Nishi NOC K Lee 8 8 8 8 8 8 8 8 8 8 8 3 Select the Specific Network Segment check box and enter the IP address and subnet mask of the printer you want to find Click OK 4 Double click the Epson_lpr icon to view the available printers 5 Double click the target printer ...

Page 192: ...Tasks click View workgroup computers Under Other Places click Microsoft Windows Network and then Entire Network Then double click the EpsonPeripheralNetwork icon Windows Server 2003 Click Start and then select Windows Explorer Click My Network Places click Entire Network and then click EpsonPeripheralNetwork Windows 2000 Double click the My Network Places icon and then double click the Entire Netw...

Page 193: ... then Printers and Faxes Double click Add Printer in the Printers folder to start the Add Printer Wizard 5 Select Network printer Windows Me 98 95 2000 A network printer or a printer attached to another computer Windows XP or Network print server Windows NT 4 0 Then click Next 6 Windows Me 98 95 Click Browse and then double click Epson_lpr Windows XP Server 2003 Click Browse for a printer In the S...

Page 194: ...d to install the printer driver see Installing the printer driver on page 182 Installing the printer driver Install the printer driver which comes with your printer 1 Insert the Software CD ROM shipped with the printer 2 Close the EPSON Installation Program screen if it appears 3 Click the Have Disk button The Install From Disk dialog box appears 4 Click Browse 5 Select the CD ROM drive for Drives...

Page 195: ...ishi NOC K Lee 8 8 8 8 8 8 8 8 8 8 8 7 Select the model name of the printer and click Next Note If the Add Printer wizard asks you to select either Keep existing driver or Replace existing driver be sure toselectthe Replace existing driver radio button 8 Click Finish and follow the on screen instructions to complete setup ...

Page 196: ...nding on the selections that you make Windows Me 98 95 NT 4 0 1 Click Start point to Settings and then select Printers 2 Right click the target printer and click Properties 3 Windows Me 98 95 Click the Details tab and then Port Settings The EPSON LPR Port dialog box appears Note If the message There is nothing to configure for this port appears when you click Port Settings click OK Windows NT 4 0 ...

Page 197: ...nd then the Enhanced Printing radio button LPR enhanced printing sends the print job to the target network printer without spooling all of the print data LPR enhanced printing is faster than LPR standard printing High speed printing Select the High Speed Printing radio button High speed printing sends the print job to the target network printer without spooling all of the print data High speed pri...

Page 198: ...then click Entire Network Then double click the EpsonPeripheralNetwork icon Windows Server 2003 Click Start and then select Windows Explorer Click My Network Places click Entire Network and then click EpsonPeripheralNetwork Windows 2000 Double click the My Network Places icon Double click the Entire Network icon click entire contents and then double click the EpsonPeripheralNetwork icon 2 Double c...

Page 199: ...nd then the Enhanced Printing radio button LPR enhanced printing sends the print job to the target network printer without spooling all of the print data LPR enhanced printing is faster than LPR standard printing High speed printing Select the High Speed Printing radio button High speed printing sends the print job to the target network printer without spooling all of the print data High speed pri...

Page 200: ...188 EpsonNet Direct Print R4CB110 User s Guide Rev C EPDCT fm A5 size 8 21 03 L Proof Sign off KOW M Arai H Tomizawa K Nishi NOC K Lee ...

Page 201: ...rint utility be sure to read the README file found in the EpsonNet Internet Print folder This file contains the latest information on the EpsonNet Internet Print Note EPSON Status Monitor is a utility program that monitors your printer and gives you information about its current status Because this utility does not support IPP printers connected to the Internet cannot be monitored with EPSON Statu...

Page 202: ...psonNet Internet Print comes with Epson network interface products that support IPP Installing EpsonNet Internet Print Follow the steps below to install EpsonNet Internet Print 1 Insert the Software CD ROM in the CD ROM drive 2 The EPSON Installation Program screen opens automatically If the Installer dialog box does not appear double click SETUP EXE on the CD ROM 3 Select Install EpsonNet Interne...

Page 203: ...st WebAssist See IPP on page 72 or IPP on page 216 for instructions on setting up IPP In the steps below you will be asked for the IPP URL you set in the IPP setting screen in EpsonNet WinAssist WebAssist Windows 98 95 1 Make sure that TCP IP is correctly installed and setup in the computer and a valid IP address is set for the computer and printer 2 Make sure that the IPP settings in EpsonNet Win...

Page 204: ...as the IPP URL you have set for the IPP setting screen in EpsonNet WinAssist WebAssist Do not use the following characters Format http IP address of printer 631 printer name Example http 192 168 100 201 631 EPSON_IPP_Printer Use Proxy When using the proxy server select this box and enter the Proxy Server Name and Port Number All communication is done via the proxy server Enter Proxy Server Name En...

Page 205: ...ds during printing and every 20 seconds when idle If you select this box a message will appear if an error occurs during printing You canalsochecktheprinterstatusbydouble clickingtheprinter icon OK button Saves the settings Cancel button Cancels any changes Note The settings you make above can be changed from the printer driver In the printer Properties dialog box click the Details tab and click t...

Page 206: ...orrectly connected on the network and then select the Get status every 20 sec check box again 5 Click OK to save settings 6 When a message appears saying the settings are correctly configured click OK to start the Add Printer Wizard Click Next Note If you click Cancel and then later want to add the printer start the Add Printer Wizard and follow the steps below 7 Click the Local printer radio butt...

Page 207: ...N Status Monitor 2 or EPSON Status Monitor 3 appears click Cancel and terminate the installation Note If you delete the port which you set above from the Details tab of the printer properties you cannot reuse the deleted port name as a new port name the printer URI until you restart the computer If you are using EPSON Status Monitor 3 and printing with EpsonNet Internet Print the message A communi...

Page 208: ... for the computer and printer 2 Make sure that the IPP settings in EpsonNet WinAssist or EpsonNet WebAssist are correct See IPP on page 72 or IPP on page 216 for instructions on settings for IPP 3 Click Start point to Settings and then select Printers 4 Double click the Add Printer icon and click Next 5 Click the My Computer radio button and click Next 6 Click the Add Port button and select EPSON ...

Page 209: ...racters The URI you set here must be the same as the IPP URL you set for the IPPconfigurationinEpsonNetWinAssist WebAssist Donot use the following characters Format http IP address of printer 631 printer name Example http 192 168 100 201 631 EPSON_IPP_Printer Use Proxy When using a proxy server select this box and enter the Proxy Server Name and Port Number All communication is done via the proxy ...

Page 210: ...printerstatus bydouble clickingtheprinter icon OK button Saves the settings Cancel button Cancels any changes Note The settings can be changed after setting up the printer In the printer Properties dialog box click the Ports tab and click the Configure Port button to change the settings Be aware that if you connect to the Internet using a dial up router and select the Get status every 20 sec check...

Page 211: ...ment Defaults and select the Utility tab Then select the Monitor the Printing Status check box Status Alert Window The EpsonNet Internet Print utility updates the status of the IPP printer if you have selected the Get status every 20 sec check box in the EpsonNet Internet Print dialog box The status alert window appears when the printer is out of paper toner or ink if paper is jammed the cover is ...

Page 212: ...200 EpsonNet Internet Print R4CB110 User s Guide Rev C Epint fm A5 size 8 21 03 L Proof Sign off KOW M Arai H Tomizawa K Nishi NOC K Lee ...

Page 213: ... typing the IP address of the print server for the URL in your browser you can start EpsonNet WebAssist that allows you to configure the print server for TCP IP NetWare MS Network AppleTalk IPP and SNMP Supported Web browser Microsoft Internet Explorer version 4 0 or later Netscape Communicator version 4 0 or later Netscape Navigator version 3 02 or later Note for Windows NT 4 0 users If you have ...

Page 214: ...ernet using a proxy server check box Configuring the Print Server Using EpsonNet WebAssist After you have assigned an IP address to the print server using EpsonNet WinAssist MacAssist or the arp ping command you can configure the print server using EpsonNet WebAssist Note A web browser must be installed on your computer TCP IP must be correctly set for the computer and the print server Do not run ...

Page 215: ...configure from the list and then click Launch Browser Open your browser and then type in the IP address of the print server directly Do not run EpsonNet WinAssist or MacAssist http IP address of print server Example http 192 168 100 201 Note on NetWare setting From any NetWare client log in to the target NetWare server or NDS context with supervisor privileges You cannot create a print server prin...

Page 216: ...for acquiring the IP address When you select Auto DHCP becomes available and assigns an IP address automatically If you want to set the IP address manually select Manual Note The network administrator must confirm any changes made to the IP address settings When Auto is selected DHCP becomes available To use the DHCP server make sure it is installed on your computer and correctly configured See yo...

Page 217: ...Note If there is a server or a router functioning as a gateway enter the IP address of the server or the router for the gateway address If there is no gateway leave the default values there 6 If you want to get a private address between 169 254 1 1 and 169 254 254 254 automatically when an IP address cannot be obtained by the DHCP server leave it at Enable for Set Using Automatic Private IP Addres...

Page 218: ... Network Interface Address Directly to DNS Server 11 Select Enable or Disable for Use Universal Plug and Play Select Enable if you want to use the Universal Plug and Play function on Windows Me or future operating systems 12 Change the default Universal Plug and Play device name if desired This device name is used for Windows that supports the Universal Plug and Play function 13 Mac OS X only Sele...

Page 219: ...the Web browser and do not send a job to the printer until this message appears Follow the on screen instructions to reset the printer Note Since the new IP address becomes available after the printer is reset you need to restart EpsonNet WebAssist by entering the new IP address Only changes on the page where you press the Submit button take effect Opening Screen Any user can access the following ...

Page 220: ...ays the print server information NetWare Displays information about NetWare TCP IP Displays information about TCP IP AppleTalk Displays information about AppleTalk MS Network Displays information about Microsoft Network IPP Displays information about IPP SNMP Displays information about SNMP Time Displays information about time Configuration Network Ethernet Configure the applicable settings for Et...

Page 221: ...te Web site Reset Resets the printer and returns to the default settings Password Set the password to protect settings Items Explanations Administrator Name Administrator name of the printer Location Location of the printer Interface Card Model Name Model of the print server MAC Address Unique hardware address of the print server You can distinguish the print server by its MAC address Hardware Ver...

Page 222: ...s that the printer is idle or printing Yellow indicates that either the paper or toner is low Red indicates that either the paper or toner is completely out the printer is offline there is a paper jam the cover is open or an error has occurred Current Time Displays the current time Refresh button Refreshes the printer status The printer status is not updated automatically Press Refresh to display ...

Page 223: ...duplex setting Normally Auto can be selected If you select a setting other than Auto make sure the setting corresponds to the type of hub you are using Items Explanations Use NetWare Enable or Disable NetWare Frame Type Leave the default frame type Auto as it is Mode Select an appropriate NetWare mode When using 4 x 5 x 6 x NDS Print Server select NDS Print Server When using 3 x 4 x Bindery Print ...

Page 224: ...rd up to 20 characters you use when you log in to the print server NDS Tree Name For the NDS Print Server mode only Enter the NDS tree name up to 31 characters NDS Context For the NDS Print Server mode only Enter the NDS context up to 255 characters Primary File Server Name For the Bindery Print Server mode only Enter the name up to 47 characters of the file server where the print server logs in I...

Page 225: ...nt server Be sure the IP address does not conflict with any other devices on the network Subnet Mask Set the subnet mask Default Gateway Set the gateway address if needed Set Using Automatic Private IP Addressing APIPA Select Enable to get a private address between 169 254 1 1 and 169 254 254 254 automatically when an IP address cannot be obtained by the DHCP server otherwise select Disable Set Us...

Page 226: ...The total number of characters of the host name and the domain name must not exceed 251 Register Network Interface Address to DNS Server Select Enable if you want to send the host name and the domain name to the DHCP server that supports Dynamic DNS update to request for DNS dynamic updates Register Network InterfaceAddressDirectly to DNS Server Select Enable if you want to directly send the host ...

Page 227: ...type Do not change the entity type unless epson appears If epson appears enter an entity type to match your printer Impact Dot Matrix 24 pin EPSONLQ2 Network Number Set Select Auto or Manual Usually Auto is recommended Network Number for Manual Mode Enter the network number when you select to set the Network Number manually Items Explanations Use Microsoft Network Shared Printing Enable or Disable...

Page 228: ...net Print on Windows 98 95 NT 4 0 See About EpsonNet Internet Print on page 189 for more information Items Explanations IPP URL Displays the printer s URL for Internet Printing Format http IP address of printer 631 printer name set below Example http 192 168 100 201 631 EPSON_IPP_Printer Printer Name Enter the name of a printer to use for Internet Printing up to 127 characters Example EPSON_IPP_Pr...

Page 229: ...which the trap is transmitted Community Enter the community name up to 32 characters Port Number Enter the Port Number of the receive host in decimal 0 65535 Items Explanations Trap Enable or Disable the trap Address Enter Network Address and Node Number MAC Address of the server to which the trap is transmitted Format Network Address Node Number Suppose Network Address is A7E00BB0 hexadecimal and...

Page 230: ...month and day Time Enter the hour minutes and seconds Time Difference Enter the difference between time at the present location and Greenwich Mean Time Apply button Applies the settings Items Explanations Time Server Select either Enable or Disable to time synchronize from the time server Time Server IP Address Enter the IP address of the time server Synchronize Interval Enter the time interval in...

Page 231: ... to the default values Items Explanations Administrator Name Enter the name of the administrator up to 255 characters Location Enter the location of the print server up to 255 characters Favorite Name Enter the link item name up to 20 characters which will be displayed in Index Favorite URL Enter a URL up to 64 characters Description Enter any comments concerning the URL above up to 64 characters ...

Page 232: ...tings on each setting screen Passwords are case sensitive No password is set by default Note The same password can be used for EpsonNet WinAssist MacAssist and WebAssist If you forget your password you need to initialize the print server See Initializing the Print Server on page 237 for instructions Items Explanations Old Password Input the old password New Password Input the new password up to 20...

Page 233: ...intosh and UNIXplatformstogive network administrators flexibility in managing network devices It allows you to search and monitor network devices and make settings for network devices It offers a Group Management function that helps you manage devices as a group It provides printer driver management functions such as the ability to store printer drivers on the EpsonNet WebManager server and easy i...

Page 234: ...nNet WebManager EpsonNet WebManager client operating systems You can access the EpsonNet WebManager server from the following operating systems through a browser Windows Me 98 XP Server 2003 2000 NT 4 0 Macintosh UNIX see the README file for supported UNIX systems Monitor 1024 x 768 or higher resolution VGA monitor with support for 256 or more display colors Operating system Windows XP Professiona...

Page 235: ...n the printer Network settings function You can make or change the network interface settings through EpsonNet WebManager Group management function Groups can help you manage network devices more effectively Printer driver management Downloading and updating the printer driver through the Internet automatically and easy installation of the printer driver on client PCs Note Some functions of EpsonN...

Page 236: ...s as the network server You can select the either of the two methods described below to use EpsonNet WebManager EpsonNet WebManager and a Web browser running on the same PC No special server is required Just install EpsonNet WebManager and a Web browser on the same computer that functions as a server All administration is possible from the network administrator s Windows Me 98 XP Server 2003 2000 ...

Page 237: ...ager and a Web browser running on different PCs Install EpsonNet WebManager in the server and install a Web browser in the client computers Run the Web browser on a client computer to access EpsonNet WebManager on the server Multi platform network administration is possible from Windows Macintosh and UNIX platforms through the browser Windows Macintosh UNIX EpsonNet WebManager server ...

Page 238: ...cally If the Installer dialog box does not appear double click SETUP EXE on the CD ROM 3 Select Install EpsonNet WebManager and then click 4 Follow the on screen instructions to complete the installation Note You do not need to install EpsonNet WebManager in the client computer Just announce the IP address or host name of the server to any clients who use EpsonNet WebManager from a client computer...

Page 239: ... All Programs Windows XP Server 2003 then EpsonNet WebManager then select EpsonNet WebManager From the client Run the Web browser and type the IP address or the host name of the server and default port number Format http IP address or host name of server 8090 Example http 192 168 100 201 8090 Opening the Online Guide After starting EpsonNet WebManager be sure to read the EpsonNet WebManager s onli...

Page 240: ... off KOW M Arai H Tomizawa K Nishi NOC K Lee Click the question mark button on the current screen so that a help screen appears describing the functions on that page Click Start point to Programs or All Programs Windows XP Server 2003 and then select EpsonNet WebManager Click Online Guide ...

Page 241: ... as described in Status sheet button on page 10 If you can print a status sheet check the network settings otherwise set the interface mode of the printer s control panel to Auto or Option Cannot print even if you have assigned the IP address to the computer and the printer Cause What to do You have assigned an IP address to the computer manually but you assigned the IP address to the printer by A...

Page 242: ...Interface Mode on page 238 for changing the interface mode by moving the jumper Unable to start EpsonNet WinAssist Cause What to do You have added or deleted protocols after installing EpsonNet WinAssist Uninstall EpsonNet WinAssist and then reinstall it See Uninstalling Software on page 249 and Installing EpsonNet WinAssist MacAssist on page 34 The message EpsonNet WinAssist cannot be used becaus...

Page 243: ...t MacAssist is installed and then enter the following command Format ROUTE_ADD_the IP address of the print server_ the IP address of the computer the under bar represents one space Example ROUTEADD192 168 192 168 22 33 44 55 Unable to start EpsonNet WebAssist Cause What to do You have not set the IP address for the print server Set the IP address for the print server using EpsonNet WinAssist MacAs...

Page 244: ...g box Cause What to do If the valid IP address is not set the items indicated in the dialog box mentioned above may not appear Set a valid IP address Refresh the status by selecting Refresh from the View menu Increase the length of time before a timeout To do this select Timeout from the Tool menu Note that doing so can cause EpsonNet WinAssist to run more slowly An extra account is generated when...

Page 245: ...onnection Printing ends normally after you cancel this dialog box but the message appears every time you print Connect to the Internet using a local area network or start a dial up network manually A communication error message appears when you start printing or when you open the printer s properties Cause What to do When you print with NetBEUI or IPP EPSON Status Monitor cannot be used Open the p...

Page 246: ...age appears every time you print Connect to the Internet using a local area network or start a dial up network manually A communication error message appears when you start printing or when you open the printer s properties Cause What to do When you print with NetBEUI or IPP EPSON Status Monitor cannot be used Open the printer s properties and then click the Optional Settings tab Select the Update...

Page 247: ...et CREATOR OWNER to Manage Documents default setting Printers do not appear in Chooser Cause What to do You may have selected a wrong one for Connect via in the AppleTalk Control Panel Make sure to select Ethernet in AppleTalkControlPanel andmakesure AppleTalk is active in Chooser Also check the network equipment including the hub cable The Rendezvous printer setting is overwritten by the AppleTal...

Page 248: ...printserverislogged in to the NetWare server EpsonNet WinAssist WebAssist will not start correctly Cause What to do Microsoft NetWare Directory Service is installed on your computer If you are using the NDS service install the Novell NetWare Client service It takes a long time to start EpsonNet WinAssist Cause What to do The Novell Client service is installed Double click Network in Control Panel ...

Page 249: ...indicating the print server is being initialized After the initialization is complete press the status sheet button to print a status sheet Check the information on the status sheet Note You can also initialize the print server using EpsonNet WinAssist MacAssist or WebAssist by clicking the Return to Default button Cause What to do The printer is turned off Turn on the printer The printer is not i...

Page 250: ...f the print server using EpsonNet Win Mac WebAssist To use EpsonNet WinAssist see Ethernet on page 58 To use EpsonNet MacAssist see Ethernet on page 87 To use EpsonNet WebAssist see Ethernet on page 211 Using jumpers on the print server See the following steps to manually set an interface mode of the print server using jumpers 1 Turn off your printer If you are using an ink jet printer unplug the ...

Page 251: ... change any jumpers other than those listed in following table JP4 JP5 JP6 JP7 Mode Open Open Open Open Auto negotiation 10Half 10Full 100Half 100Full Factory default settings Close Close Open Open 100 Base TX Full Duplex Close Close Open Close 100 Base TX Half Duplex Close Open Close Open 10 Base T Full Duplex Close Open Close Close 10 Base T Half Duplex JP7 JP5 JP6 JP4 ...

Page 252: ...o 10Base and Full Duplex pullout thejumper of JP4 andJP6 and putitoverthetwopins ThefollowingillustrationindicatesthatJP4andJP6areclosed and JP5 and JP7 are opened 4 After changing the settings make sure the printer is turned off and then insert the print server into the printer s interface slot 5 Turn on your printer JP6 closed JP4 closed JP7 opened JP5 opened ...

Page 253: ...e Features of the Printing Methods on page 242 for information on additional methods If no Windows XP Server 2003 2000 NT print server exists Use a printing method appropriate to your operating system For Windows Me 98 95 We recommend TCP IP printing via EpsonNet Direct Print See About EpsonNet Direct Print on page 173 For Windows XP Server 2003 2000 NT WerecommendTCP IPprintingviaLPR See WindowsX...

Page 254: ...inting methods available for you to choose LPR TCP IP printing Advantages No computer as a print server is required No special utility for Windows XP Server 2003 2000 NT is required You can see the printer status using EPSON Status Monitor 2 or 3 For Windows XP Server 2003 2000 NT you can create a print log using the event viewer You can print via a router Disadvantages You need to set up TCP IP F...

Page 255: ...uired For Windows Me 98 95 EpsonNet Internet Print must be installed on all computers used for printing For Windows XP Server 2003 2000 you cannot share the Internet printer Microsoft Network Shared printing Advantages Easy to set up IP address is not required if NetBEUI protocol is installed No computer as a print server is required No special print utility is required Disadvantages EPSON Status ...

Page 256: ...ing PING function is enabled on the TCP IP menu in EpsonNet WinAssist or EpsonNet WebAssist If this function is disabled you cannot set the IP address using the arp ping command Make sure the print server and the computer are in the same segment Before you start you need the following information A valid IP address for the print server Ask your network administrator for anIP address whichdoes not ...

Page 257: ...ck that the computer is reachable by pinging it from the command line ping 192 168 100 101 3 If the computer is reachable you can see the following result the exact form of the message depends on your operating system and the time may vary 64 bytes from 192 168 100 101 icmp_seq 0 Time 34 ms 4 If the computer is unreachable you may see something like this PING 192 168 100 101 56 data bytes If you p...

Page 258: ...rom the command line type Example arp s 192 168 100 201 00 00 48 93 00 00 2 Execute the ping command to set the IP address by pinging it Example ping 192 168 100 201 3 The print server should now respond to the ping If it does not you may have incorrectly typed the MAC address or the IP address in the arp s command Double check and try again If none of these actions are effective re initialize the...

Page 259: ...er port setting every time you turn on the printer Therefore we recommend that you set a valid IP address for the print server by using the one of the following methods Set the IP address for the print server manually Use EpsonNet WinAssist or MacAssist See TCP IP on page 59 or TCP IP on page 88 Specify the print server by using the bind of DHCP function Set the exclusive address of the DHCP funct...

Page 260: ...he printer such as manufacturer model name location and administrator s name Right click the printer s icon in the My Network Places folder and select Properties You can check the brief information of the print server Tousethisfunction theUniversalPlugandPlaymustbeinstalled on Windows Me or future operating systems For information on how to install Universal Plug and Play see the Windows Me online...

Page 261: ...lect the utility you want to uninstall and then click the Add Remove button Windows Me 98 95 NT 4 0 or the Change Remove button Windows 2000 4 Follow the on screen instructions to complete uninstallation Windows XP Server 2003 1 Click Start click Control Panel and then click Add or Remove Programs 2 Click the Change or Remove Programs icon 3 Select the utility you want to uninstall and then click ...

Page 262: ...g box read the License Agreement and then click the Accept button 4 Select Uninstall from the pull down menu 5 Click the Uninstall button 6 Follow the on screen instructions to complete uninstallation Note You can also uninstall EpsonNet MacAssist by dragging the MacAssistxxxfolder MacOS8 xto9 x ortheEpsonNet MacAssist OSX x xx folder Mac OS X to the Trash ...

Page 263: ...r Specification Regulatory Approvals Network Interface RJ 45 connector Button Status sheet button Jumper Four jumpers Status Lights Status light Data light Rated voltage Rated current Current consumption DC 5 V 5 1 1 A Less than 1 0 A EMC FCC part 15 subpart B Class B CSA C108 8 Class B CISPR Pub 22 Class B CE Marking EMC Directive 89 336 EEC EN 55022 Class B EN 55024 AS NZS 3548 Class B ...

Page 264: ... Network Software NetWare 3 x 4 x 5 x or 6 EtherTalk AppleTalk TCP IP NetBEUI IPP MTBF 10 000 hours power on 100 duty MTTR N A Operating Temperature 10 to 35 C 50 to 95 F Storage Temperature 20 to 50 C 4 to 122 F Operating Humidity 15 to 85 RH Storage Humidity 5 to 95 RH Operating Vibration 0 15 G 5 to 55 Hz Storage Vibration 0 5 G 5 to 55 Hz Shock 1 G ...

Page 265: ...Assist 43 81 MacAssist EasySetup 95 WebAssist 201 WebManager 221 WinAssist 37 49 WinAssist EasySetup 76 F ftp 171 I Initializing the print server 237 Installation EpsonNet Direct Print 174 EpsonNet Internet Print 190 EpsonNet MacAssist 36 EpsonNet WebManager 226 EpsonNet WinAssist 35 Internet printing 191 196 Internet Printing Protocol 189 IntranetWare 138 139 IP address 60 89 203 232 IPP 72 92 21...

Page 266: ... 140 144 146 159 212 Rendezvous 130 206 Reset 209 219 Return to default button 57 87 219 RJ 45 connector 10 Router 40 45 89 205 S SAP Name 156 Search options 53 54 84 85 Setting the IP address 59 88 244 SNMP 73 217 Status light 9 Status sheet button 10 Subnet mask 40 45 60 89 205 T TCP IP 59 88 203 Timeout option 51 83 U Universal Plug and Play 62 90 UNIX configure for different OS 164 Using the p...

Reviews: