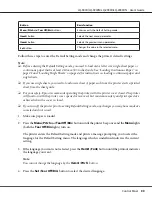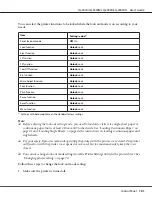
Item
Setting / value*
1
Low-noise mode
Off
, On
*
1
Settings with bold weight mean the standard factory settings.
*
2
This does not affect printing from Windows even if the settings are changed.
*
3
Changing from the standard factory settings may cause undesirable effects when printing from Windows.
*
4
You can use the font selected in this setting by selecting Others in the control panel.
*
5
This setting is available only on Network compatible models.
*
6
Printing is available only when the port setting and printer settings are configured correctly.
*
7
This setting is available only in IBM PPDS emulation mode.
Page length for front tractor
This setting allows you to set the page length (in inches) for the continuous paper loaded on the front
push tractor.
Page length for rear tractor
This setting allows you to set the page length (in inches) for the continuous paper loaded on the rear
push tractor.
Skip over perforation
This feature is available only when continuous paper is selected as the paper source. When you turn on
this feature, the printer provides a one-inch (25.4 mm) margin between the last line printed on one
page and the first line printed on the next page. Because most application program margin settings
override margin settings from the control panel, you should use this setting only if you cannot set your
top and bottom margins using your application.
Auto tear off
When auto tear off is on and you are using continuous paper with the front or rear push tractor, the
printer automatically advances the paper perforation to the tear-off position, where you can easily tear
off the printed pages. When the printer receives the next print job, it automatically moves the unused
paper back to the top-of-form position and starts printing, so you can use all of the next page.
When auto tear off is off and you are using continuous paper with the front or rear push tractor, you
need to move the perforation to the tear-off position manually by pressing the
Tear Off/Bin
button.
See “Using the tear-off function” on page 42 for more information.
LQ-590II/LQ-590IIN/LQ-2090II/LQ-2090IIN User’s Guide
Control Panel
94


