AN2 Series
Installation Instructions
14
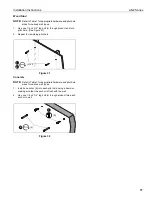
Adding Whiteboard Brackets to Whiteboard
NOTE:
Use 3 whiteboard brackets (
minimum
of 2 brackets)
along bottom of whiteboard, and locate brackets as
close to outer corners as possible. Remaining brackets
may be used along sides of whiteboard, as desired.
1.
Install whiteboard brackets (MM) using:
•
Wood/steel studs/drywall:
one #8 x 1-1/2" screw (LL)
into back of each whiteboard bracket.
•
Concrete wall:
one #8 x 1-1/2" screw (LL) into back of
each whiteboard bracket, and into installed AF6 toggler
(KK).
2.
Fasten to whiteboard frame using one #8 x 1/2" self-drilling
screw (JJ) per whiteboard bracket (MM).
Figure 20
Attaching Valence
1.
Align right valence bracket (D) along
outside
of right brace
on back of valence (E), and fasten with two 10-24 x 1/4"
Phillips pan head machine screws (L). (See Figure 21)
2.
Align left valence bracket (C) along
outside
of left brace on
back of valence (E), and fasten with two 10-24 x 1/4" Phillips
pan head machine screws (L). (See Figure 21)
3.
Slide the valence (E) with attached brackets into the boom
projector mount (S), sliding brackets under tabs in boom
and adjust distance as required. (See Figure 22)
4.
Fasten through bracket slots into boom mount using four
10-24 x 1/4" Phillips pan head machine screws (L). (See
Figure 22)
Figure 21
Figure 22
5.
Readjust projector following instructions in the
Align
Projector Image
section.
2
(JJ)
1
(MM)
(LL)
(D)
2
1
1
(L) x 4
2
Right brace
Left brace
(C)
Bracket
placed on
outside edge
of brace
(E)
3
(L) x 4
4
(E)
Tabs


