background image

EWS850-FIT Quick Start Guide 

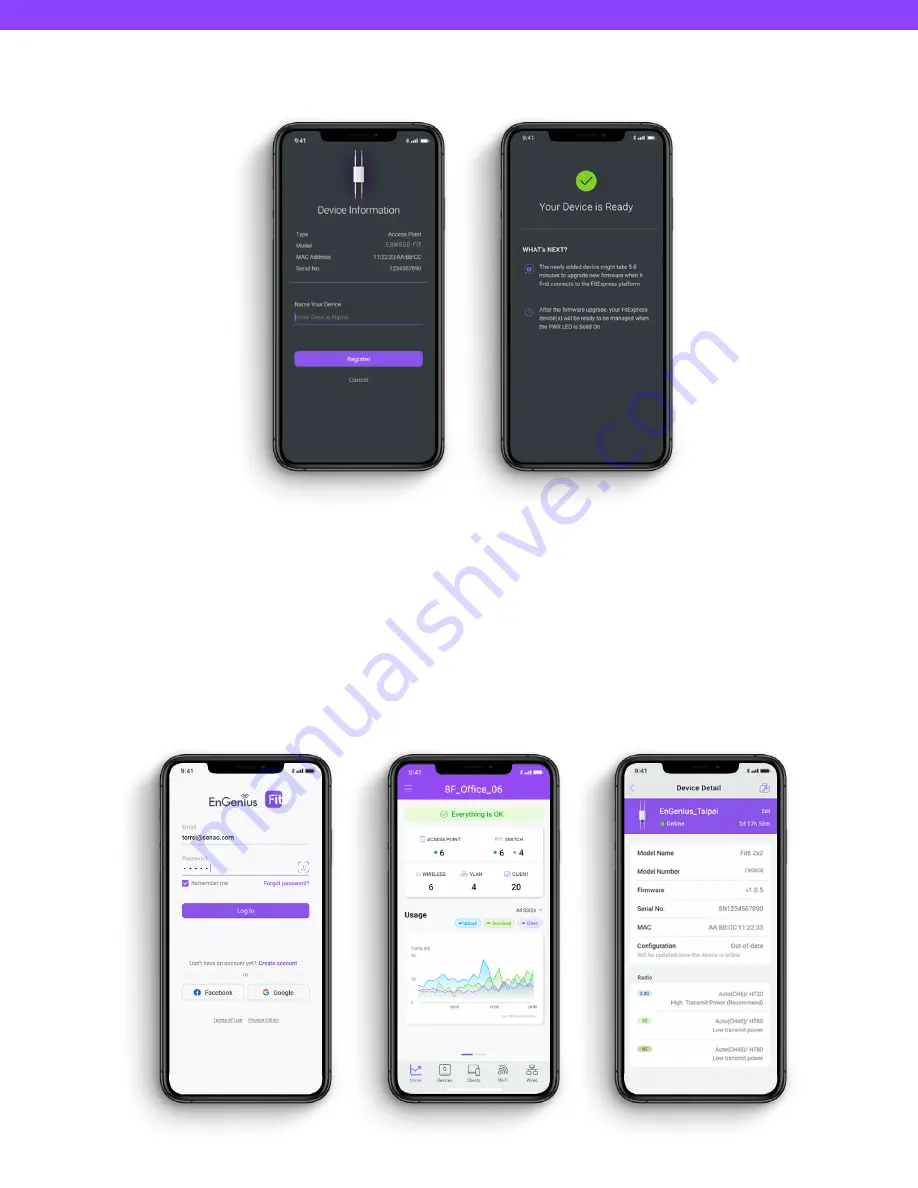
4. If the camera successfully scans the QR code, the app will display the device information. You can tap “Register” to 

complete the registration.

Step 3: Connect to FitXpress

Once the device is powered on and ready to connect to the Internet, the PWR LED will stay 

Solid On,

 which means the 

device is now connected to the FitXpress platform. It will automatically download the default configuration settings from 

FitXpress for automated provisioning. 

When the Access Point is connected to the FitXpress Platform for the first time, it will automatically check the latest 

firmware version available. If a firmware upgrade is required, it might take 8~10 minutes to complete the process. All LED 

indicators will be Flashing (0.5 sec) till the process is finished.

Step 4: Manage with the FitXpress

Log in to the FitXpress app to configure detailed settings and monitor your devices. 

Summary of Contents for EWS850-FIT

Page 1: ...nt Mounting Screw Kit x2 Mounting Bracket Pole Mounting Strap x2 Ground Wire Screw Set Product Card Detachable Antena 2 4GHz Antenna x2 5GHz Antenna x2 Package Contents Wi Fi 6 technology for high per...

Page 2: ...rt 802 3at PoE LEDs STATUS LED COLOR LED BEHAVIOR Connecting to the management FitXpress FitController PWR Orange Flashing 0 5 Sec Management Connected FitXpress FitController Standalone PWR Orange So...

Page 3: ...y are flush with the wall 3 Fasten the Mounting Bracket with the included Screws into the Anchors Hardware Mounting Wall Mount The access point can be mounted on the Wall and Pole and please perform t...

Page 4: ...Bracket Pole Mount 2 Lock and tighten the Pole Mounting Strap to secure the Mounting Bracket onto the pole 3 Hang the Access Point onto the Mounting Bracket 4 Secure the Access Point on the Mounting...

Page 5: ...t Access Point Ethernet Cable AP is power by a PoE Switch EnGenius Fit PoE Switch Powering with a PoE Injector A Connect one end of the Ethernet cable into the LAN PoE port of EnGenius FIT AP and the...

Page 6: ...ises mode you need an onsite management station running the FitController connected to the same Layer 2 network FitController FitController is a custom built appliance with optimized network managemen...

Page 7: ...the AP can reach the Internet Gateway Router Network Switch DHCP Assigned IP EnGenius Fit Access Point Internet Step 2 Register Device You can register the access point with the FitXpress app 1 Open...

Page 8: ...tXpress platform It will automatically download the default configuration settings from FitXpress for automated provisioning When the Access Point is connected to the FitXpress Platform for the first...

Page 9: ...the same Layer 2 network as FitController Step 2 Log in to the FitController Launch your web browser to access the login page of FitController and create an account Enter the email address and passwor...

Page 10: ...encrypted connection between the device and FitController Step 3 Register Device and Assign to Network 1 Go to the system Inventory page and click Register Device 2 FitController will list all EnGeniu...

Page 11: ...r tablet to find the SSID EnMGMTxxxx and connect to it 1 EnMGMTxxxx xxxx is the last four digits of MAC MAC can be found on the device label on the back of the access point 2 Under your web browser en...

Reviews: