


Spider® AT
User's Guide
P a g e 17
Revision: Draft
9.
Install the drivers (refer to Appendix A).
10.
Provision the Spider Asset Tag (refer to Section 3.2).
11.
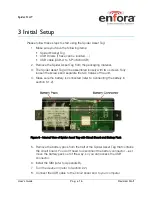
Once Provisioning is complete, remove the USB connector, and replace the
battery pack.
12.
Close the Spider Asset Tag, and replace the screws.
13.
The Spider Asset Tag is now activated, and will begin transmitting data.
Note: Verify the Server is receiving messages from the device.
Note: If you are ready to deploy the Spider Asset Tag, mount the unit
on the asset you need to locate (refer to Section 4). If you are not
ready to deploy, deactivate the unit until you are ready (refer to
Section 2.2).
3.1
VERIFY THE COM PORT
In order to send commands to the Spider Asset Tag you will need to note the com
port number of the device. Open the Windows Device Manager.
You will see the following screen:


