background image

8

IM_SWi_EX_Rev14

Actuating The SWi20/25TIEX

Follow the SWi Tool Operation instructions, using the 

following instructions to actuate the SWi20/25TIEX tool 

in particular:
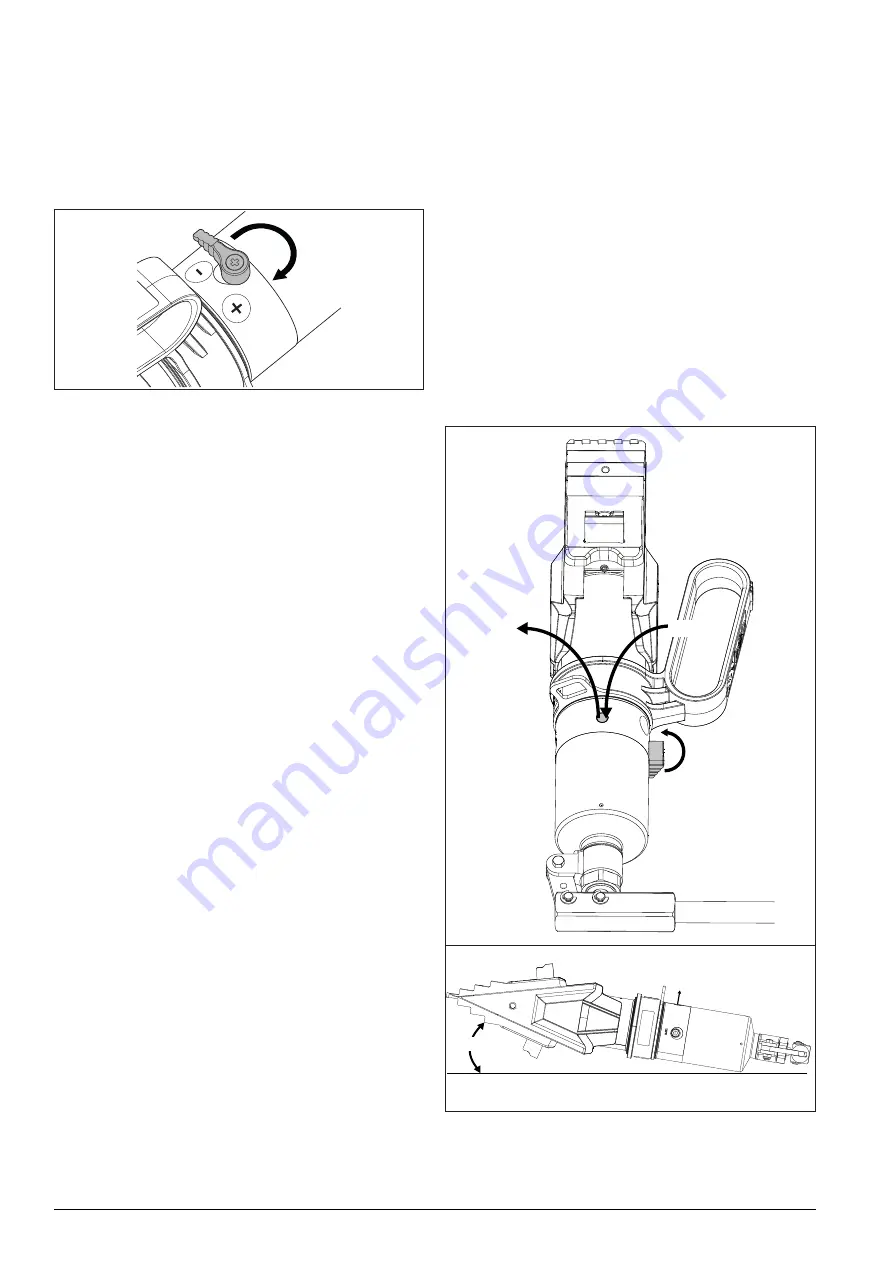
When advance (+) is selected, pumping the handle of 

the pump will advance the cylinder and spread the jaws.

Figure 7: 

When using multiple tools, ensure that the spread of all 

tools correspond to keep the spreading force balanced.  

Retracting The SWi20/25TIEX

Selecting retract (-) will de-pressurise the cylinder and 

cause it to retract under the force of its internal spring.  

The handle does not need to be pumped to retract the 

tool.
When using multiple tools, exercise caution while 

retracting to keep the spreading force balanced as the 

gap is closed.

Air Relief Instructions

In the event of air build-up within the cylinder-pump sub-

assembly, the following procedure should be executed:
1.  Select advance (+), and pump the handle to extend 

the piston around 30 mm [1.2"]. 

2.  Remove the Oil Fill Screw using an appropriate hex 

key, ensuring the tool is on its side with the Oil Fill 

facing upwards.

3.  Replenish any missing hydraulic oil by pouring into 

the Oil Fill hole until excess spills over.

4.  Sit the tool with the wedge facing uphill (and the 

open Oil Fill hole still facing upwards) on a gentle 

slope, around 30 degrees from horizontal.

5.  Very slowly move the selector from advance (+) to 

retract (-), and wait for the tool to fully retract.

6.  Replace the Oil Fill Screw.  
7.  Repeat this procedure 3 times.

Figure 8: 

30°

Step 4

Oil Fill Hole

Step 1

Step 3

Step 2

Summary of Contents for Equalizer SWi12/14TMEX

Page 1: ...4 Document Revision Date 15 OCT 2021 Document Language ENGLISH EN Operation and Maintenance Manual Flange Spreading Wedge SWi12 14TMEX SWi20 25TEEX SWi20 25TIEX To reduce the risk of injury users must...

Page 2: ......

Page 3: ...SPREADING WEDGE FEATURE DIAGRAM 10 3 6 SWI20 25TEEX EXTERNAL HYDRAULIC SPREADING WEDGE FEATURE EXPLANATION 10 4 TECHNICAL PRODUCT DATA 12 4 1 DIMENSIONAL CALLOUT ART 12 4 2 SPREADING WEDGE SPECIFICAT...

Page 4: ...rize complete and fully connected hydraulic systems Do not pressurize systems that contain unconnected couplers Hydraulic circuit must be at zero pressure before couplings are disconnected WARNING Rea...

Page 5: ...Ensure components are protected from external sources of damage such as excessive heat flame moving machine parts sharp edges and corrosive chemicals Take care to avoid sharp bends and kinks in hydra...

Page 6: ...nder normal operations Where they do occur it will be for a short period only Gas G or Dust D with protection by constructional safety c and liquid immersion k Suitable for use with Gas Group llB Ethy...

Page 7: ...1 6 Using all 4 steps but without the stepped blocks the tool can spread from 6 0 mm to 87 5 mm 0 24 3 4 Using both steps on the stepped blocks the tool can spread 48 5 mm 103 5 mm 1 9 4 1 3 2 2 SWi12...

Page 8: ...ally applying force to the torque wrench in the clockwise direction see Torque Wrench Usage Gradually increase the torque setting of the Torque Wrench over several steps for example 30 N m or 20 ft lb...

Page 9: ...spreading force on the 4th step Spreading Gap See Section 4 1 Using only the 1st step the tool can spread from 6 0 mm to 40 0 mm 0 24 1 6 Using all 4 steps but without the stepped blocks the tool can...

Page 10: ...ing to keep the spreading force balanced as the gap is closed Air Relief Instructions In the event of air build up within the cylinder pump sub assembly the following procedure should be executed 1 Se...

Page 11: ...ure 70 C 158 F 3 4 4 SWi20 25TIEX Kit Contents SWi20 25TIEX Standard Kit 1 x SWi20 25TEEXA Spreading Wedge Wedgehead 1 x 700 bar 10 000 psi Integral Hydraulic Pump Cylinder 1 x Set of Safety Blocks 1...

Page 12: ...s the tool can spread 48 5 mm 103 5 mm 1 9 4 1 3 6 2 SWi20 25TEEX Tool Function Hydraulic Tool Operation The SWi20 25TEEX Spreading Wedge uses a hydraulic cylinder to advance the wedge and spread the...

Page 13: ...h 90 degree elbow 1 x 700 bar 10 000 psi HP350S Sealed Hand Pump with Gauge 1 x Set of Safety Blocks 1 x Pair of Stepped Blocks 1 x Hex Key 1 x Lanyard 1 x Set of Instruction Manuals 1 x Carry Case 68...

Page 14: ...Wi20 25TIEX SWi20 25TEEX Dimensions Figure 10 87 5mm 3 4 71 5mm 2 8 55 5mm 2 2 40mm 1 6 Tool open 60mm 2 4 31 8mm 1 3 10 5mm 0 4 152mm 6 SWM12 53 5mm 2 1 37 5mm 1 5 21 5mm 0 9 6mm 0 2 Tool Closed 152m...

Page 15: ...X SWi20 25TIEX SWi20 25TEEX Figure 11 4 1 3 SWI20 25TIEX Handle Rod Figure 12 8 1 0 m m 3 1 9 6 8 0 m m 2 6 8 5 2 0 m m 2 0 5 3 8 0 m m 1 5 0 SMALL SAFETY BLOCK 1 0 0 0 m m 3 9 4 9 4 0 m m 3 7 0 LARGE...

Page 16: ...36 6 2 13 7 lbs SWi20 25TIEX Integral Hydraulic 240 0 26 98 103 5 4 07 6 0 0 24 60 0 2 36 8 5 18 7 lbs SWi20 25TEEX External Hydraulic 240 0 26 98 103 5 4 07 6 0 0 24 60 0 2 36 6 4 14 1 lbs US tons Se...

Page 17: ...ection Before attaching the tool ensure at least two flange bolts remain in place These should be 180 degrees apart with their nuts loosened sufficiently to enable flange work to be carried out Leavin...

Page 18: ...tool in the gap and actuate enough to relieve the load on the Safety Blocks In this way the flange joint can be progressively closed WARNING As the flange approaches its fully closed position support...

Page 19: ...iguration Replace the handle immediately following the task Figure 24 15 0 MM 0 59 MINIMUM HOLD ANCHOR HOLES HANDLE CIRCLIP 5 8 Lanyard SWi tools are supplied with a secure anchor point and a lanyard...

Page 20: ...he fully open position until the tool has ascended to the surface 6 The tool and pump are stripped down cleaned and lubricated immediately to minimise corrosion Please note that SWi20 25TEEX cannot be...

Page 21: ...7 1 Inspection A thorough inspection should be carried out prior to usage storage or transportation to ensure the completeness and condition of the tool Inspection should include Visual inspection of...

Page 22: ...d Views SWi12 14TMEX 1 2 14 17 15 4 16 8 3 7 6 10 11 9 12 5 13 18 1 13 12 11 10 9 8 7 6 5 3 2 18 16 15 14 17 4 Note Items marked supplied in Fasteners Kit 840140 01 Items marked supplied in Stickers K...

Page 23: ...Spiral Retaining Ring 1 830313 01 8 Mechanical Cylinder 1 850300 01 9 SWi Jaw Pair 1 830100 01 10 Retaining Washer 2 11 M6 CSK Hex Screw 3 12 M5 Socket Set Screw 1 13 M6 Grub Screw 25mm 2 14 Wedge St...

Page 24: ...Views SWi12 14TMEX Mechanical Cylinder 8 4 Exploded Views SWi12 14TMEX Mechanical Cylinder Service Kit 4 1 10 6 2 7 8 7 3 5 9 4 1 2 6 10 7 8 7 3 9 5 Note Items marked supplied in Mechanical Cylinder K...

Page 25: ...on Qty Part Numbers 1 Cylinder Base 1 850301 01 2 Drive Rod 1 850302 01 3 Cylinder Cap 1 850303 01 4 Push Rod 1 850304 01 5 Drive Hex 1 850305 01 6 Thread Stop 1 850306 01 7 Thrust Washer 2 8 Thrust R...

Page 26: ...SWi20 25TEEX 18 14 15 17 6 16 3 4 5 8 1 10 13 11 9 7 12 2 12 2 1 14 15 17 6 16 3 4 5 8 18 10 13 11 9 7 Note Items marked supplied in Fasteners Kit 840140 01 Items marked supplied in Stickers Kit 8401...

Page 27: ...6 Captive Fastener 2 830500 01 7 Lugs 1 830600 1 8 Anchor Point 1 830800 01 9 SWi Jaw pair 1 830100 01 10 Retainer Washer 2 11 M6 CSK Hex Screw 3 12 M6 Grub Screw 12mm 2 13 M5 Socket Set Screw 1 14 We...

Page 28: ...draulic Cylinder 8 9 Exploded Views SWi20 25TEEX Hydraulic Cylinder Service Kit 10 13 12 11 9 8 7 6 4 3 2 1 10 11 1 13 12 11 10 9 8 7 4 2 11 10 3 6 Note Items marked supplied in Cylinder Service Kit 8...

Page 29: ...ers 1 Cylinder Base 1 830301 01 2 Piston 1 830302 01 3 Cylinder End Cap 1 830303 01 4 3 8 NPT Coupler 10kpsi 1 300901 01 6 Wiper Seal 1 7 Tension Die Spring 1 8 Spring Lock 2 9 M6 Capscrew 4 10 O Ring...

Page 30: ...i20 25TIEX 19 18 14 15 17 6 3 4 5 8 1 10 13 11 9 7 12 2 16 13 2 1 15 16 18 5 6 19 17 14 3 8 7 4 12 10 11 9 Note Items marked supplied in Fasteners Kit 840140 01 Items marked supplied in Stickers Kit 8...

Page 31: ...nchor Point 1 830800 01 8 Spiral Retaining Spring 2 830313 01 9 SWi Jaw pair 1 830100 01 10 Retainer Washer 2 11 M6 CSK Hex Screw 3 12 M5 Socket Set Screw 1 13 M6 Grub Screw 12mm 2 14 Integral Pump Wr...

Page 32: ...8 27 26 25 24 23 22 43 42 41 40 39 38 37 36 35 47 46 45 44 34 33 32 31 30 48 49 21 22 24 43 27 47 36 18 3 Note Items marked supplied in Clevis Kit 840160 01 Items marked supplied in Cylinder Service K...

Page 33: ...Wi20 25TIEX Internal Manifold Service Kit 8 17Exploded Views SWi20 25TIEX Integral Bladder Service Kit 5 2 4 3 2 1 8 7 9 16 15 2 6 13 14 11 12 11 10 1 13 12 11 10 9 8 7 6 5 4 3 2 16 15 14 2 11 2 2 8 7...

Page 34: ...76901 01 7 Bladder Housing 1 840302 01 8 Piston Housing Cap 1 372401 01 9 Swivel Clevis 1 372501 01 10 Clevis Screw 1 373201 01 11 Anti Loosen Nut 1 373301 01 12 Link Connector 1 373101 01 13 Retainin...

Page 35: ...1 33 Cap 1 34 O Ring 1 35 Washer 1 36 O Ring 2 37 Back Up Ring 1 38 Reservoir Bladder 1 39 O Ring 1 40 O Ring 1 41 Pump Piston Rod 1 42 Steel Ball 1 43 Steel Ball 2 44 Cone Seat 1 45 Cone 1 46 Long S...

Page 36: ...y Block Small Service Kit 1 2 3 1 3 2 8 20Exploded Views Safety Block Large Service Kit Exploded View 1 2 3 1 3 2 8 21Exploded Views Step Block Service Kit 8 22Exploded Views Fastener Service Kit 3 1...

Page 37: ...Handle 1 3 Cap Screw M6x35 1 8 25Table of Parts Safety Block Small Service Kit Item Description Qty Part Numbers 1 Step Block Machined Finish 2 830050 01 2 M6 CSK Hex Screw 2 3 Retaining Washer 2 4 4...

Page 38: ...but doesn t seem to be achieving full pressure when under load Intermediate valve not seating relief valve leaking Check cleanliness of valve ball Re seat using a hammer and punch Refer to an approve...

Page 39: ...________________ ____________________________________________________________________________________ ____________________________________________________________________________________ _____________...

Page 40: ...www equalizerinternational com EQUALIZER INTERNATIONAL LTD S dlo Equalizer House Claymore Drive Aberdeen Skotsko UK AB23 8GD t 44 0 1224 701970 f 44 0 1224 823791...

Reviews: