background image

EMPYRE PRO SERIES INSTALLATION AND OPERATION MANUAL • 2009 

7

SAFETY

WARNING

!

ELECTROCUTION HAZARD

ALWAYS SECURE DOOR WITH LATCH. 

TIGHTEN WITH WRENCH.

815541

Electrical  Ratings:  120  volts,  60HZ, 

max  breaker  size  15  amps.  (Blower 

rating is less than 2 amps.)
For supply connections use No.14 AWG 

or larger wires acceptable for at least 

90ºC or equivalent.
For  use  with  aluminum  or  copper 

conductors.

815543

ELECTRICAL

INSTALLATION

ADD ON INSTALLATION 

INSTRUCTIONS

-  This furnace can be connected to an 

existing boiler system.

-  Operate the (oil, gas, electric) boiler 

periodically to ensure it will operate 

satisfactorily when needed.

-  DO  NOT

  relocate  or  bypass  any  of 

the  safety  controls  in  the  original 

boiler installation. 

CAUTION:

 This equipment may only be 

installed by qualifi ed personnel. 

-  Disconnect  electric  power  to  both 

boilers before servicing.  

CAUTION: 

  Maintain  combustion  air 

supply to both boilers. Air starvation is 

dangerous. Provide  a fresh air opening 

at least 2,000 mm

2

 (3 in

 2

).

An  annual  inspection  by  a  qualifi ed 

service technician is recommended.

INSTALLER INFORMATION:

Name__________________________
Address________________________
_______________________________
Date of Installation_______________

CAUTION

!

• THIS LID IS HEAVY.
• USE BOTH HANDS.
• LID AREA MAY BE VERY HOT.
• SWITCH BLOWER OFF BEFORE OPENING.

815544

DANGER

!

Risk of fi re or explosion.

 DO NOT

 start or fuel the fi re using 

garbage, gasoline, drain oil or other fl ammable liquids or 

chemicals.

WARNING

!

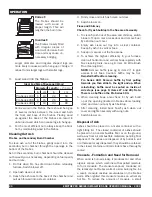
SAFE DOOR OPERATION:

-  Stand 

BEHIND

 loading door and 

SLOWLY

 open. (Close 

door  if  heavy  smoke  is  present.) 

WAIT

  30  seconds 

before opening door fully.  

-  Switch blower 

OFF

 for loading when fl ames are present.

-  Always 

CLOSE

 and 

LATCH

 doors fi rmly. Switch blower 

ON

.

DO NOT

 operate with loading door and ash removal door open.

DO NOT

 store combustible materials close to furnace.

-  Follow listed combustibles installation clearances.

-  Follow  complete  installation,  operating  and  cleaning 

instructions in Operator’s Manual.

CAUTION

!

-

  Hot

 surfaces do not touch. 

KEEP CHILDREN

 at safe distance.

DO NOT

 damage furnace. Load wood carefully.

DO NOT

 add fuel during a power outage.

KEEP

 water level above the add mark.

-  Place  ash  in  metal  containers  and  away  from 

combustible materials.

815545

SPECIFICATIONS

Install  and  use  only  in  accordance 

with  the  manufacturer’s  installation/

operating  instructions  and  local 

codes. If there are no applicable local 

codes, an outdoor installation chimney 

must  be  listed  to  the  ULC-S610  and 

ULC-S604  standard  and  an  indoor 

installation  must  follow  ANSI/NFPA 

211  and  NFPA90B.  Chimney  must 

be  a  listed  UL  103  HT  or  ULC  S629 

residential  all-fuel  type  or  tile-lined 

masonry.  Flue  connector  pipe  must 

be made of a minimum 24 NSG black 

steel. Special precautions are required 

for  passing  the  chimney  through  a 

combustible  wall  or  ceiling.  Refer 

to  authorities  having  jurisdiction  for 

proper installation.

Minimum Clearance to Combustibles

Side Wall to Furnace

12” (305 mm)

Back Wall to Furnace 36” (914 mm)
Front of Furnace to 

Combustibles

48” (1220 mm)

Combustibles to Flue 12” (305 mm)
Ceiling to Furnace

33” (838 mm)

CAUTION

!

DO  NOT

  connect  the  unit  to  a 

chimney  fl ue  that  serves  another 

appliance.

DO NOT

 burn trash in this furnace.

DO  NOT

  pressurize  water  in 

furnace.

DO  NOT

  dump  ash  close  to  any 

combustible materials.

-  The  heat  exchanger,  fl ue  pipe, 

chimney must be in good condition 

and  cleaned  regularly  to  remove 

accumulated creosote and ash.

-  Clean  at  the  end  of  the  heating 

season  to  minimize  corrosion 

during summer months.

-  Follow  cleaning  instructions  in 

Operator’s Manual.

-  Refer  to  Operator’s  Manual  for 

complete instructions.

In the event of loss of electrical power:

1.  Open all check and zone valves in 

the  system.  Depending  on  system 

design,  this  may  allow  convective 

circulation.

2.  It  is  important  to  remember  that 

the heating system cannot dispose 

of a great deal of heat without the 

circulators running. Avoid over fi ring! 

DO NOT LOAD LARGE AMOUNTS OF 

SOLID  FUEL  INTO  THE  FURNACE!


Fire the furnace cautiously until you 

are able to determine how  quickly 

the heat system is able to dissipate 

the  heat  being  produced  by  the 

furnace.

3.  When  the  power  has  returned, 

reset all check and zone valves and 

resume  normal  operation  of  the 

system.

In the event of a runaway fi re:

1.  Ensure  the  fi rebox  door  is  tightly 

closed.

2.  Close all the combustion air inlets 

on the furnace.

To cool an overheated furnace: 

1.  Turn all thermostats to their highest 

temperature setting.

815546

1.

3.

4.

5.

6.

7.

1

6

2

3

5

7

4

EMPYRE PRO SERIES HYDRONIC FURNACE

15

Pro Series 100/200 #702112153 or #702111396, Pro Series 400 #70625938

Pro Series 100/200 #702112153 or #702111396, Pro Series 400 #70625938

Pro Series 100/200 no702112153 ou no 702111396, Pro Series 400 no 70625938

Pro Series 100/200 no702112153 ou no 702111396, Pro Series 400 no 70625938

815228

Model No./Certifi 

én De Modèle  

100  

200  

400  Serial No./ N° De Série ___________________________

Certifi ed H

eating Appliance   CSA Standard B366-1-M91   UL Standard 391-2006/726-06   Standard C22.2 No. 3

Appareil De Chauffage   Norme B366-1-M91 De La CSA   Norme 391 De ULC - 2006/726-06   Norme C22.2 No 3

Appareil De Chauffage   Norme B366-1-M91 De La CSA   Norme 391 De ULC - 2006

Appareil De Chauffage   Norme B366-1-M91 De La CSA   Norme 391 De ULC - 2006

Certifi ed as an add-on model October 2007.

2.

Summary of Contents for Pro Series 100

Page 1: ...Installation and Operation Instructions Empyre Pro Series Empyre Pro Series Installation and Operation Instructions Phase II Wood Gasifier Models 100 200 and 400 ...

Page 2: ......
Page 3: ...tion Dimensions 10 Trench for Underground Pipes 10 Outdoor Furnace Installation 11 Outdoor Chimney Installation 11 Indoor Chimney Installation 11 Supplying Make Up Air 11 Water Line Hookup 12 Electrical Hookup 12 Typical Installation 13 Hookup to the Existing Heat System Water to Air 14 Belt Driven Hot Air Fan 14 Direct Drive Fan 14 Thermostat 14 Under Floor Heat 14 Side Arm Installation 15 Option...

Page 4: ... of Ash 20 Creosote Formation and Need for Removal 20 Fire Brick Insulation 21 Blower Draft Setting 21 Loading Door 21 Power Outages 21 Maintenance 22 During Heating Season 22 End of Heating Season 22 Reference 23 25 Operating the Digital Temperature Switch DTS 23 Hot Water Wood Furnace Wiring Diagram Empyre Pro Series 200 and 400 24 Furnace Specifications 25 Troubleshooting 26 27 Warranty Back Co...

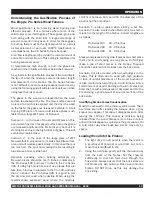
Page 5: ... Empyre Pro Series 200 How The Empyre Pro Series Works The Empyre Pro Series uses a process called wood gasification to produce highly efficient combustion in the furnace s dual burn chambers 1 Wood in the firebox burns from the bottom up drying the top layer of wood in the firebox and forcing gases and exhaust into the lower burn chamber 2 In the brick lined lower chamber these volatile gases are...

Page 6: ...11396 Pro Series 400 70625938 Pro Series 100 200 702112153 or 702111396 Pro Series 400 70625938 Pro Series 100 200 no702112153 ou no 702111396 Pro Series 400 no 70625938 Pro Series 100 200 no702112153 ou no 702111396 Pro Series 400 no 70625938 815575 Model No Modèle 100 200 400 Serial No N De Série _________________________________ Certified Heating Appliance CSA Standard B366 1 M91 UL Standard 391...

Page 7: ...Stand back behind door 3 SLOWLY open door 4 Wait for smoke to clear 30 seconds Close door if smoke continues 5 Open door fully 6 After loading always close and latch door firmly 7 Switch blower on CAUTION Keep children a safe distance from the furnace DO NOT use chemicals gasoline oil or any other combustible fluid to start the fire DO NOT store fuel or combustible materials within the installatio...

Page 8: ... that if not avoided COULD result in death or serious injury if proper precautions are not taken CAUTION CAUTION Indicates a potentially hazardous situationthat if notavoided MAYresultinminoror moderate injury if proper practices are not taken or serves as a reminder to follow appropriate safety practices Safety Decals Please read and follow directions to ensure safe practices when using the Empyr...

Page 9: ...0B Chimney must be a listed UL 103 HT or ULC S629 residential all fuel type or tile lined masonry Flue connector pipe must be made of a minimum 24 NSG black steel Special precautions are required for passing the chimney through a combustible wall or ceiling Refer to authorities having jurisdiction for proper installation Minimum Clearance to Combustibles Side Wall to Furnace 12 305 mm Back Wall to...

Page 10: ...ATION MANUAL 2009 FEATURES Identifying Main Components see item list on page 9 1 2 4 5 6 8 7 3 10 9 11 12 27 13 14 16 17 19 21 22 23 24 25 18 26 15 29 Pro Series 200 400 30 28 Top 12 13 14 15 16 17 22 Pro Series 100 18 20 29 23 25 26 11 24 20 ...

Page 11: ...yre Pro Series furnace must be completed in accordance with local state provincial and federal building and fire codes IMPORTANT Contact an insurance provider prior to installation to ensure that installation is in compliance with local insurance requirements and all terms have been met No Description 1 Insulated Chimney 2 Light 3 Smoke Curtain 4 Light Blower Switch 5 Aquastat 6 Control Panel Door...

Page 12: ...ating professional to determine the line size necessary to meet the demands of your specific application 4 Identify each water line clearly in order to correctly locate the supply and return lines 5 Lay down 14 2 underground wire approved for underground installation Obtain the required electrical permit and confirm local electrical code requirements prior to installation House Shop Insulated Line...

Page 13: ... of the roof within 10 0 feet 3 04 m For a new chimney use an insulated stainless steel system that conforms to type HT High Temperature requirementsofUL103andULCS629andcomplies with the requirements of Chapter 11 of NFPA 211 Standard for Chimneys Fireplaces Vents and Solid Fuel Burning Appliances Caution The section of 1 inch 2 54 cm insulated chimney on the furnace is not rated for indoor use re...

Page 14: ...upply make up air for this type of installation Water Line Hookup 1 Hook up supply to Supply port and return to Return port as indicated see page 8 Note When using only one set of hookups always use the left set closest to the snap disc 2 Install shut off valves on all lines attached to the furnace to prevent loss of water during maintenance and repairs Fittings and valves to be attached to the fu...

Page 15: ...the Empyre Pro Series furnace only and does not include anything outside of the Empyre Pro Series furnace Pro Fab Industries takes NO responsibility for faulty installations etc These drawings should help in establishing a list of material required for a typical installation All parts should be available from your Empyre Pro Series provider Ask your dealer for a parts list Pro Series Furnace Insul...

Page 16: ... speed to obtain the correct air flow Thermostat 6 Install a second thermostat to allow the blower to operate separately from the furnace 7 The existing thermostat should be set several degrees lower than the new thermostat This will allow the regular system to cut in should the Pro Series run out of wood and the temperature drop below the second setting IMPORTANT Have a qualified electrician chec...

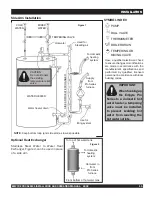
Page 17: ...m loop and side arm as low as possible PUMP BALL VALVE THERMOMETER BOILER DRAIN TEMPERING OR MIXING VALVE SYMBOL INDEX Have a qualified electrician check to ensure changes or modifications are made in accordance with the manufacturer s specifications and performed by qualified licensed personnel in accordance with local building codes Side Arm Installation To domestic heating system Hot water in f...

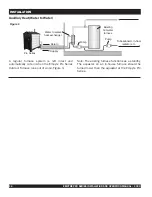
Page 18: ...ries Outdoor Furnace runs out of wood Figure 3 Note The existing furnace functions as a standby The aquastat on an in house furnace should be turned lower than the aquastat at the Empyre Pro Series Auxiliary Heat Water to Water Pro Series Water to water heat exchanger Return Supply Existing hot water furnace Pump To baseboard in floor radiator etc Pump Figure 3 ...

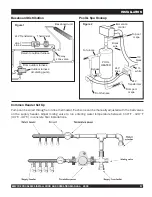
Page 19: ...m outdoor furnace Figure 1 Figure 2 To furnace From furnace From pool or spa 110 white 110 black Immersion control Black wire 24 V lines POOL HEATER Bypass 24 V Transformer To pool or spa Common Header Set Up Pump can be wired through an in line thermostat Each zone can be manually adjusted with the ball valves on the supply header Adjust mixing valve to run entering water temperature between 110 ...

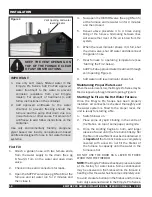
Page 20: ...ening Figure 3 9 Add water until level indicator shows full Maintaining Proper Water Level When the water level is low the Empyre Pro Series may be filled or topped up through the vent opening Figure 3 First Fill 1 Attach a garden hose with two female ends from the water supply to the drain See pg 8 No 22 Turn on the water and open drain valve 2 Check all lines and connectors for leaks 3 Open the ...

Page 21: ... pieces should be over 5 inches in diameter in the Pro Series 100 and over 7 inches in the Pro Series 400 If using high moisture wood use pieces that are less than 5 inches in diameter in the Pro 100 and less than 7 inches in the Pro Series 400 It is good to mix the dry and wet wood when possible When using the recommended seasoned wood where the moisture content is between 19 and 25 the diameter ...

Page 22: ...lue Cleaning Rod NOTE Remove baffle see pg 8 item 27 to gain access to all flues Caution baffle may be hot Reinstall baffle after cleaning Pro Series 400 Remove baffle by first pulling towards you then slide to the right and up When reinstalling baffle must be seated on inside of side stops see page 8 items 27 and 28 Note There is no baffle on the Pro Series 100 5 When cleaning flues also check fo...

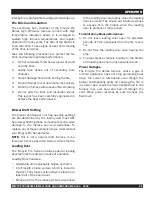
Page 23: ...To replace any of these components you must contact your Empyre Pro Series dealer NOTE This is not a natural draft furnace It is a forced air furnace where the blower controls the fire Loading Door The Empyre Pro Series includes special loading door features for safety and ease of operation Loading Door Features Adjustable and replaceable hinges and latch A full length smoke curtain which is linke...

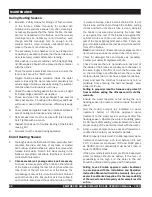
Page 24: ...slots Ensure that air is free to flow to each air hole Also inspect the vertical air tube if there is creosote buildup insert a small chain at the top of the air tube pull the chain through the bottom pulling it back and forth until the air tube is clean Reinstall the bricks in reverse order ensuring the back brick is up against the rear of the firebox and against the vertical air tube so that no ...

Page 25: ...llowing messages will be shown Er Memory error Short circuit probe error Open probe error DTS Technical Data Accuracy 1 Output 16 Amp 1HP 240 Vac SPDT relay Supply voltage 115 Vac 10 Display 3 digit red DTS Programming Press SET SP text will appear on the display Press SET again The real value is shown on the display The value can be modified with the UP and DOWN arrows Press SET to enter new valu...

Page 26: ...ES INSTALLATION AND OPERATION MANUAL 2009 REFERENCE Hot Water Wood Furnace Wiring Diagram Empyre Pro Series 100 200 and 400 CAUTION DO NOT CONNECT THE ELECTRICAL COMPONENTS OF THIS UNIT TO ANY OTHER ELECTRICAL APPLIANCE ...

Page 27: ... 15 6 15 8 20 Loading Door Size in 14 x 16 18 x 18 20 x 24 cm 36 x 41 46 x 46 51 x 61 Firebox Volume 5 3 cubic feet 9 3 cubic feet 20 3 cubic feet in 16w x 21h x 28d 23w x 22h x 31d 28w x 33h x 40d cm 41w x 53h x 71d 58w x 56h x 79d 71w x 84h x 102d Water Capacity US gal 30 75 115 Litres 114 284 435 Shipping Weight lbs 1 080 2 100 2 610 kg 490 953 1 184 Note Weights and measurements may vary sligh...

Page 28: ...quality Burn only seasoned wood Water temperature is too low Reduce heat draw from furnace allowing the water temp to reach at least 160 F 71 C Furnace overheats and boils Main door has been left open Close door Main door and or ash clean out gaskets are leaking Replace gaskets or adjust latches and or hinges Hot water is not reaching the building Water level is low Fill system to proper water lev...

Page 29: ...he centre In spring fall use only 6 inch 15 cm diameter and smaller seasoned logs Not drawing enough heat from the furnace Increase the heat draw on the furnace There is a lot of smoke present when I open the loading door The fire is at a stage when there is a lot of smoke Clear smoke by opening door but not smoke curtain Avoid opening the door for several hours after loading The furnace has just ...

Page 30: ...to validate the warranty 10 Year Limited Warranty Pro Fab will not be responsible or liable for any of the following a If warranty work requires removal or replacement of all or a part of the furnace Pro Fab is not responsible for the cost of plumbing freight permits removal or disposal of damaged furnace or parts replacement of water or additives labour after the one 1 year warranty coverage expi...

Reviews: