4 – 4
Section 4 • Operation
VSS/VSR/VSM/VSH/VSSH Compressor • Installation, Operation and Service Manual • Emerson • 35391S
Calibrate Slide Valve Actuators (For
Units Using Vission20/20™)
1
Slide valve actuators must be installed prior to calibra-
tion. Refer to Slide Valve Actuator Installation proce
-
dure. The following steps pertain to calibrating one slide
valve actuator. Repeat procedure to calibrate other slide
valve actuator.
WARNING
After stopping the compressor, allow the compressor
and surrounding components to cool down prior
to servicing. Failure to comply may result in serious
injury.
CAUTION
Do not calibrate in direct sunlight. Failure to comply
may result in damage to equipment.
Both the capacity and volume slide actuators should be
calibrated when one or more of these have occurred:
•
Compressor unit starting up for the first time.
•
A new actuator motor has been installed.
•
There is an error code flashing on the actuator’s
circuit board - an attempt to recalibrate should be
made.
1
Does not apply to compressors that operate
without slides (VSM-97, VSM-113, VSM-127).
• The range of travel is not correct and the command
shaft travel is physically correct.
• The compressor is pulling high amperage, the cali-
bration of the volume slide should be checked.
• An actuator does not unload below 5%, or an actua-
tor that doesn’t move.
• Something is not working properly such as the actua-
tors, RTDs or transducers.
To calibrate optical actuators, continue with the follow-
ing steps:
NOTE
If the compressor unit is starting up for the first
time or a new actuator motor has been installed,
leave the power cable and position transmitter cable
disconnected until step 6.
1. Stop compressor unit and allow to cool.
2.
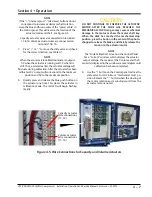
Remove screws securing actuator cover to actuator
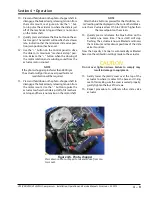
assembly. As a reference see Figure 4-2.
CAUTION
Wires are attached to the connector on the actuator
cover. Handle actuator cover with care to prevent
damage to wires. Failure to comply may result in
damage to equipment.
Blue Calibrate Button
Red LED
Actuator
Plastic Cover
Actuator
Assembly
Figure 4-2. Actuator Assembly
View Rotate 180°

