background image

52


Fig 5-7 Live Configuration-Main Monitor

5.2.3 Mask

If there is something you don’t want to display in the live image, you can set mask. For a given channel a maximum of three areas can be masked. If the mask 

function is not available in the added IP camera, the mask function here will not take effect.

To set up mask area: 

1 -  Go to Main Menu 

Setup  Live  Mask interface.

Fig 5-8 Live Configuration-Mask

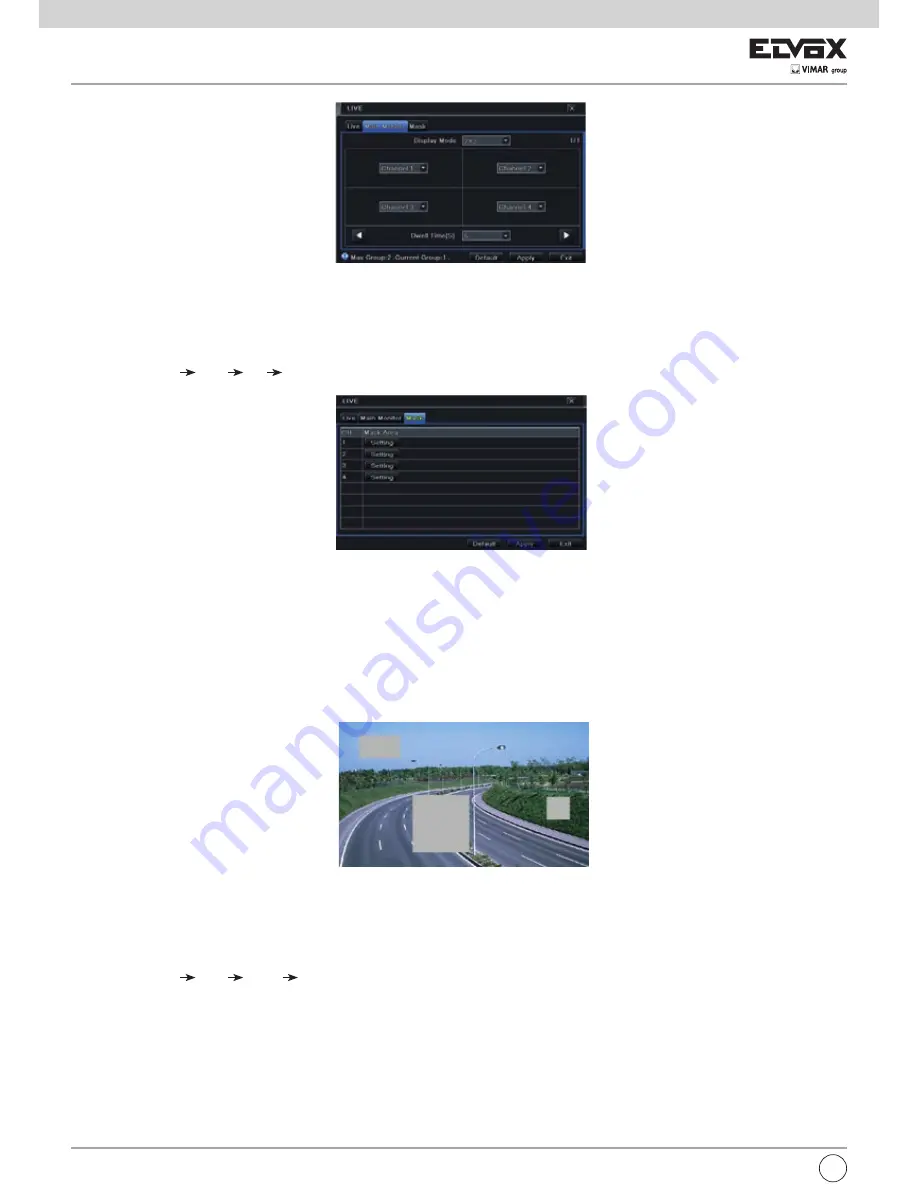
2 -  Click “Setting” button to go to live image. 

3 -  Press and drag the left mouse button to set mask area as shown below. 

4 -  Right click to exit the mask setting interface.

5 -  Click “Apply” button to save the setting.

To delete mask area

1 -  Click “Setting” button in the mask interface. 

2 -  Select a certain masked area and double click to delete that masked area. 

3 -  Then click “Apply” button to save the setting.


Fig 5-9 Setting Mask Area

5.3 Record Configuration

Record configuration includes six sub menus: enable, record bit rate, time, recycle record, stamp and snap. 

Before Configuration, please make sure your NVR has been installed with HDD and has completed its initialization.

5.3.1 Enable

1 -  Go to Main Menu 

Setup  Record 

Enable tab. Refer to Fig 5-10.

2 -  Checkmark record and audio.

EN

Summary of Contents for 46241.F08

Page 1: ...46241 F08 46241 F16 Manuale per l uso dell NVR NVR User Manual Manuale per l installazione e l uso Installation and operation manual ...

Page 2: ...enere indicazioni tecniche non corrette ed errori di stampa Gli aggiornamenti verranno aggiunti alla nuova versione del manuale Il contenuto del manuale è soggetto a modifica senza preavviso Utilizzare il dispositivo esclusivamente con il tipo alimentatore indicato sulla targhetta Prima dell uso verificare la tensione dell alimentazione Se il dispo sitivo rimane inutilizzato per un lungo periodo r...

Page 3: ...28 7 1 7 QRCODE 28 7 2 Allarme manuale 28 7 3 Gestione disco 28 7 4 Upgrade 28 7 5 Logoff 28 8 Sorveglianza in remoto 29 8 1 Sorveglianza in remoto da Internet Explorer tramite NAT 29 8 1 1 Impostazioni NAT 29 8 1 2 Accesso NAT 29 8 2 Sorveglianza in remoto da Internet Explorer via LAN e WAN 29 8 2 1 Tramite LAN 29 8 2 2 Tramite WAN 29 8 3 Sorveglianza in remoto da computer Apple 30 8 3 1 Tramite ...

Page 4: ...uzione simultanea di 4 8 16 schermi Eliminazione e blocco individuale dei file registrati Riproduzione in remoto tramite Network Client via LAN o Internet ALLARME Ingresso allarme e un uscita generica solo 46241 F16 Supporta la programmazione per il rilevamento movimento e l allarme sensore Pre registrazione e post registrazione Registrazione dei canali collegati quando un canale stabilito si atti...

Page 5: ...superiore 2 1 2 Installazione del masterizzatore DVD Allentare le viti di blocco del pannello anteriore per rimuovere la paratia e collocare il masterizzatore DVD sul fondo del case Collegare i cavi di alimentazione e dati quindi fissare il masterizzatore DVD con le viti I 1 Allentare le viti posteriori e laterali del dispositivo per aprire il coperchio superiore ...

Page 6: ... in modalità live 0 10 Consente di inserire numeri da 0 a 10 o superiori e altri caratteri digitali Messa a fuoco 1 Registrazione manuale 2 La funzione di messa a fuoco si attiva in modalità PTZ Velocità 1 Tasto riavvolgi 2 La funzione di velocità si attiva in modalità PTZ Apertura diaframma 1 Consente di accedere all interfaccia di riproduzione 2 La funzione di apertura diaframma si attiva in mod...

Page 7: ...arlanti Porta CVBS Collegare al monitor Porta HDMI Collegare al dispositivo di visualizzazione ad alta definizione Porta VGA Uscita VGA collegare al monitor Porta USB Collegare a dispositivi USB esterni come memorie USB flash HDD USB per il backup o l aggiornamento del firmware o mouse USB LAN Porta di rete PoE Porte di rete PoE collegare a telecamere IP 4 8 canali con funzione PoE DC 48 V Porta a...

Page 8: ...mento movimento REC Registra Consente di attivare manualmente la registrazione Search Cerca Accede al modo di ricerca MENU Accede al menu Exit Esci Esce dall interfaccia corrente ENTER INVIO Conferma la scelta o l impostazione Pulsante di direzione Sposta il cursore durante la configurazione ZOOM Esegue lo zoom avanti PIP Attiva la funzione PIP Picture in Picture Controlla la riproduzione Riproduz...

Page 9: ... di rete e la gestione del disco È possibile eseguire la configurazione in questa schermata facendo riferimento alle procedure descritte nei capitoli corrispondenti Se si preferisce non utilizzare la procedura guidata fare clic sul pulsante Exit per uscire Nota l uscita predefinita è l uscita HDMI Tenere premuto il tasto ESC per commutare la risoluzione dell uscita tra VGA e HDMI 3 1 2 Spegnimento...

Page 10: ...cui siano disponibili ulteriori canali è ovviamente possibile collegare la telecamera IP tramite la rete WAN LAN Per gli NVR a 16 canali è possibile collegare i precedenti 8 canali direttamente alle porte PoE del dispositivo e quindi aggiun gere all NVR le telecamere IP ai canali rimanenti tramite WAN LAN In questo documento viene descritto come aggiungere le telecamere tramite WAN LAN Per aggiung...

Page 11: ...ivo Lo stato Connected Collegato significa che il dispositivo è collegato ed è quindi possibile vedere l immagine live È possibile selezionare il dispositivo aggiunto e fare clic sul pulsante Setup Impostazione per modificare il canale l indirizzo IP del dispositivo come mostrato nella Fig 4 5 Fig 4 4 Ricerca dei dispositivi Fig 4 5 Modifica di dispositivi Per aggiungere le telecamere IP tramite W...

Page 12: ... di diverse telecamere in sequenza Le immagini possono essere visualizzate su canale singolo o come griglia da diverse telecamere Il modo Dwell è attivato solo quando il modo di visualizzazione selezionato non è in grado di visualizzare tutte le telecamere disponibili Colore attivare questo pulsante per regolare il colore delle immagini live E Zoom ingrandimento elettronico dell immagine su canale...

Page 13: ... il sistema viene avviato viene visualizzata la procedura di impostazione guidata in cui è possibile eseguire la configurazione di base Video Output Uscita video risoluzione dell interfaccia di visualizzazione live Language Lingua consente di selezionare la lingua di visualizzazione dei menu Nota dopo aver modificato la lingua e l uscita video è necessario eseguire nuovamente il login Logout After...

Page 14: ...tazioni di una telecamera canale specifici per visualizzare la finestra illustrata di seguito 2 In questa interfaccia è possibile regolare la luminosità il colore la saturazione e il contrasto per la visualizzazione live Fare clic sul pulsante OK per salvare le impostazioni 5 2 2 Monitor principale Le impostazioni del monitor principale consentono di impostare la sequenza della telecamera in modo ...

Page 15: ...r uscire dall interfaccia di impostazione della maschera 5 Fare clic sul pulsante Apply Applica per salvare le impostazioni Per eliminare l area della maschera 1 Fare clic sul pulsante Setting Impostazioni nell interfaccia della maschera 2 Selezionare un area oscurata e fare doppio clic sull area per eliminarla 3 Fare quindi clic sul pulsante Apply Applica per salvare le impostazioni Fig 5 9 Impos...

Page 16: ... consentiti 256 12288kbps Se il parametro viene impostato a un valore che supera le risorse massime del sistema il sistema lo corregge automaticamente 5 3 3 Tempo 1 Andare a Main Menu Setup Record interfaccia Time per impostare il tempo di registrazione Fare riferimento alla Fig 5 12 2 Impostare il tempo di registrazione pre allarme e post allarme Selezionare All Tutti per impostare gli stessi val...

Page 17: ...trazioni e ricicla lo spazio liberato La procedura di impostazione è la seguente 1 Andare a Main Menu Setup Record interfaccia Recycle Record 2 Selezionare la casella Recycle Record Ricicla registrazione per attivare il riutilizzo automatico Se questa opzione è disattivata o non è selezionata quando l HDD è pieno l NVR interrompe la registrazione 3 Fare clic sul pulsante Apply Applica per salvare ...

Page 18: ...clic sul pulsante per aggiungere la programmazione per un giorno specifico Fare clic sul pulsante per eliminare la programmazione selezionata Se si desidera applicare l impostazione della programmazione di un canale ad altri o tutti i canali selezionare il canale e fare clic sul pulsante Copy Copia È possibile impostare la programmazione settimanale facendo doppio clic nell area della griglia Verr...

Page 19: ...dettagli Questo passaggio è molto importante per l allarme sensore Anche se l allarme sensore è attivato per tutti i canali ed è stata impostata l attivazione il risultato dell allarme sensore non sarà visibile se non viene aggiunta alcuna programmazione Se la programmazione della registrazione attivata dal sensore è stata impostata nella stessa linea temporale le registrazioni verranno attivate 5...

Page 20: ...i 7 Fare clic sul pulsante Apply Applica per salvare le impostazioni 8 Andare alla scheda Schedule Programmazione La procedura di impostazione dell allarme attivato dal movimento è analoga a quella di configurazione della programmazione normale per maggiori informazioni vedere il paragrafo 5 4 1 5 5 3 Altri allarmi In questa scheda è possibile configurare l allarme per Disk Full Disco pieno IP Con...

Page 21: ...nternet Esistono tre modi per collegarsi a Internet Fig 5 23 Configurazione di rete Rete Se è attivato un server DHCP e si desidera che l NVR ottenga automaticamente l indirizzo IP e altre impostazioni di rete da quel server selezionare la casella accanto a Obtain an IP address automatically Ottieni indirizzo IP automaticamente Il dispositivo compilerà l indirizzo IP la subnet mask l IP gateway e ...

Page 22: ...erire l IP server suddetto la porta server e l ID dispositivo nell interfaccia del server Fare clic sul pulsante Apply Applica per salvare le impostazio ni Il sistema CVM Elvox ora connetterà automaticamente il dispositivo Fig 5 26 Configurazione di rete NAT 5 6 5 Altre impostazioni Se l NVR è configurato per utilizzare il PPPoE come connessione di rete predefinita è possibile configurare congiunt...

Page 23: ...ionare www autoddns com nella colonna DDNS Type Tipo DDNS come mostrato sopra 4 Inserire un nome host casuale ad esempio 123 5 Fare clic su Register Registra per registrare il nome del dominio Quando viene visualizzato il messaggio di conferma significa che la registrazione del nome di dominio è stata completata correttamente 3 Quando la richiesta del nome di dominio sarà stata finalizzata il nome...

Page 24: ...mputer specificato identificato dall indirizzo MAC 5 Selezionare la scheda Authority Autorizzazioni e assegnare i diritti di utilizzo per gli utenti specifici Fare riferimento alla Fig 5 30 6 Fare clic sul OK per salvare le impostazioni Fig 5 30 Aggiunta utente Autorizzazioni Per eliminare un utente 1 Andare a Main Menu Setup interfaccia Users 2 Selezionare gli utenti aggiunti che si desidera elim...

Page 25: ...a 1 Andare a Main Menu Search Time Search Fare riferimento alla Fig 6 1 Fig 6 1 Configurazione della ricerca Ricerca cronologica 1 Selezionare data e canali sulla destra e premere il pulsante Search Cerca Se la data ha il bordo evidenziato significa che sono presenti dei dati 2 Impostare l ora di inizio selezionandola da una griglia oppure inserendo il valore nel campo dell ora di inizio 3 Selezio...

Page 26: ...k Sblocca Selezionare un file bloccato e fare clic sul pulsante Unlock per sbloccare il file Delete Elimina Selezionare un file sbloccato e fare clic sul pulsante Delete per eliminare il file 6 4 Ricerca per immagine 1 Andare a Main Menu Search scheda Image 2 Selezionare i dati e i canali sul lato destro 3 Premere il pulsante Search Cerca per cercare un immagine registrata 4 Dopo aver identificato...

Page 27: ...a verifica delle impostazioni di sistema comprende sette sottomenu sistema evento log rete utenti online registrazione e QRCODE 7 1 1 Informazioni di sistema In questa interfaccia è possibile controllare la versione dell hardware la versione della MCU la versione del kernel l ID dispositivo e così via 7 1 2 Informazioni sull evento In questa scheda è possibile cercare eventi quali movimento sensor...

Page 28: ...o rigido 2 Advanced Avanzate In questa interfaccia è possibile controllare il modello il numero di serie il firmware e lo stato del disco È anche possibile monitorare la temperatura il circuito interno il materiale isolante del disco analizzare i potenziali problemi del disco e impostare un avviso per proteggere i dati contenuti 7 4 Upgrade È possibile eseguire l upgrade dell NVR con l unità flash...

Page 29: ...l numero di porta dopo l indirizzo IP o il nome di dominio 4 Internet Explorer scarica automaticamente i controlli ActiveX Viene visualizzata una finestra in cui inserire il nome utente e la password Inserire corret tamente le credenziali e premere Invio Nota se si riscontrano problemi relativi al download e all installazione dei controlli ActiveX far riferimento alle FAQ domande frequenti D8 8 So...

Page 30: ...o 1 8 3 Sorveglianza in remoto da computer Apple Nota l attuale versione client end del plug in supporta solo la modalità a 32 bit di conseguenza il browser Safari deve essere avviato in modalità 32 bit Se si utilizza un browser MAC OS precedente l impostazione predefinita è 32 bit pertanto questo passaggio non è richiesto La procedura di impostazione è la seguente 1 Fare clic con il pulsante dest...

Page 31: ...ire l indirizzo IP e la porta HTTP per accedere all interfaccia di accesso dell NVR 8 3 2 Tramite WAN Sono disponibili due modi per collegare l NVR a Internet 1 Collegare l NVR a Internet tramite il router o il server virtuale 1 Le configurazioni di rete sono le stesse descritte dal passaggio 1 al passaggio 4 del punto 1 della procedura per la sorveglianza in remoto da Internet Explorer su WAN 2 I...

Page 32: ...trol Center regolare la velocità di rotazione apertura diaframma iris e zoom regolare la focale specificare le preimpostazioni ecc Definizione dei pulsanti Trascinare la barra di scorrimento per regolare la velocità di rotazione della telecamera Pulsante Iris Apertura diaframma Fare clic sul pulsante accanto al pulsante Iris per aumentare la luce che entra nella telecamera dome Fare clic sul pulsa...

Page 33: ...nte destro per selezionare lo zoom avanti sull immagine Fare doppio clic con il pulsante sinistro o fare clic con il pulsante destro per uscire 8 5 Riproduzione e backup in remoto 8 5 1 Riproduzione remota Fare clic sul pulsante per accedere all interfaccia di riproduzione delle registrazioni Fare riferimento alla Fig 8 3 Selezionare la data della registrazione e i canali e fare doppio clic sul no...

Page 34: ...management Fare riferimento alla Fig 8 7 2 Selezionare la data e i canali evidenziati 3 Fare clic sul pulsante Search Cerca per cercare i file registrati Fig 8 7 interfaccia di gestione file Lock Blocca selezionare file specifici nella casella di riepilogo dei file quindi fare clic sul pulsante Lock per bloccare i file selezionati I file bloccati non possono essere eliminati né sovrascritti Unlock...

Page 35: ...onare il percorso Fare clic sul pulsante Backup per avviare il backup I file di backup vengono salvati sul computer dell utente Fig 8 9 Configurazione del sistema in remoto L elenco dei sottomenu e le opzioni di ciascun menu sono analoghi a quelli dell NVR Per maggiori dettagli far riferimento alla Guida alla configurazione del menu principale 8 7 Strumenti Fare clic sulla scheda degli strumenti p...

Page 36: ...zioni del monitor D4 Perché non sono visualizzate le immagini di alcuni o di tutti i canali dell NVR a Potrebbe essere un problema di cablaggio Controllare i cavi e le porte delle telecamere b Il problema potrebbe riguardare le telecamere Verificare c Assicurarsi di aver aggiunto e attivato le telecamere D5 Perché non trovo l HDD a La potenza dell alimentatore potrebbe non essere sufficiente per a...

Page 37: ...Modulo PC Parametri CPU Intel Celeron 2 4G Scheda madre Intel 845 HDD 80G RAM 512M VGA NVIDIA GeForce MX440 FX5200 ATIRADEON 7500 X300 SISTEMA OPERATIVO Windows 2000 SP4 o successivo Windows XP SP2 o successivo VISTA DirectX 9 0 D13 Come mi comporto se il controllo Codec viene bloccato durante il download nel sistema VISTA o Win7 Il problema può essere risolto in due modi a Selezionare Pannello di...

Page 38: ... è la seguente Capacità di registrazione totale spazio utilizzato per ora MB h velocità di copertura del disco rigido tempo di registrazione ora numero di canali Ad esempio un cliente imposta la risoluzione su 1080P il frame rate su 15fps il Bit rate su 4M e attiva in totale 4 canali Vuole che l unità registri ininterrot tamente per un mese Ecco il calcolo Capacità di registrazione totale 900 mb h...

Page 39: ...960P 1280x960 720P 704x576 Frame rate fps 200 fps PAL 240 fps NTSC Bit rate 256Kbs 12Mbps Codifica CBR Qualità 6 livelli Modalità Manuale Timer Movimento Sensore Gestione file Blocco sblocco tempo di conservazione Riproduzione Riproduzione 4 canali Ricerca Ricerca per ora data evento movimento sensore Funzione Riproduci Pausa Avanti veloce Indietro veloce Zoom digitale Allarme Modalità Sensore Mov...

Page 40: ...ta evento movimento sensore Funzione Riproduci Pausa Avanti veloce Indietro veloce Zoom digitale Allarme Modalità Sensore Movimento Perdita video Ingresso 8 canali Uscita 1 canale Attivazione Registrazione Movimento PTZ Uscità rel email ecc Rete Interfaccia RJ45 x 1 10M 100M 1000M PoE RJ45 x 8 Protocollo TCP IP UDP DHCP DNS PPPOE DDNS Altri 20 utenti online doppio flusso Cellulare SISTEMA OPERATIV...

Page 41: ... The updates will be added into the new version of this manual The contents of this manual are subject to change without notice This device should be operated only from the type of power source indicated on the marking label The voltage of the power must be verified before using the same Kindly remove the cables from the power source if the device is not to be used for a long period of time Do not...

Page 42: ...1 6 Record Information 67 7 1 7 QRCODE 67 7 2 Manual Alarm 87 7 3 Disk Management 87 7 4 Upgrade 87 7 5 Logoff 67 8 Remote Surveillance 68 8 1 IE Remote Surveillance by NAT 68 8 1 1 NAT Settings 68 8 1 2 NAT Access 68 8 2 IE Remote Surveillance via LAN WAN 68 8 2 1 Via LAN 89 8 2 2 Via WAN 89 8 3 Remote Surveillance through Apple PC 69 8 3 1 Via LAN 69 8 3 2 Via WAN 69 8 4 Remote Preview 70 8 5 Re...

Page 43: ...t deleting and locking the recorded files one by one Support remote playback in Network Client through LAN or internet ALARM Support alarm input and 1 generic output 46241 F16 only Support schedule for motion detection and sensor alarm Support pre recording and post recording Support linked channels recording once motion or alarm triggered on certain channel SECURITY Customize user right log searc...

Page 44: ...d data cables 3 Turn over the machine and secure the HDDs with the screws and then install back the top cover 2 1 2 Install DVD Writer Loosen the lock screws in the front panel to remove the barrier and then put the DVD writer onto the bottom of the case Connect the power and data cables and then secure the DVD writer with the screws EN ...

Page 45: ...UP 1 Decrease the value in setup 2 Enter backup mode in live 0 10 Input number 0 10 and the above number together with other digital keys Focus 1 Record manually 2 FOCUS function enables at PTZ mode Speed 1 Rewind key 2 SPEED function enables at PTZ mode IRIS 1 Enter play interface 2 IRIS function enables at PTZ mode P T Z 1 Fast forward 2 Enter PTZ mode in live Input button Direction button Chang...

Page 46: ...o high definition display device VGA port VGA output connect to monitor USB port Connect to external USB devices like USB flash USB HDD for backup or update firmware or connect to USB mouse LAN Network port PoE PoE network ports connect to 4 8 CH IP cameras with PoE function DC 48 V PoE power supply port DC 12 V Power supply Alarm Out Connection Pull out the green terminal blocks and loosen the sc...

Page 47: ...of the polarity and Replace the battery cover The interface of remote controller is shown in Remote Controller Key points to check in case the remote doesn t work 1 Check batteries polarity 2 Check the remaining charge in the batteries 3 Check IR controller sensor for any masking 4 Check the ID of the remote with respect to the NVR If it still doesn t work please try using a good known remote or c...

Page 48: ...n record configuration and disk management You can set here and refer to the concrete setup steps from the corresponding chapters If you don t want to set up Wizard please click Exit button to exit Note The default output is HDMI output Hold and press ESC key to switch the resolution of the VGA HDMI output 3 1 2 Shutdown You can shut down the device by using IR remote controller or mouse Go to Mai...

Page 49: ...rk For 16 CH NVR you may connect the previous 8 CH directly to the device through PoE network ports and then add the IP cameras for the remaining channels into the NVR via WAN LAN Here we will introduce how to add cameras through WAN LAN To add IP cameras via LAN Please go to Main Menu IP Camera tab Refer to Fig 4 1 Click Search button to search the devices in the same network The IPC which suppor...

Page 50: ...devices will be listed in the device management interface Connected status means connecting the device successfully and you will see the live image You may select the added device and click Setup button to modify channel IP address of the device as shown in Fig 4 5 Fig 4 4 Search Devices Fig 4 5 Modify Devices To add IP cameras via WAN Please go to Main Menu IP Camera tab Refer to Fig 4 1 Click Ad...

Page 51: ...eras in a sequence The images may be displayed as a single channel or in a grid fashion from different cameras Dwell mode is enabled only when the chosen display mode is not able to display all the available cameras Color If this button is enabled you can adjust the color of live images E Zoom Single channel large screen electronic amplification Audio Enable sound PTZ Click the PTZ button to contr...

Page 52: ... number of concurrent user logins in the NVR Show wizard If selected the GUI would launch the startup wizard on every boot allowing user to do basic setup Video Output Resolution of live display interface Language To set up the menu language Note After changing the language and video output the device needs to login again Logout After Minutes You can set up the screen interval time 30s 60s 180s 30...

Page 53: ...o set up color 1 Click Setting button for a particular camera channel to see a window as below 2 In this interface you can adjust brightness hue saturation and contrast in live Click OK button to save the setting 5 2 2 Main Monitor The main monitor settings allow you to set camera sequence in live display mode Operate the following steps to set main monitor 1 Go to Main Menu Setup Live Main Monito...

Page 54: ...n to set mask area as shown below 4 Right click to exit the mask setting interface 5 Click Apply button to save the setting To delete mask area 1 Click Setting button in the mask interface 2 Select a certain masked area and double click to delete that masked area 3 Then click Apply button to save the setting Fig 5 9 Setting Mask Area 5 3 Record Configuration Record configuration includes six sub m...

Page 55: ...l 3 Select All to set up the same settings for all channels 5 3 2 Record Bitrate 1 Go to Main Menu Setup Record Record Bitrate Refer to Fig 5 11 2 Setup rate resolution and max bit stream 3 Select All to set the same settings for all channels 4 Click Apply button to save the setting Parameter Meaning Rate Range from 1 30 NTSC 1 25 PAL Resolution Supports1080P 720P VGA Quality The default quality i...

Page 56: ...will automatically delete the old records and recycle the space if it is com pletely utilized The setting steps are as follows 1 Go to Main Menu Setup Record Recycle Record interface 2 Checkmark recycle record to activate auto recycling If the option is disabled or not selected the NVR would stop recording once HDD is full 3 Click Apply button to save the setting 5 3 6 Snap In this interface user ...

Page 57: ...details 2 Select channel and click button to add a certain day schedule Click button to delete the selected schedule If you want to apply the schedule setting of a certain channel to other or all channels you need to select channel and click Copy button You can also set week schedule by double clicking in the gridding area This will take you to see a dialog box as Fig 5 15 1 Select a day and click...

Page 58: ...important for sensor alarm Even if you have enabled the sensor alarm for all channels and set the trigger you will not see the result of sensor alarm if no schedule is added If you have set schedule for sensor based recording in the same timeline recordings can also be triggered 5 5 2 Motion Alarm Motion includes two sub menus motion and schedule The steps to set motion alarm are as follows 1 Go t...

Page 59: ...ttings for all channels 7 Click Apply button to save the setting 8 Go to Schedule tab The setting steps for schedule for motion based alarm are similar to normal schedule setup see Chapter 5 4 1 for more details 5 5 3 Other Alarm This tab gives a choice to configure alarm for Disk Full IP Conflict the Disconnect event etc 1 Go to Main Menu Setup Alarm Other Alarm Refer to Fig 5 21 Fig 5 21 Other A...

Page 60: ...etwork Configuration Network If you have a DHCP server running and would like your NVR to automatically obtain an IP address and other network settings check the checkbox beside Obtain an IP address automatically Then the device will distribute IP address subnet mask and gateway IP and DNS server If you want to configure your own settings disable Obtain an IP address automatically item and input t...

Page 61: ...nd device ID in the server interface Then click Apply button to save the setting Now the ECMS NVMS system will automatically connect this device Fig 5 26 Network Configuration NAT 5 6 5 Other Settings If your NVR is set to use PPPoE as its default network connection you may set up DDNS to be used in connection The setting steps are as follows 1 Enable DDNS server 2 Select DDNS server 3 Enter user ...

Page 62: ... 3 Select www autoddns com in DDNS Type column as shown above 4 Enter the host name at random like 123 5 Click Register to register the domain name When the successful prompt pops up it means you successfully register your domain name 3 After you successfully request your domain name you will see your domain in the list 2 Create domain name If your IP address is not WAN IP address you should forwa...

Page 63: ... OK to save the setting Fig 5 30 Add User Authority To delete user 1 Go to Main Menu Setup Users interface 2 Select the added user you want to delete and then click Delete button To modify user 1 Go to Main Menu Setup Users interface 2 Select the added user you want to modify and then click Modify button to do the relevant operation To change user password 1 Go to Main Menu Setup Users interface 2...

Page 64: ...search file management and image 6 1 Time Search 1 Go to Main Menu Search Time Search Refer to Fig 6 1 Fig 6 1 Search Configuration Time Search 1 Select date and channels on the right hand side and press the Search button A date with highlighted borderline indicates presence of data 2 Set the start time by clicking a particular grid or by entering the specific value in the start time field 3 Selec...

Page 65: ...at file will not be deleted or covered Unlock Select a locked file and click Lock button to unlock this file Delete Select an unlocked file and click Delete button to delete this file 6 4 Search by Image 1 Go to Main Menu Search Image tab 2 Select data and channels on the right hand side 3 Press Search button to search for a recorded image 4 Once an alarm image has been identified the user can dou...

Page 66: ...ormation includes seven submenus system event log network online users record and QRCODE 7 1 1 System Information In this interface user can check the hardware version MCU version kernel version device ID etc 7 1 2 Event Information In this tab you can search for events like motion sensor and video loss The utility provides an interface to have a date based and a channel based search This report c...

Page 67: ...isk will be lost once it is formatted 2 Advanced You may check model S N firmware health status of the disk in this interface You also can monitor the temperature internal circuit dielectric material of the disk analysis the potential problems of the disk and warn so as to protect its data 7 4 Upgrade The NVR can be upgraded by using USB flash drive Get the upgrading software from your vendor when...

Page 68: ...t is not 80 add the port number after IP address or domain name 4 IE will download ActiveX automatically Then a window pops up and asks for user name and password Input name and password correctly and enter to view Note If you cannot download and install ActiveX please refer to FAQ Q8 8 Remote Surveillance 8 1 IE Remote Surveillance by NAT 8 1 1 NAT Settings 1 The NVR shall be powered on and conne...

Page 69: ...etting steps are as the same as Step 3 and Step 4 in Point 1 8 3 Remote Surveillance through Apple PC Note Because the current plug in version of client end just only supports 32 bit mode so the safari browser shall start 32 bit mode If the browser is the earlier MACOS version the default setting is 32 bit mode and the setting can be skipped The Setting steps are as follows First Right click safar...

Page 70: ... desktop and select Quit button to quit the browser Then restart Safari browser Input the IP address and HTTP port to enter the login interface of NVR 8 3 2 Via WAN There are also two ways for NVR to connect to Internet 1 Connect the NVR to internet through router or virtual server 1 The network setups are the same as step one to step four of point 1 on WAN of IE remote surveillance 2 Enter WAN IP...

Page 71: ...e speed dome is supported by the device and set the relative para meters manually User can control the dome up down right left or stop rotating on Control Center adjust rotation speed Iris and zoom focus on the dome and set the presets etc Buttons definition Drag the scroll bar to adjust rotating speed of the dome Iris button Click button near Iris button to increase light of the dome Click button...

Page 72: ...annel which needs to be zoomed Right click to select zoom in button to zoom in the image Double click or right click to exit 8 5 Remote Playback Backup 8 5 1 Remote Playback Click button to go to record playback interface Refer to Fig 8 3 Select the record date and channels and double click the file name in the record file list box Then user can play that file and preview the picture Fig 8 3 Recor...

Page 73: ... 1 Go to Search File management Refer to Fig 8 7 2 Select highlighted date and channels 3 Click Search button to search the recorded files Fig 8 7 File Management Interface Lock Select certain file item in the file list box and then click Lock button to lock this file that ca not be deleted or overlaid Unlock Select a locked file and then click Unlock button to unlock this file Delete Select an un...

Page 74: ... The backup files will be saved on user s PC Fig 8 9 Remote System Configuration The sub menu list and the options in every menu are similar to that of the NVR Please refer to Main Menu Setup Guide for more details 8 7 Tools Click on tool s tab to access the disk management tool You can view the status of the HDD change view the read write properties and can also format the HDD remotely 8 8 Remote...

Page 75: ... wiring issue Please check the cable and the ports of the cameras b The problem can also be related to cameras Please check the same c Please make sure that you have added and enabled the cameras Q5 Why can t I find the HDD a The power from the adapter may be not enough for operating the NVR Please use the power adaptor supplied along with the NVR b It could be a wiring issue Please check the powe...

Page 76: ...inimum configuration required for remote monitoring Q13 How to handle the situation that the codec Control is blocked when downloading in the VISTA or Win7 system This problem can be fixed in two ways a Enter Control Panel User Account and Family Safety User Account Control refer to Fig 13 1 click Turn User Account on or off Cancel Use User Account Control UAC to help protect your computer b Right...

Page 77: ...n to1080P frame rate to 15fps bitrate to 4M and enables total 4 channels He wants the unit to record continuously in a month Below is the calculation Total Recoding capacity 900 mb h 24 hours day 30 days 4 channels 2592000 MB 2531 25 GB Therefore customers just install two SATA HDDs with 1 5TB for one month recording Appendix C Compatible Devices 1 Compatible USB drive after test Resolution Frame ...

Page 78: ... MP 2048x1536 1080P 1920x1080 960P 1280x960 720P 704x576 Frame rate fps 200 fps PAL 240 fps NTSC Bit Rate 256Kbs 12Mbps Encode CBR Quality 6 level Mode Manual Timer Motion Sensor File manage Lock unlock reserving time Play Playback 4CH Search Time Calendar search event motion sensor Function Play Pause FF FB Digital zoom Alarm Mode Sensor Motion Video Loss Input No Output No Triggering Record PTZ ...

Page 79: ...ck 4CH Search Time Calendar search event motion sensor Function Play Pause FF FB Digital zoom Alarm Mode Sensor Motion Video Loss Input 8CH Output 1CH Triggering Record PTZ move Relay out e mail etc Network Interface RJ45 x 1 10M 100M 1000M PoE RJ45 x 8 Protocol TCP IP UDP DHCP DNS PPPOE DDNS Others 20 users online dual stream Cell phone OS iPhone Blackberry Android Windows phone Function Multi ch...

Page 80: ...Vimar SpA Viale Vicenza 14 36063 Marostica VI Italy Tel 39 0424 488 600 Fax Italia 0424 488 188 Fax Export 0424 488 709 www vimar com 49400746A0 00 14 12 VIMAR Marostica Italy ...

Reviews: