


17
User Manual
MN032EN
Effective October 2017
215U-2 802.11
wireless I/O and gateway
EATON
www.eaton.com
Comm Fail Registere:
You can choose a separate register in the
local register map to indicate that the remote device has failed to
respond inside the configured response timeout. If this register is a
bit register, it will be set ON if the transaction fails, and OFF if the
transaction is successful. If this register is a word register, it will
receive an extended code indicating the reason for the failure. It will
be set to zero on successful transaction. Refer to section “Modbus
Error Codes” on
page 51
.
Dashboard
The 215U-2 provides a dashboard feature that allows you configure
the device so that users can view the status of the device’s local
I/O and registers. Any authorized user can access the device’s
dashboard remotely using a standard web browser. You configure
which registers will be displayed on the dashboard, and how they
will be displayed. The dashboard provides a live status of I/O, with
regular automatic refresh.
Figure 25. Modbus client mappings
To access the dashboard, use a web-browser to browse to the
device’s IP address. You can view the dashboard from the "Unit
Information" section of the menu. You can also configure the
dashboard to automatically display. The dashboard display updates
automatically.
otee:
N
Note: Before you can access the Dashboard remotely, you need to
enable Remote Configuration Access on the Quick Start Page.
To Configure the dashboard display, select the “Dashboard”
item from the right side menu under “Configuration”. (Click “Full
Configuration” under Advanced if needed).
Save Changese:
Clicking this button saves changes to non-volatile
storage. It also applies most of the changes you have made to the
dashboard configuration. If you plan to make changes to multiple
pages, use this button before navigating to another page.
otee:
N
You can quickly edit the dashboard settings and use the “Save
Changes” button to check the result without needing to wait for the device
to restart. Changes to the Display Color and changes to the Home Page links
don’t take effect until you click “Save Changes and Reset” below.
Save Change and Resete:
Clicking this button immediately applies
the changes on you have made by saving the new configuration to
non-volatile storage, then forcing the device to reset immediately.
Once the device has booted, the new changes will be in effect.
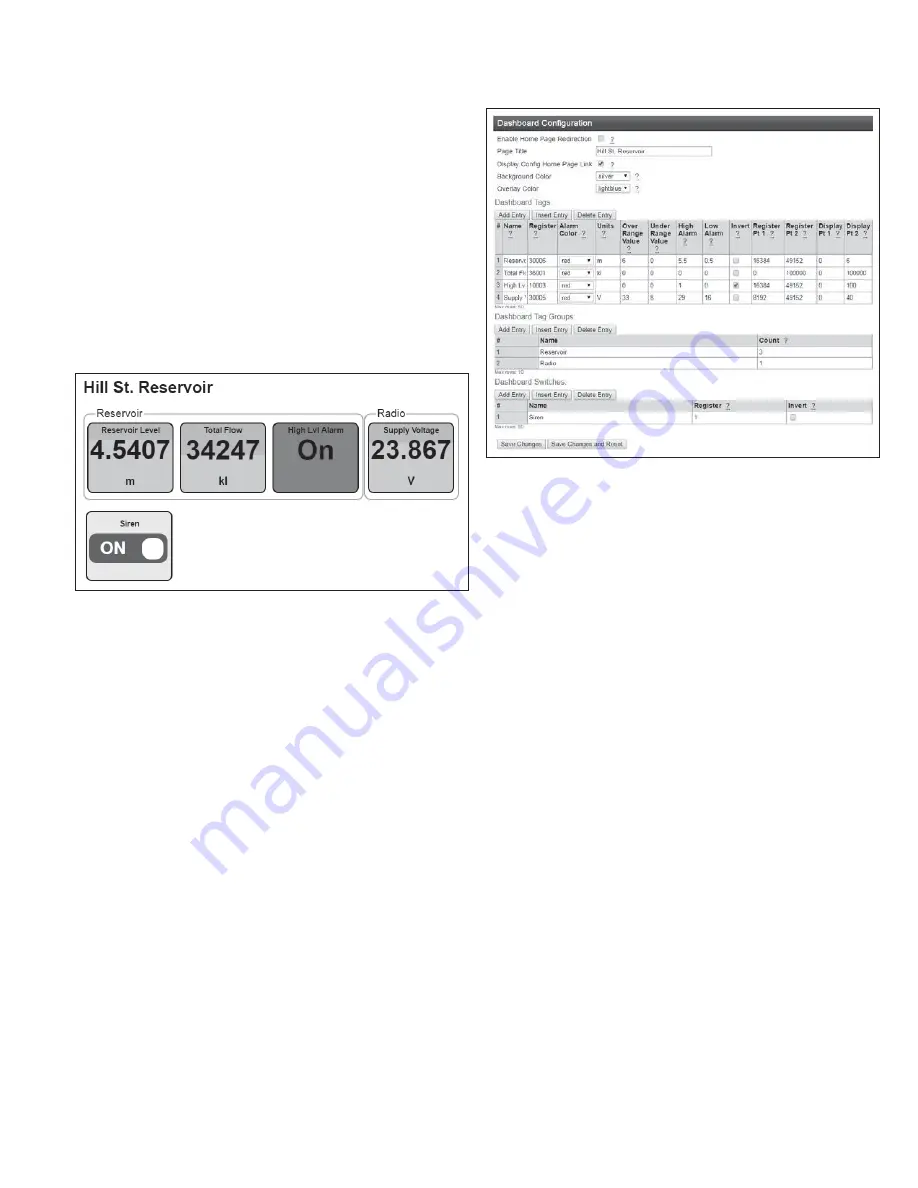
Figure 26. Dashboard configuration
Enable Home Page Redirectione:
Check this box if you want the
dashboard to display as soon as the user accesses the device
webpage. This simplifies access to the dashboard for users that are
unfamiliar with the product. If you don’t check this box, then you can
still access the dashboard from the device menu. See "Enable Home
Page Redirection".
Page Titlee:
This is the title for the dashboard page. Choose
something descriptive that identifies the site clearly.
Display Config Home Page Linke:
If this is selected ,the dashboard
view provides a link labelled “Configuration”. This provides a link to
the device’s regular home page. If you don’t want your users to have
easy access to the device’s home page, then un-check this button.
otee:
N
You can still access the home page by typing in full address to your
browser bar: http://<Device_IPAddress>/operator/main.asp.
Background Colore:
select a background color for your display
panels.
Overlay Colore:
Select a color for the overlay on your display panels
(This shows the bar-graph level for analog values)
Dashboard Tagse:
This section adds the panels to the dashboard that
display the I/O status. Each row of the table describes one panel.
Use the “Add Entry”, “Insert Entry” and “Delete Entry” buttons to
build your list of items to display on the dashboard. For each item,
enter the configuration parameters.
Name
The name you want to display on the individual
panel
Register
The I/O Register that you want to have the value
displayed
Alarm Color
The color you want the panel to change to when
it is in the Alarm state
Over/Under
Range Value
These settings are used for analog values. The
analog bar displays between these two vales.
When the scaled value goes over or under the
corresponding limit, the panel shows “OVR”
or “UND” rather than the measured value. To
disable this feature, set these values to outside
the expected range of values for the register.


