background image

10

elna 9900

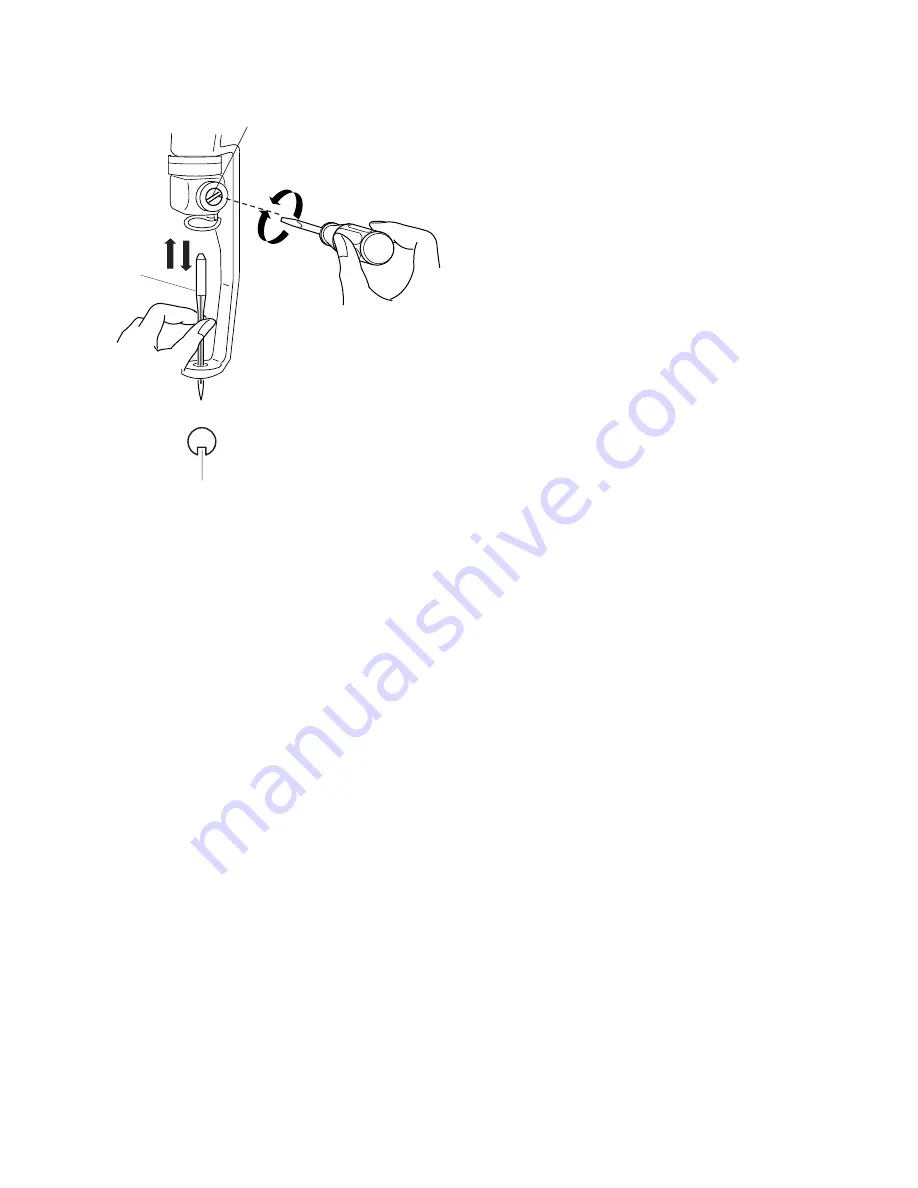
Replacing the Needle

To remove:

1. Loosen the needle clamp screw.
2. Remove the needle.

To attach:

3. Insert the needle into the needle clamp with the

long groove facing you. Push the needle up as
far as it will go.

4. Tighten the needle clamp screw.

Needle clamp screw

Needle

Long groove

Summary of Contents for 9900 - LEAFLET

Page 1: ...SERVICE MANUAL 9900 ...

Page 2: ...ing the Thread Paths 2 9 Replacing the Needle 10 Needle and Thread Reference Table 11 Checking the Lowest Position of the Needle 12 Replacing the Needle Bar Rest 13 Replacing the Take up Lever Cam Roller 14 Adjusting the Take up Lever Timing 15 Replacing and Adjusting the Presser Foot 1 16 Replacing and Adjusting the Presser Foot 2 17 Replacing the Thread Catcher Unit 18 Replacing the Thread Catch...

Page 3: ...the Rotation Stopper Plate 27 Replacing the Thread Take up Lever 28 Adjusting the Check Spring Tension 29 Adjusting the Check Spring Stroke 30 Adjusting the Thread Catcher Holder 31 Replacing the Thread Catcher Loop Tape 32 Replacing the Lateral Moving Unit 33 Adjust the Hook Timing 34 Adjusting the Position of the Hook Stopper 35 Replacing the Thread Cutter Driving Roller 36 Replacing the Dynamic...

Page 4: ...carriage Belt Tension 45 Replacing the Y carrige Belt 46 Adjusting the Timing Belt Tnsion 47 Replacing the Timing Belt 48 Adjusting the Motor Belt Tension 49 Replacing the Motor Belt 50 Replacing the DC Motor 51 Adjusting the Needle Upper Shaft Timing 52 Adjusting the Moving Head Stop Position 53 Adjusting the Needlr Stop Position 54 Adjusting the Carriage Home Position 1 55 Adjusting the Carriage...

Page 5: ...cover To remove 1 Remove the 3 setscrews and spool stand To attach 2 Attach the spool stand and tighten the 3 setscrws Setscrews Replacing the Spool Stand To remove 1 Remove the 2 setscrews and tension unit cover To attach 2 Attach the tension unit cover and tighten the 2 setscrws ...

Page 6: ...tor and K board connector To attach 4 Connect the LED lamp connector and K board connector 5 Attach the static head cover right with the 2 setscrews A while pulling the cover to the back of the machine Attach the 2 caps 6 Attach the RCS mounting arm knob Replacing the Static Head Cover Right RCS mounting arm knob Caps Setscrews A Hooks LED lamp connector K board connector ...

Page 7: ...the right cover while pulling the right bottom part toward you and lift To attach 3 Attach the right cover with 3 setscrews A and 3 caps 4 Attach the static head cover right Do not get cords caught when attaching the static head cover right Left Cover To remove 1 Remove 4 caps and 4 setscrews B Remove the left cover Disconnect the connectors To attach 2 Connect the connectors Attach the left cover...

Page 8: ...he back of the machine with a crosstie To attach 3 Attach the machine into the base cover 4 Tighten the 6 setscrews A securely Replacing the Base Cover and Bed Cover Bed Cover To remove 1 Remove the setscrews A Remove the bed cover To attach 2 Attach the bed cover with the setscrews A Setscrews A Setscrews A Base cover Bed cover ...

Page 9: ...rs or scratches 3 Thread take up lever a There should be no burrs or scratches 4 Lower guide plate a There should be no burrs or scratches 5 Needle a The needle should not be bent or blunt To check the needle Place and slide the tip of the needle on your nail to check if there is any nick or chip Replace the needle if it marks a scratch on your nail Place the needle onto something flat needle plat...

Page 10: ...oot 8 Hook race a There should be no burrs or scratches b The tip of hook race should not be blunt c There should be no detectable play in the hook and hook race 9 Thread keeper a There should be no burrs or scratches especially on the tip of the thread keeper 10 Check spring a The check spring should not be worn Checking the Thread Paths 2 Upper side Lower side Hook Thread keeper Presser foot Che...

Page 11: ...1 Loosen the needle clamp screw 2 Remove the needle To attach 3 Insert the needle into the needle clamp with the long groove facing you Push the needle up as far as it will go 4 Tighten the needle clamp screw Needle clamp screw Needle Long groove ...

Page 12: ...ppropriate size of needle for threads and fabrics to be sewn An inappropriate size of needle may cause skip stitches thread breakage or thread looping Please refer to the table below and select the suitable needle size 75 8 10 120 9 11 200 11 14 Thread Size Denier Polyester Needle Size ...

Page 13: ...wheel clockwise until the indicator reads 0 2 mm and read the angle Aº of the index disk Turn the handwheel counterclockwise until the indicator reads 0 2 mm and read the angle Bº of the index disk Calculate the mean angle Cº C A B 360 2 Turn the handwheel clockwise to set the index disk at Cº Loosen the 2 setscrews and set the pointer at 0º L Tighten the 2 setscrews securely Check the following i...

Page 14: ...3 Loosen the setscrew B Pull the needle bar main shaft up and remove it from the machine 4 Loosen the setscrew C and remove the needle bar rest from the needle bar main shaft To attach 5 Reverse the procedure above Attach the needle bar main shaft so its bottom end is level with the bottom surface of the head frame 6 Adjust the needle height after the replacement Setscrews A Connector Needle bar m...

Page 15: ...ake up lever unit and washer 5 Loosen the setscrew Remove the cam roller shaft and cam roller To attach 6 Reverse the procedure above When attaching the thread take up lever shaft tighten the screw while pressing the thread take up lever shaft lightly Drive cover Setscrews Connector Thread take up lever spring Setscrew Thread take up lever shaft Thread take up lever unit Cam roller Cam roller shaf...

Page 16: ...ncorrect loosen the setscrew on the cam clamp and turn the take up lever cam so the positioning pin can go into the pin grove on the cam Turn the handwheel to set the index disk at 6º Tighten the setscrew on the cam clamp while pressing the take up lever cam to the side of the moving head There should be no gap between the take up lever cam and cam clamp 5 Pull the positioning pin out from the arm...

Page 17: ...ons NOTE The presser foot will spring down when the needle clamp is removed 3 Remove the setscrew and replace the presser foot 4 Attach the needle needle clamp and needle clamp cushions Tighten the needle clamp screw and setscrew 5 Adjust the needle height see To Adjust the Needle Height 6 Push the needle bar down to engage the needle bar clutch Needle clamp cushion Needle clamp screw Setscrew Pre...

Page 18: ... Foot 2 7 Turn the handwheel to set the index disk at 0º L 8 Insert the 1 2 mm thick gauge between the needle plate and the presser foot 9 Tighten the setscrew 10 Turn the handwheel to reset the index disk at 270º 11 Attach the removed parts Setscrew ...

Page 19: ...ral moving unit 2 Disconnect the thread catcher connector Remove the 3 setscrews A the thread catcher To attach 3 Connect the thread catcher connector Tighten the setscrews A while pressing the thread catcher unit in the direction of arrows as illustrated 4 Adjust the thread catcher see page 31 5 Attach removed parts Setscrews A Connector ...

Page 20: ...hread catcher guide 3 Remove the thread catcher hook screw Remove the thread catcher hook To attach 4 Attach the thread catcher hook with the thread catcher hook screw 5 Attach the thread catcher guide with the 6 setscrews 6 Attach the thread catcher unit see page 18 Setscrews Thread catcher hook screw Thread catcher hook Thread catcher guide ...

Page 21: ...solenoid 3 The slope cam should slide on the slope cam guide smoothly Clean the solenoid if there is any lint or dust on it 4 Attach the jump solenoid to the machine Tightnen the setscrews Setscrews should be positioned at center of holes 5 Attach the static head cover right Setscrews Connector Slope cam Slope cam guide Solenoid bracket ...

Page 22: ...n the direction of the arrows If there is a detectable play loosen the setscrew and tighten it while pressing the adjusting roller against the needle drop adjust ing rail 3 Adjust the needle drop position see page 24 4 Attach the static head cover right Needle drop adjusting rail Adjusting roller Setscrew ...

Page 23: ...e either the left or right side of stopper screw on the rail shaft 4 Turn the idler gear to move the moving head to the end of the rail shaft with the stopper screw removed Support the moving head securely while remov ing the moving head so as not to fall To attach 5 Attach the moving head Tighten the stopper screw Setscrew Connector Connector Connector Idler gear Stopper screw Rail shaft Cord cla...

Page 24: ...eedle hole 9 Check the needle drop position The needle drop position should be the center of the needle hole If the needle drop position is off position to the front or rear adjust the needle drop position see the next page If the needle drop position is off position in the lateral direction adjust the position of the lateral moving head se page 33 10 Turn the handwheel to set the index disk at 27...

Page 25: ...h the needle bar No 3 down to engage the needle bar clutch 2 Turn the handwheel until the needle goes down into the needle hole Loosen the 2 setscrews Adjust the needle drop position adjusting plate Center the needle drop position in the needle hole 3 Adjust the hook timing see page 34 Setscrews Needle drop position adjusting plate Needle Needle hole ...

Page 26: ...5 Loosen the setscrew 6 Insert the needle bar height gauge into the hook 7 Adjust the needle bar height so the tip of needle slightly touches the gauge 8 Adjust the direction of needle clamp as illustrated below the needle clamp screw is at 5 o clock Tighten the setscrew 9 Remove the needle bar height gauge 10 Turn the handwheel to set the index disk at 270º 11 Attach the removed parts Setscrew Ne...

Page 27: ...e bar as far as the desired part can be removed 4 Insert the needle bar down into the frame and put the parts on the needle bar as it goes 5 Attach the presser foot 6 Adjust the needle height see page 25 7 Adjust the presser bar height see pages 16 and 17 Needle bar Needle bar spring Needle bar holder Spring base Presser foot spring lower Presser foot block Stop felt Presser foot holder Presser fo...

Page 28: ...e pages 22 and 23 2 Remove the 6 setscrews and rotation stopper plate To attach 3 Attach the rotation stopper plate with the 6 setscrews The setscrews should be positioned at the center of each holes when tightening each setscrews 4 Attach the moving head Setscrews Rotation stopper plate ...

Page 29: ...ut in the direction of the arrow Remove the thread take up lever to replace 5 Replace the thread take up lever 6 Attach the E ring 7 Insert a 0 2 mm thick gauge between the moving head case and thread take up lever Tighten the setscrew while pressing the thread take up lever shaft in the direction of the arrow 8 Attach the moving head Setscrew E ring Moving head case Thread take up lever 0 2 mm th...

Page 30: ...s A and lower thread guide plate 2 Loosen the 2 setscrew B 2 setscrews C and thread catcher panel 3 Hook the tail of the check spring into the one of three slits Use a narrow screwdriver to hook the check spring Top slit Higher tension Center slit Standard tension Bottom slit Lower tension 4 Attach the thread catcher panel and lower thread guide plate Setscrew B Setscrew C Setscrew A Lower thread ...

Page 31: ...r you need to adjust the stroke of the check spring when it is replaced 1 Loosen the setscrew Move the adjuster up or down so the distance between the top of the check spring and the bottom side of the thread guide pin is 7 mm For a longer stroke move the adjuster down For a shorter stroke move the adjuster up Adjustor Setscrew ...

Page 32: ...ad catcher touches the upper surface of the lower thread catcher holder NOTE If an adjustment allowance of the thread catcher holder is not enough loosen the 3 setscrews B and move the thread catcher unit 5 Check if the thread catcher moves smoothly by moving the rod shaft with your hand Tighten the 4 setscrews A 6 Press the thread cutter button to test thread cutting and catching 7 Attach the par...

Page 33: ...rews B and remove the 2 spacers S and lower thread catcher holder 5 Peel the loop tape off Stick a new loop tape on the bottom side of the thread catcher holder aligning with the front edge of the holder Leave a 2 mm space from the threaded hole at each side 6 Attach the 2 spacers S and lower thread catcher holder with the 2 setscrews B 7 Attach the parts removed in steps 1 and 2 Setscrews A Space...

Page 34: ...rews B and remove the lateral moving unit To attach 6 Attach the lateral moving unit and loosely fix it with the 2 setscrews B 7 Push the needle bar down and rotate the handwheel to set the index disk at L 8 Adjust the position of the lateral moving unit so the needle enters into the center of the hole in the needle plate Tighten the 2 set screws B securely 9 Connect the connectors and attach the ...

Page 35: ... handwheel to set the index disk at 21º NOTE To prevent the needle from hitting the hook body hold the hook with the hook point up while turning the handwheel 5 Turn the hook to align the hook point with the right side of the needle use DBxK5Q1NY needle NOTE Maintain a clearance between the needle and hook point within 0 05 0 20 mm 6 Tighten the three setscrews securely 7 Check the position of the...

Page 36: ... the hexagonal socket screw 2 mm to move the hook stopper 2 Move the hook stopper to align the center with the needle and make a 0 65 0 95 mm clearance between the hook and hook stopper Tighten the setscrew securely Setscrew Align the center with the needle Center of the needle ...

Page 37: ...ve the roller shaft Replace the thread cutter driving roller 4 Insert the 0 05 mm thick gauge between the lever unit and thread cutter driving roller Tighten the setscrew securely 5 Attach the lever unit to the frame and insert the pivot pin Tighten the setscrew securely 6 Adjust the position of the dynamic cutter blade see page 37 7 Attach the parts remove in step 1 Pivot pin Setscrew Setscrew Le...

Page 38: ... open the Cut Motor adjusting window Press Divide key to move the dynamic cutter blade forward 3 Loosen the 2 setscrews and remove the drive shaft ring 4 Remove the cutter drive shaft unit from the frame Remove the two setscrews and replace the dynamic cutter blade 5 Insert the drive shaft into the frame and link pin of the cutter drive shaft unit into the hole in the lever unit 6 Attach the drive...

Page 39: ...c cutter blade 4 Attach the static cutter blade and tighten the set screws while pressing the static cutter blade in the direction of the arrow NOTE If the dynamic cutter blade interferes with the left corner of the static cutter blade when moving the dynamic cutter blade shift the static cutter blade to the right 5 Adjust the cutter blades position see following pages 39 and 40 and test auto thre...

Page 40: ...de should extends 0 3 to 0 5 mm from the edge of the static cutter blade If there is a gap between the edge of the static cutter blade and the dynamic cutter blade adjust the height of the static cutter blade Loosen slightly the two setscrews and nut on the adjusting screw Screw in the adjusting screw until the edge of the static cutter blade evenly touches the upper surface of the dynamic cutter ...

Page 41: ...lade to the home position 4 Loosen the two setscrews and move the thread cutter drive unit in the direction of the arrow to adjust the position of the dynamic cutter blade so the front tip of the dynamic cutter blade is in line with the center of the needle drop position 5 Test auto thread cutting with polyester threads size 120 both in the needle and bobbin 6 Attach the needle plate 7 Attach the ...

Page 42: ...clamp the bobbin thread 3 Loosen the nut and turn the adjusting screw to adjust the clamping pressure 4 Pull the bobbin thread with a tension gauge and read the tension when the bobbin thread is coming out The tension should be 20 25 grams Check the tension several times 5 Tighten the nut while holding the adjusting screw in place 6 Attach the needle plate Setscrews Nut Adjusting screw Bobbin thre...

Page 43: ...acer on the bobbin Tighten the 2 setscrews A securely NOTE The clearance between the bobbin and the tips of the thread keeper should be 1 4 1 8 mm 4 Loosen the setscrew B and move and press the stopper against the thread keeper rod Remove the 2 mm thick gauge and push the thread keeper toward the bobbin to check if the tips of the thread keeper touches the 1 6 mm thick spacer on the bobbin 5 Tight...

Page 44: ...600 grams when the upper portion touches the lower portion 4 If the belt tension is too tight or loose slightly loosen the 2 setscrews B and move the X belt pulley in the direction of the arrow to adjust the belt tension Tighten the 2 setscrews B securely and check the tension again NOTE When moving the X belt pulley insert a 4 mm rod into the side hole and pry the base plate of the pulley 5 Attac...

Page 45: ...the 2 setscrews B and shift the X belt pulley to the left 5 Remove the E ring and pull the X belt pulley shaft to remove the X belt pulley 6 Remove the setscrew D and drive pulley shaft unit 7 Replace the X carriage belt 8 Attach the parts removed in steps 3 6 9 Adjust the X carriage belt tension see the previous page 10 Attach the parts removed in steps 1 2 Setscrews A X belt holder Setscrews C X...

Page 46: ...frame and push the Y carriage timing belt The gauge should read 280 grams when the upper portion touches the lower portion 4 If the belt tension is too tight or loose slightly loosen the 2 setscrews A and move the Y belt pulley in the direction of the arrow to adjust the belt tension Tighten the tow setscrews A securely and check the tension again 5 Attach the parts removed in step 1 Push pull gau...

Page 47: ...2 setscrews A and shift the Y belt pulley in the direction of the arrow 4 Remove the E ring and pull the Y belt pulley shaft to remove the Y belt pulley 5 Replace the Y carriage belt 6 Attach the parts removed in steps 2 5 7 Adjust the Y carriage belt tension see the previous page 8 Attach the parts removed in step 1 Setscrews B Y belt holder Setscrews A E ring Y belt pulley shaft Y belt pulley ...

Page 48: ...g belt The gauge should read 300 grams when the belt deflect 5 mm 3 If the belt tension is too tight or loose remove the 3 setscrews A and CPU board then slightly loosen the 2 setscrews B and move the idler in the direction of the arrow to adjust the belt tension Tighten the 2 setscrews B securely and check the tension again 4 Attach the parts removed in step 1 Push pull gauge Timing belt CPU boar...

Page 49: ...e motor belt see page 50 5 Loosen the 2 setscrews C and remove the idler 6 Replace the timing belt 7 Attach the parts removed in steps and 5 8 Adjust the timing belt tension see the previous page 9 Check the following items and adjust them if necessary Needle bar lowest position Hook timing Thread cutter timing 10 Attach the parts removed in steps 1 3 Setscrews A Pointer CPU board Setscrews B Timi...

Page 50: ...ith the scale as illustrated and push the timing belt The gauge should read 300 grams when the belt deflect 3 mm 3 If the belt tension is too tight or loose slightly loosen 3 setscrews and move the motor in the direction of the arrow to adjust the belt tension Tighten the 3 setscrews securely and check the tension again 4 Attach the parts removed in step 1 Motor belt Push pull gauge Motor Setscrew...

Page 51: ...d left cover see pages 4 6 2 Remove the 2 setscrews A and the pointer 3 Remove the three setscrews B and DC motor 4 Replace the motor belt Attach the motor and motor belt 5 Adjust the motor belt tension see the previous page 9 Attach the parts removed in step 1 Setscrews A Pointer DC motor Setscrews B ...

Page 52: ...left cover see pages 4 6 2 Disconnect the motor connector Remove the 3 setscrews A and DC motor 3 Attach the DC motor and tighten the 3 setscrews A slightly Connect the motor connector 4 Adjust the motor belt tension see page 49 5 Attach the parts removed in step 1 DC motor Setscrews A Motor connector ...

Page 53: ...ion shield plate and turn it clockwise until the indication changes from L to H Tighten the set screw 4 Turn the handwheel clockwise The indication next to Needle Change should change from L to H when the index disk is set at 270º To adjust the needle change position timing loosen the setscrew on the C point needle change shield plate and turn it clockwise until the indication changes from L to H ...

Page 54: ...NCHM No Sen should be H To adjust the stop position loosen the setscrew and turn the stop positioning shield plate Tighten the setscrew NOTE The shield plate should not interfere with the sensor 4 Press Init key to move the head to the stop position and check if L is indicated 5 Attach the parts removed in step 1 Lateral movement idler gear Stop position shield plate Phase reference of the lateral...

Page 55: ...5 Move the needle stop sensor to the right until the indication next to NCHM Init Sen turns H 6 Move the needle stop sensor slowly to the left until the indication next to NCHM Init Sen turns L Tighten the setscrews NOTE The sensor should not interfere with the home position dog 7 Attach the parts removed in step 1 Adjusting the Needle Stop Position Lateral movement idler gear Home position dog Se...

Page 56: ...wly to the left until the indication under X changes from H to L Tighten the two setscrews B NOTE The sensors should not interfere with the carriage 7 Press Init key to initiallize the carriage position Check if the needle drop position is the center of the hole 8 Press the jog key Position the hole C 1 to the needle drop position X 0 Y 200 Check if the needle drop position is the center of the ho...

Page 57: ...en the hexagonal socket screws B 3 Move the carriage to the right with your hand Loosen the hexagonal socket C 4 Adjust the position by moving the connecting plate to the direction of arrow 5 Tighten the hexagonal socket screw C 6 Tighten hexagonal socket screws B Confirm the adjustment of carriage position sensor 1 Carriag sensor plate Hexagonal socket screws B Setscrews A Connecting plate Hexago...

Reviews: