17
16
ELITE VO2 EXERCYCLE ASSEMBLY MANUAL
Key Functions:
There are 3 button keys and the function description as follows:
1) SCAN Key: During the STOP Mode, press the key to increase the value of Time,
Distance and Calories.
2) REST Key: During the STOP Mode, press the key to clear the exercising value or setting
value
to zero.
3) MODE Key:
a: Press the key to accept these setting values of Time, Distance and Calories.
b: During the STOP Mode, by hold this key for more than 2 seconds then the computer will
re-power on.
c: During the exercise mode, press the key to check the function from SCAN- TIME-
SPEED- DISTANCE- CALORIES- RPM- PULSE for a circle.
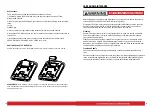
HOW TO REPLACE THE BATTERIES
Remove the battery cover from the bottom housing then replace the batteries as shown below.
PLEASE NOTE:
If the machine is put in storage or not intended to be used for any period longer
than 4 weeks, please remove the batteries from the console to avoid any corroding and potential
damage to the console.
Before cleaning or carrying out any maintenance on your exercycle, ensure the power is
turned off and the power cord removed from the plug socket.
Prolong the life of your exercycle by performing periodic maintenance checks. Not only
does this ensure your machine is in full working order to ensure they continue to run
smoothly and reliably, but it will save you service costs in the long run.
Cleaning
General cleaning of the unit after use will protect the bike’s powder-coated framework
and prevent unnecessary corrosion stains and damage to the structural components
from sweat and perspiration.
Please ensure all sweat residue is wiped from any contact points or framework with a
damp cloth using a suitable PH neutral detergent in water to avoid salt and corrosion
deposits on your equipment. Failure or neglect to maintain and clean sweat residue from
the bike frame may affect any frame warranty implied.
Frame and Pedals
Check all nuts and bolts securing the framework, seat and handlebar assemblies are
tight.
Ensure the pedals are securely attached to the crank arms. When tightening pay attention
to the reverse thread (tightening anti-clockwise) on the left hand pedal assembly, when
sitting on the bike. Be careful not to strip or force the pedal thread when tightening.
CARE AND MAINTENANCE
IMPORTANT INFORMATION


