background image

8

The anti-tip guard

The anti-tip guard must be fitted to 
prevent the cooker from tipping under 
abnormal loading. 

The anti-tip guard only functions 
when the cooker has been pushed 
into position.

THIS


HOW


TO


FIT


THE


ANTI

-

TIP


GUARD


ON


THE


COOKER

:

1

Before fitting the anti-tip guard, 
make sure that the cooker has been 
adjusted to the correct height and 
is standing level (see page 7).

2

The attachment (B) is fitted to the 
left side when delivered. Measure 
out where the anti-tip guard (A) is 
to be located, 60 mm (2.4") down 
from the edge of the ceramic glass 
plate and 50 mm (2.0") from the 
wall(cupboard). Screw it firmly 
into solid material or use suitable 
reinforcement. The entire anti-tip 
guard (A+B) can also be located 
on the right-hand side 

(

SEE

 F

IG

. 1)

.

Make sure that the surface 
behind the cooker is smooth. 
If there are tiles or a moulding 
behind the edge of the ceramic 
glass plate then there must be a 
space with the same dimension 
between the anti-tip guard and 
the wall. This is so that the anti-
tip guard is firmly attached to 
the cooker and functions 
correctly.

Check that the anti-tip guard 
projects at least 20 mm (0.8") 

into the hole in the back of the 
cooker (B) when the cooker is 
pushed in (

SEE

 F

IG

. 2

).

NOTE!

 If the space between the bench 

cupboards is greater than the width of the 
cooker, then you must adjust the side 
measurement if you want to centre the 
cooker.

2

1

Summary of Contents for EKC60154

Page 1: ...user manual Cooker EKC60154 ...

Page 2: ......

Page 3: ...the future Electrolux ambition is to offer a wide variety of quality products that would make your life even more comfortable You can look at some examples on the cover in this manual But now it s time to study this manual and start using and enjoying the benefits from your new machine We promise that it ll make your life a little easier Good luck ...

Page 4: ...2 Before using for the first time 13 Setting and changing the time 13 Burning off the oven 14 Removable baking plate rails 15 Using the ceramic glass plate 17 The heating zones 18 Using the oven 21 The oven functions 21 Additional functions 22 Practical use 26 Cleaning and care 30 Cleaning the cooker 30 Cleaning the ceramic glass plate 31 Cleaning the oven 33 Technical data 41 European Guarantee 4...

Page 5: ...corners with which you do not normally come into contact can be sharp Use gloves when moving the cooker THE ANTI TIP GUARD must be fitted so that you avoid the cooker tipping when subjected to abnormal loading NOTE Do not place the cooker on an extra plinth or other height increasing unit This means more risk that the cooker will tip over Children and the cooker Children are by nature inquisitive ...

Page 6: ...so a possible fire hazard While the oven is still hot you must use the scraper blade immediately to remove sugar and boiled over material with a high sugar content for example marmalade as well as melted plastic and foil to avoid damaging the ceramic glass plate Be careful the blade scraper is very sharp Maintenance service Turn all the knobs to zero before replacing a burned out oven light bulb B...

Page 7: ...bench height of 900 mm The cooker has a telescopic plinth You can change the height so that the cooker suits a bench height from 848 mm up to 933 mm Take care when positioning the cooker so that it does not block the ventilation outlets behind the cooker and above the hood The cooker must not be pushed in under a tiled edge or similar The cooker must have a bench area on both sides see Safety Make...

Page 8: ...w in the screws again A in one of the holes for a bench height of 850 to 920 mm 33 4 to 36 2 The distance between the holes varies from 7 to 14 mm 0 3 to 0 5 SEE ILLUSTRATION A 4 Lift the cooker upright and connect it up electrically Push the cooker back into position and make sure that it is absolutely level before fitting the safety equipment Adjusting the level The cooker must stand level for e...

Page 9: ...l cupboard Screw it firmly into solid material or use suitable reinforcement The entire anti tip guard A B can also be located on the right hand side SEE FIG 1 Make sure that the surface behind the cooker is smooth If there are tiles or a moulding behind the edge of the ceramic glass plate then there must be a space with the same dimension between the anti tip guard and the wall This is so that th...

Page 10: ...isfied for safety reasons The connected rating and voltage are shown on the data plate There is a wiring diagram on the back of the cooker Decor plinth optional accessory NOTE Take due care when fitting the base trim to the cooker Edges which you do not normally come into contact with can be sharp NOTE ONLY FITS COOKERS WITH A HEIGHT OF 900 MM 35 4 Remove the protective film before fitting the bas...

Page 11: ...The knob jumps out about 2 mm In this position neither the heating zones nor the oven work THIS IS HOW YOU USE THE COOKER Press in the knob towards the panel and turn it clockwise to the required position Cooling fan The cooker is fitted with an extractor fan The purpose of the fan is to keep the appliance cool The extractor fan starts when the oven is used When all the knobs are zeroed the fan st...

Page 12: ...ut can be disconnected as necessary OPEN THE DOOR Move the lock to the right when opening the door DISENGAGING THE LOCK Check that the oven is not hot Move the lock to the right lift it up and move it a little further to the right then lift the left hand edge of the button ENGAGING THE LOCK Move the lock to the right and downwards ...

Page 13: ...anel 3 Oven 4 Storage drawer 5 Plinth Oven 1 Top heat element 2 Heating element 3 Ovenlighting 40W 4 Meat probe socket 5 Fan cover 6 Oven lighting 25W 7 Fan 8 Bottom heat 9 Oven shelf runners removable 10 Shelf positions 1 2 3 4 5 1 3 4 5 6 7 10 9 8 2 ...

Page 14: ...e flashes automatically 1 To change a time that has already been set press the button and the button at the same time until the function indicator Time flashes 2 Using the or button set the current time After approx 5 seconds the flashing stops and the clock displays the time of day set The appliance is now ready to use The Time can only be changed if no Countdown is set 12 00 12 00 12 00 ...

Page 15: ...200o C 3 Leave the oven at this setting for about one hour 4 Move over to the grill function Turn the function knob to Grill 5 Leave the oven at this setting for about 30 minutes 6 Turn the function knob to 0 and turn off the temperature knob 7 Then leave the oven door open for about two hours and air out the kitchen 8 Clean the oven the door and the oven step units with hot water and washing up l...

Page 16: ...nsist of two rails that can be pulled out The shelves the roasting pan and the grid are laid on top of the rails A locating pin keeps the shelf in position see the illustration Using the removable rails facilitates cooking For example when steak or chips are to be basted the roasting pan is easily pulled out on the rails Fitting the rails First remove the oven step units that are fitted see page 3...

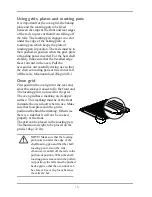
Page 17: ...n grid First position the oven grid at the rear end since this makes it easier to fix the front end The locating pin is not used for the grid The oven grid has a marking on its upper surface This marking must be at the front towards the oven door when in use Make sure that food placed on the grid is positioned behind the marking Otherwise there is a risk that it will not be cooked properly at the ...

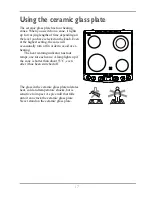
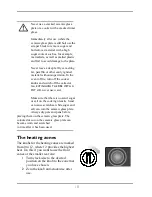
Page 18: ...the zone will occasionally turn off in order to avoid over heating The heat warning indicator has four lamps one for each zone A lamp lights up if the zone is hotter than about 55 C even after it has been switched off The glass in the ceramic glass plate tolerates heat cold and temperature shocks but is sensitive to impact A spice mill that falls onto it can crack the ceramic glass plate Never sta...

Page 19: ...he extractor fan EXTINGUISH THE FIRE WITH A POT LID never use water Make sure that there is no sand sugar or salt on the cooking utensils Sand can cause scratches while sugar and salt can ruin the ceramic glass plate Always dry pots and pans before placing them on the ceramic glass plate The coloured decor on the ceramic glass plate can become worn and scratched in time after it has been used The ...

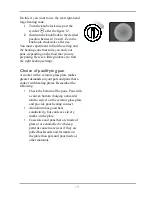
Page 20: ...d the right heating setting Choice of pan frying pan A cooker with a ceramic glass plate makes greater demands on your pots and pans that a cooker with heating plates Remember the following Check the bottom of the pans Pans with a convex bottom bulging outwards tend to swivel on the ceramic glass plate and provide poor heating contact Aluminium has good heat conductivity but can leave silvery mark...

Page 21: ...eel model with a sandwich bottom that is to say a bottom with layers of different metals Certain pans are concave when cold but become flat when they are heated up Save energy Use a lid and you halve the energy requirements compared with cooking without a lid Use pans with flat bottoms and save 25 energy compared with uneven bottoms Make sure that the ceramic glass plate is clean and dry Dirt and ...

Page 22: ...mperature has been reached it lights up and goes out when the thermostat switches on and off To select an oven function turn the function knob to the symbol for the desired function see below THE OVEN HAS THE FOLLOWING FUNCTIONS Hot air Annular heating element and fan Top and bottom heating Top heating element and bottom heating element Pie pizza function Bottom heating element annular heating ele...

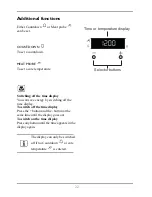
Page 23: ...e energy by switching off the time display To switch off the time display Press the button and the button at the same time until the display goes out To switch on the time display Press any button until the time appears in the display again The display can only be switched off if no Countdown or core temperature is entered 12 00 Time or temperature display Selector buttons ...

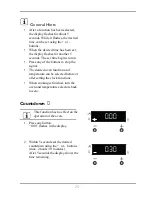
Page 24: ...the buttons to stop the signal The desired oven function and temperature can be selected before or after setting the clock functions When cooking is finished turn the oven and temperature selectors back to zero Countdown This function has no effect on the operation of the oven 1 Press any button 0 00 flashes in the display 2 Within 5 seconds set the desired countdown using the or buttons max 2 hou...

Page 25: ...se use only original replacement parts 1 Push the tip of the meat probe right into the meat so that the tip is in the centre of the meat 2 Insert the meat probe plug into the socket on the side wall of the oven as far as it will go 3 Using the or button set the desired core temperature The display changes to the current core temperature The core temperature is displayed from 30 C 4 Set oven functi...

Page 26: ...tion selector and temperature selector to the Off position Warning The meat probe is hot There is a risk of being burned when removing the plug and the tip of the meat probe 7 Remove the meat probe s plug from the socket and take the meat out of the oven CHANGING THE CORE TEMPERATURE If necessary change the temperature using or 65C ...

Page 27: ...st sponge cakes with a cooking needle about five minutes before the end of the cooking time Then you have the opportunity to shorten or lengthen the cooking time The result can be affected by the recipe and the material colour shape and size of the cake tin THE PRINCIPLE OF HOT AIR An annular heating element round the fan heats up then air which is then spread through the air channels in the oven ...

Page 28: ... Read Practical advice tips on page 44 for tips to solve your baking problems Cooking Follow the recommendations in the table Cooking with hot air HOT AIR is used for cooking at several levels at the same time for example meat loaf and meat balls as well as for the preparation of complete meals starters main courses and dessert Remember to choose courses that are to have the same temperature If th...

Page 29: ...k of burns from hot steam when the bag is opened Turbo Max Grill browning Using the hot air grill means that the food is ready faster and has more even colouring than when using the grill function the grill heating element provides more even colouring and the fan circulates the hot air Perfect for use with high courses for example grilling pork which is to have the same colour all round Pie pizza ...

Page 30: ...foil under the grill to catch the fat etc that drips off Pork chops steaks fish fillets etc should be placed high up in the oven while thick spare ribs etc should be placed in the lower part of the oven Set the function knob at and the thermostat knob at the desired temperature max 250ºC Start grilling after 3 5 minutes pre heating Watch carefully and turn over at least once during cooking Grillin...

Page 31: ...AGENTSL Remember that the anti tip guard does not function when you have pulled out the cooker in order to clean behind it Knobs and handles Never put a hot rosing pan bakingtray pan to close to the knobs because they can be damaged by the heat Never use scouring agents or other abrasive agents such as sponges with an abrasive surface Only use soft sponges or cloths Never try to remove a knob from...

Page 32: ...rface Cleaning the ceramic glass plate Immediately after use while the plate is still hot use the blade scraper to remove sugar or boil over with a high sugar content such as marmalade as well as melted plastic and foil to avoid damage to the plate WHAT TO DO IF THE PLATE IS VERY DIRTY 1 Remove stains with the blade scraper see below 2 Use cleaning agents when the heat warning indicator has gone o...

Page 33: ...e is clean and whole otherwise it could damage the plate You can buy new blades at a hardware store 3 hold the scraper at an angle of about 45 and scrape clean You can press the blade hard against the plate without damaging it 4 Carefully wipe off any dirt from the blade with kitchen tissue 5 After use press the guard forward so that it covers the blade Store the scraper out of the reach of childr...

Page 34: ...rial with a spatula or something similar CATALYSIS ENAMEL The oven gets hot when in use keep an eye on children Dirt on the enamel is burned off to some extent when the oven is used If the enamel becomes patchy you can burn off the oven at its highest temperature with top and bottom heating for 30 60 minutes Remove stubborn stains like this 1 Drench the catalysis enamel with soft soap and hot wate...

Page 35: ...tom heating for about 10 minutes 4 When the oven has cooled down rinse it with clean water or if necessary rub carefully with a soap pad Wipe dry The oven door The oven door on your product can be removed for cleaning WHEN THE OVEN DOOR OPENS THE LAMPS LIGHT AND THE HOT AIR FAN STOPS Removing the oven door 1 Open the door about one third of the way parking position 2 Grasp both sides of the oven d...

Page 36: ...eflecting glass to provide a lower surface temperature One glass unit can be removed for cleaning CLEANING BETWEEN THE GLASS PANES Take care not to damage the door glass Formation of cracks at edges can result in the glass breaking after having being heated a few times REMOVING THE UPPER GLASS IN THE DOOR 1 Grasp the upper glass pane at its lower edge and push it against spring pressure towards th...

Page 37: ...gonally upwards in the glass retainer on the handle side 1 2 Lower the glass and push towards the door lower edge until the glass will go no further under the lower retainer 2 FITTING THE UPPR GLASS IN THE DOOR 1 Insert the upper glass diagonally from above into the glass retainer on the handle side 1 2 Lower the glass pane Push the pane against spring pressure on the handle side in front of the r...

Page 38: ...n lift them away at the back 2 RE FITTING THE OVEN SHELF RAILS The rounded ends of the bars must point forward Fit the oven step units again by first attaching them in the front hole 1 and then press them into position 2 Cleaning the baking plate rails Loosen the rails To facilitate the removal of dirt and fat they can be soaked in water with washing up liquid Wash by hand NOTE DO NOT USE A DISHWA...

Page 39: ...ries thoroughly in hot water and washing up liquid before using them for the first time If you follow this advice and these tips then your SUPER CLEAN accessories will last for a long time and remain easy to clean Use plastic or wood instead of metal which can damage the plate Remember that pots and pans with rough bottoms can damage the accessories Clean the accessories with a soft sponge or a di...

Page 40: ...ective glass by turning it to the left and clean it SEE ILLUSTRATION 3 If necessary Replace the oven light with a new bulb marked 230 240V 40W 300 C with an E14 base 4 Re fit the protective glass REPLACING THE LAMP BULB ON PAGE CLEANING THE PROTECTIVE GLASS 1 Check that the oven is not hot 2 Loosen and remove the oven step units on the left hand side see page 37 3 Loosen the protective glass with ...

Page 41: ... drawer or on the handle 1 Empty the drawer and pull it out to the stop 2 Grasp the handle lift it upwards and the drawer goes free from the catch at the rear edge 3 Pull the drawer completely out After cleaning place the drawer rollers on the brackets SEE ILLUSTRATION Push in the drawer Lift it up slightly first of all so that the wheels do not get caught in the front catch ...

Page 42: ... the demands in EC directives 89 336 EEC and 73 23 EEC EKC60154 Width mm 597 Height when delivered mm 900 Depth 595 ENERGY EFFICIENCY CLASS A ENERGY CONSUMPTION Conventional heating kWh 0 89 Hot air kWh 0 79 COOKING TIMES STANDARD LOAD Conventional heating min 43 Hot air min 38 ...

Page 43: ...e applies for the same period and to the same extent for material and labour as that which applies to this type of equipment or product group in the country to which you have moved The Guarantee is personal applying only to the person who purchased the equipment and it cannot be transferred to any other user The equipment has been installed and used in accordance with instructions from Electrolux ...

Page 44: ...43 ...

Page 45: ...ising times against recommendations in recipes Not enough yeast or baking powder Check in the recipe that you have taken the right amount If the fat liquid mixture is too hot it ruins the effect of the yeast The correct temperature of the liquid for fresh yeast is 37 concerning dry yeast see the recommendations on the packet Bread yeasted doughs and sponge cakes turn out dry Not enough liquid too ...

Page 46: ...eating when using top and bottom heating and the opposite effect when placed too low Check in the table or recipe that you have chosen the correct position Cakes oven dishes are pale in colour Aluminium foil a tray or a roasting pan on the bottom of the oven is blocking the bottom heating Make sure that there is nothing in the bottom of the oven Light coloured baking tins produce paler cakes than ...

Page 47: ... time to boil or fry Check that you have chosen a suitable pan with good heat conductivity and a flat bottom see page 19 The oven lighting does not work Replace the defective bulb see page 39 The door lock does not work Activate the lock function see page 11 The meat probe does not work Check that the meat probe is correctly connected in the oven Take it out and then re connect it again Programme ...

Page 48: ...47 Disposal 1 Disconnect the cooker from the wall outlet 2 Cut off the cable as close to the back Of the cooker as possible 3 Deactivate the door lock so that children cannot be locked inside the oven ...

Page 49: ......

Page 50: ......

Page 51: ......

Page 52: ...www electrolux com 349 53 01 02 A 2007 08 20 ...

Reviews: