- 19 -
OPERATING INSTRUCTIONS
OPERATING INSTRUCTIONS
7. Repeat steps 2 through 4 to set more presets.
8. To recall a preset station, press the
SET/NAP
button once to view current preset;
press the
SET/NAP
again until desired preset station appears on the LED panel.
The unit supports up to 10 AM & 10 FM preset stations.
USB CHARGING FUNCTION
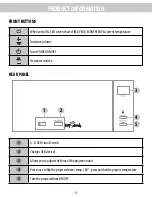
This alarm clock is equipped with a convenient USB charging port on the back panel that
allows you to recharge many brands of smartphones, tablets and portable music players
that come with USB charging cables. To charge your device, connect the USB charging
cable that is connected to your handheld device to the USB charging port on the back
panel of this alarm clock.
IMPORTANT!
When connecting your USB cable to the USB port on this alarm clock please be sure that
the USB symbol on your plug is facing UP when you insert the plug into the USB port.
Observe the charging indicator on your device to confirm that it is charging. If your device
is not charging when the USB selector switch is in the
'
A
'
position, slide the selector
switch to the
'
B
'
position to begin charging. To improve charging effectiveness, please
turn off and/or refrain from using your device while charging.
Charging time will vary depending on the charging current that your device requires.
Therefore, some devices will take longer to charge than others.
PROJECTION UNIT
The Projection Unit will project the Time or the Temperature on a wall or ceiling of a
darkened room (Max. distance is 3-9 feet). To display the temperature, press and hold
the 180° FLIP button. You can flip the projected image 180° by pressing the 180°
FLIP button ONCE (time or temperature). To turn the projected image OFF, press the
PROJECTION ON/OFF button. Turn the Focus Adjustment Wheel until the projected
time/temperature is clearly shown on the ceiling or wall.
Summary of Contents for EAAC475
Page 23: ...NOTES 23 ...
Page 24: ...NOTES 25 ...

