background image

- 21 -

TROUBLESHOOTING

SPECIFICATIONS

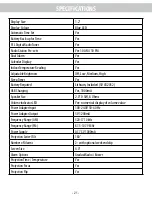
Display Size

1.2"

Display Colour

Blue LED

Automatic Time Set

Yes

Battery Back-up for Time

Yes

PLL Digital Radio Tuner

Yes

Radio Station Pre-sets

Yes 10 AM / 10 FM

Dual Alarm

Yes

Calendar Display

Yes

Indoor Temperature Reading

Yes

Adjustable Brightness

Off, Low, Medium, High

Sleep Timer

Yes

Battery Required

Lithium, Included (3V CR2032)

USB Charging

Yes, 1000mA

Speaker Size

2.0" 0.5W, 8 Ohms

Volume Indicator LED

Yes- numerical display of volume value

Power Adapter Input

100-240V 50-60 Hz

Power Adapter Output

5V 1200mA

Frequency Range (AM)

520-1710 kHz

Frequency Range (FM)

87.5-107.9 MHz

Power Supply

AC 7.5V 1000mA

Projection Swivel Tilt

180°

Number of Alarms

2 - with optional weekend skip

Screen Size

4.0"

Alarm Options

Gradual Radio / Buzzer

Projection Time / Temperature

Yes

Projection Focus

Yes

Projection Flip

Yes

Summary of Contents for EAAC475

Page 1: ...of this Electrohome product Please read this instruction manual carefully before using product to ensure proper use Keep this manual in a safe place for future reference EAAC475 USB Charging Alarm Clock Radio with Time Projection USER MANUAL AM FM PM ...

Page 2: ...rt representative first regarding any additional information on product features specifications or assistance with setup Please contact us via one of the methods below For more product information visit www electrohome com Support www electrohome com support Online live web chat www electrohome com ...

Page 3: ...a risk of electric shock to persons The exclamation point within an equilateral triangle is intended to alert the user to the presence of important operating and maintenance servicing instructions in the literature accompanying the appliance WARNING TO PREVENT ELECTRIC SHOCK DO NOT USETHIS PLUGWITH AN EXTENSION CORD RECEPTACLE OR OTHER OUTLET UNLESSTHE BLADES CAN BE FULLY INSERTEDTO PREVENT BLADE ...

Page 4: ...n spilled or objects have fallen into the apparatus the apparatus has been exposed to rain or moisture does not operate normally or has been dropped 15 Apparatus shall not be exposed to dripping or splashing and that not objects filled with liquids such as vases shall be placed on the apparatus 16 The batteries shall not be exposed to excessive heat such as sunshine fire or the like 17 The MAINS p...

Page 5: ...roduct yourself as opening or removing covers may expose you to dangerous voltages or other hazards Refer all servicing to a qualified service professional 29 Replacement Parts When replacement parts are required be sure the service technician has used replacement parts specified by the manufacturer or have the same characteristics as the original parts Unauthorized substitutions may result in fir...

Page 6: ...enna Increase the separation between the equipment and receiver Connect the equipment into an outlet on a circuit different from that to which the receiver is connected Consult the dealer or an experienced radioTV technician for help IC STATEMENT CAN ICES 3 B NMB 3 B Operation is subject to the following two conditions 1 This device may not cause interference and 2 This device must accept any inte...

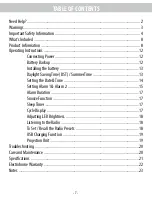
Page 7: ...ht SavingTime DST SummerTime 13 Setting the Date Time 14 Setting Alarm 1 Alarm 2 15 Alarm Duration 17 Snooze Function 17 SleepTimer 17 Cycle Display 17 Adjusting LED Brightness 18 Listening to the Radio 18 To Set Recall the Radio Presets 18 USB Charging Function 19 Projection Unit 19 Troubleshooting 20 Care and Maintenance 20 Specifications 21 ElectrohomeWarranty 22 Notes 23 TABLE OF CONTENTS ...

Page 8: ...he right of when Alarm 1 is set 4 Displays the hour 5 Displays the minutes 6 Blue LED dot appears to the left of AM indicating AM Band is selected 7 Blue LED dot appears to the left of FM indicating FM Band is selected 8 Alarm 2 Blue LED dot appears to the left of when Alarm 2 is set PRODUCT INFORMATION USB Charging Alarm Clock Radio Quick Start Guide Instructional Manual 1 x 3V CR2032 Flat Lithiu...

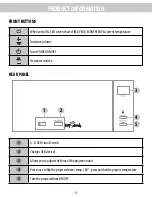
Page 9: ...es volume Turns POWER ON OFF Decreases volume FRONT BUTTONS 1 A B USB Circuit Switch 2 Charges USB devices 3 Allows you to adjust the focus of the projection unit 4 Press once to flip the projected time temp 180 press and hold to project temperature 5 Turn the projected time ON OFF REAR PANEL 1 2 3 4 5 ...

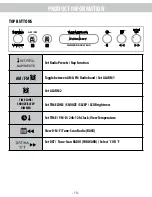
Page 10: ...ween AM FM Radio band Set ALARM 1 Set ALARM 2 TIME ZONE SNOOZE SLEEP DIMMER SetTIME ZONE SNOOZE SLEEP LED Brightness SetTIME Y M D 24h 12h Clock ViewTemperature View D M Y Tune Scan Radio BACK Set DST Tune Scan RADIO FORWARD Select C OR F TOP BUTTONS AM FM DIMMER GRADATEUR ...

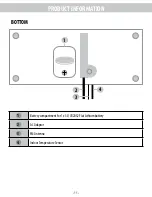
Page 11: ... 11 BOTTOM PRODUCT INFORMATION 1 Battery compartment for 1 x 3V CR2032 Flat Lithium battery 2 AC Adaptor 3 FM Antenna 4 IndoorTemperature Sensor 1 2 3 4 ...

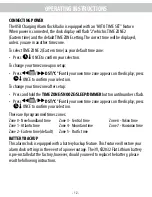
Page 12: ...lection To change your time zone after setup Press and hold the TIME ZONE SNOOZE SLEEP DIMMER button until numbers flash Press DST C F until your own time zone appears on the display press ONCE to confirm your selection There are 8 programmed times zones BATTERY BACKUP This alarm clock is equipped with a battery backup feature This feature will restore your alarm clock settings in the event of a p...

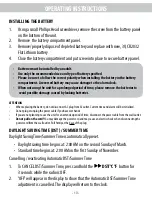
Page 13: ...cting the power cord from the wall outlet Pull firmly at the base of the plug DAYLIGHT SAVING TIME DST SUMMER TIME Daylight SavingTime SummerTime is automatically preset Daylight saving time begins at 2 00 AM on the second Sunday of March Standard time begins at 2 00 AM on the first Sunday of November Cancelling reactivating Automatic DST SummerTime 1 To CANCEL DST SummerTime press and hold the DS...

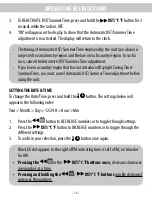
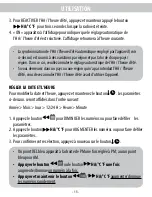
Page 14: ...EASE numbers or to toggle through the different settings 3 To confirm your selection press the button once again The timing of Automatic DST SummerTime employed by the unit see above is subjected to variations by region and the law in each country region In such a case cancel the Automatic DST SummerTime adjustment If you live in a country region that has not introduced Daylight SavingTime SummerT...

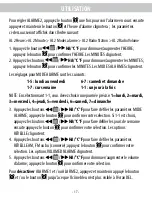
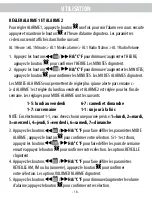
Page 15: ... on weekends The ALARM MODE settings are as follows 1 5 Monday to Friday 6 7 Saturday Sunday 1 7 Whole week 1 1 One day of week NOTE When selecting 1 1 you must select a specific day as follows 1 Monday 2 Tuesday 3 Wednesday 4 Thursday 5 Friday 6 Saturday 7 Sunday 3 Press the DST C F buttons to toggle between the ALARM MODE settings then press the button to confirm your selection if 1 1 is selecte...

Page 16: ... must select a specific day as follows 1 Monday 2 Tuesday 3 Wednesday 4 Thursday 5 Friday 6 Saturday 7 Sunday 3 Press the DST C F buttons to toggle between the ALARM MODE settings press the button to confirm your selection if 1 1 is selected press the DST C F buttons to toggle between the days of the week and press the button to confirm your selection TheWake options will begin to flash 4 Press th...

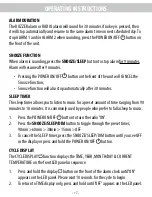
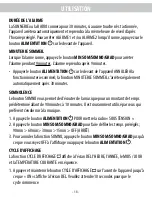
Page 17: ...sten to music for a preset amount of time ranging from 90 minutes to 10 minutes It is commonly used by people who prefer to fall asleep to music 1 Press the POWER ON OFF button to turn the radio ON 2 Press the SNOOZE SLEEP DIM button to toggle through the preset times 90min 60min 30min 15min OFF 3 To cancel the SLEEP timer press the SNOOZE SLEEP DIM button until you see OFF in the display or press...

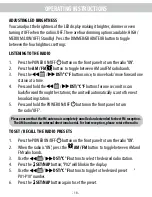
Page 18: ...rd through the stations the unit will automatically scan to the next broadcasting station 5 Press and hold the POWER ON OFF button on the front panel to turn the radio OFF Please ensure that the FM antenna is completely unrolled and extended for best FM reception The AM band uses an internal directional aerial For best reception please rotate the radio TO SET RECALL THE RADIO PRESETS 1 Press the P...

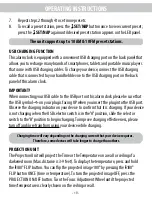
Page 19: ...ug is facing UP when you insert the plug into the USB port Observe the charging indicator on your device to confirm that it is charging If your device is not charging when the USB selector switch is in the A position slide the selector switch to the B position to begin charging To improve charging effectiveness please turn off and or refrain from using your device while charging Charging time will...

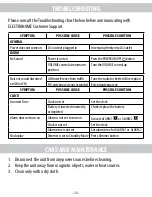
Page 20: ...er AM reception FM antenna wire not extended Extend antenna wire SYMPTOM POSSIBLE CAUSE POSSIBLE SOLUTION CLOCK IncorrectTime Clock not set Set the clock Battery is inserted incorrectly or depleted Check replace the battery Alarm does not turn on Alarm is not set to turn on Activate ALARM 1 or ALARM 2 Clock is not set Set the clock Alarm time is not set Set alarm time for ALARM 1 or ALARM 2 No dis...

Page 21: ...y Required Lithium Included 3V CR2032 USB Charging Yes 1000mA Speaker Size 2 0 0 5W 8 Ohms Volume Indicator LED Yes numerical display of volume value Power Adapter Input 100 240V 50 60 Hz Power Adapter Output 5V 1200mA Frequency Range AM 520 1710 kHz Frequency Range FM 87 5 107 9 MHz Power Supply AC 7 5V 1000mA Projection SwivelTilt 180 Number of Alarms 2 with optional weekend skip Screen Size 4 0...

Page 22: ... without appropriate model serial number and CSA cUL cULus cETL cETLus markings H Any products used for rental or commercial purposes I Any installation setup and or programming charges Should this ELECTROHOME product fail to operate during the warranty period warranty service may be obtained upon delivery oftheELECTROHOMEproducttogetherwithproofofpurchaseandacopyofthisLIMITEDWARRANTYstatementtoan...

Page 23: ...NOTES 23 ...

Page 24: ...NOTES 25 ...

Page 25: ... pas les identifications appropriées quant aux numéros de modèle et de série ni les étiquettes et attestations de l ACNOR de l ULC de l ULI de l ETL au Canada et aux États Unis H Tout appareil utilisé à des fins commerciales ou de location I Tous les frais d installation d ajustement et ou de programmation Si cet appareil de marque ELECTROHOME devient défectueux au cours de la période de garantie ...

Page 26: ... Incluse au lithium 3V CR2032 Chargement USB Oui 1000mA Largeur haut parleur 2 0po 0 5W 8 Ohms Indicateur de volume DEL Oui Affichage numérique du niveau de volume Alimentation entrée 100 240V 50 60 Hz Alimentation sortie 5V 1200mA Portée de fréquence AM 520 1710 kHz Portée de fréquence FM 87 5 107 9 MHz Alimentation AC 7 5V 1000mA Projection pivotante inclinable 180 Nombre d alarmes 2 avec option...

Page 27: ...ur régler ALARME 1 Appuyez le bouton pour régler ALARME 2 L horloge n est pas réglée Réglez l horloge L heure de l alarme n est pas réglée Appuyez le bouton gradateur Pas d affichage Gradateur est réglé en mode veille Press Dimmer button 1 Débranchez toujours l appareil du réseau électrique avant de le nettoyer 2 Gardez l appareil à bonne distance d objets magnétiques de l eau et de sources de cha...

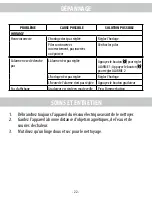
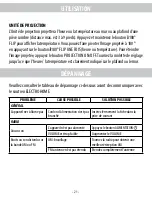
Page 28: ...e que l heure la température est clairement indiqué sur le plafond ou le mur Veuillez consulter le tableau de dépannage ci dessous avant de communiquer avec le soutien ELECTROHOME PROBLÈME CAUSE POSSIBLE SOLUTION POSSIBLE GÉNÉRAL L appareil ne s allume pas Cordon d alimentation n est pas branché Insérez fermement la fiche dans la prise de courant RADIO Aucun son L appareil n est pas alimenté Appuy...

Page 29: ...téléphones intelligents tablettes et lecteurs de musique portables qui viennent avec câbles de recharge USB Pour charger votre appareil connectez le câble qui est connecté à votre appareil portatif au port de chargement USB sur le panneau arrière du radio réveil IMPORTANT Lors de la connexion de votre câble USB au port USB du radio réveil assurez vous que le symbole USB sur la fiche est vers le ha...

Page 30: ...t FM 3 Appuyez le bouton ou HA C F une fois pour déplacer avant arrière une station à la fois 4 Appuyer et maintenir le bouton ou HA C F pour une seconde pour balayer arrière avant les stations de radio l appareil avancera automatiquement à la station de radiodiffusion suivante 5 Appuyer et maintenir le bouton ALIMENTATION sur le devant de l appareil pour éteindre la radio Assurez vous que l anten...

Page 31: ...NOLENCE Le bouton SOMNO vous permet de d écouter de la musique pour un montant de temps prédéterminé allant de 90 minutes à 10 minutes Il est couramment utilisé par ceux qui préfèrent s endormir à la musique 1 Appuyez le bouton ALIMENTATION POUR mettre la radio SOUSTENSION 2 Appuyez le bouton MIN SOM SOMNO GRAD pour faire défiler les temps préréglés 90min 60min 30min 15min OFF ARRÊT 3 Pour annuler...

Page 32: ...fois NOTE En sélectionnant 1 1 vous devez choisir une journée précise 1 lundi 2 mardi 3 mercredi 4 jeudi 5 vendredi 6 samedi 7 dimanche 3 Appuyez les boutons HA C F pour faire défiler les paramètres MODE ALARME appuyez le bouton pour confirmer votre sélection Si 1 1 est choisi appuyez les boutons HA C F pour faire défiler les jours de semaine ensuite appuyez le bouton pour confirmer votre sélectio...

Page 33: ...di et ALARME 2 est réglée pour les fins de semaine Les réglages pour MODE ALARME sont les suivants 1 5 lundi au vendredi 6 7 samedi et dimanche 1 7 sur semaine 1 1 un jour à la fois NOTE En sélectionnant 1 1 vous devez choisir une journée précise 1 lundi 2 mardi 3 mercredi 4 jeudi 5 vendredi 6 samedi 7 dimanche 3 Appuyez les boutons HA C F pour faire défiler les paramètres MODE ALARME appuyez le b...

Page 34: ...ton HA C F pour AUGMENTER les numéros ou pour faire défiler les paramètres 3 Pour confirmer votre sélection appuyez à nouveau sur le bouton La synchronisation de l HA l heure d été automatique employé par l appareil voir ci dessus est soumis à des variations par région et par la loi de chaque pays région Dans ce cas veuillez annuler le réglage automatique de l HA l heure d été Si vous demeurez dan...

Page 35: ...ébranchant le cordon d alimentation de la prise murale Tirer fermement sur la base de la fiche HEURE AVANCÉE HA HEURE D ÉTÉ L heure avancée HA l heure d été est préréglée automatiquement L heure avancée commence à 2h00 le deuxième dimanche de mars Et se termine à 2h00 le premier dimanche de novembre Annulation réactivation automatique de l HA l heure d été 1 Pour annuler l HA l heure d été appuyez...

Page 36: ...rmer votre sélection Pour changer votre fuseau horaire lors de la configuration initiale Appuyez et maintenir FUS HOR MIN SOM SOMNO GRAD jusqu à ce que les numéros clignotent Appuyez ou HA C F jusqu à ce que l écran affiche votre propre fuseau horaire appuyez UNE FOIS pour confirmer votre sélection Il y a 8 fuseaux horaires CIRCUIT SECOURS À PILES Ce réveil est équipé d un circuit secours à piles ...

Page 37: ... 37 DESSOUS 1 Compartiment à piles pour 1 x pile à plat au lithium 3V CR2032 2 Adaptateur CA 3 Antenne FM 4 Capteur de température intérieur 1 2 3 4 INFORMATIONS DU PRODUIT 12 ...

Page 38: ... ALARME 2 FUS HOR MIN SOM SOMNO GRAD Régler FUSEAU HORAIRE MINUTERIE SOMMEIL SOMNOLENCE Luminosité DEL gradateur Régler l HEURE A M J Horloge 24h 12h Affichage de température Affichage ANNÉE MOIS JOUR Syntoniser Balayer stations de RADIO ARRIÈRE Régler HA Syntoniser Balayer stations de RADIO AVANT Choisir C OU F BOUTONS DESSUS 11 AM FM DIMMER GRADATEUR ...

Page 39: ... appareil SOUSTENSION et HORSTENSION Baisse le volume BOUTONS AVANT 1 Interrupteur de circuit USB A B 2 Chargement de périphériques USB 3 Vous permet d ajuster la mise au point de l appareil de projection 4 Appuyez une fois pour basculer l heure la température projetée appuyer et maintenir appuyé pour projeter la température 5 Allume et éteint la projection PANNEAU ARRIÈRE 10 1 2 3 4 5 ...

Page 40: ...arme 1 est réglée 4 Affiche l heure 5 Affiche les minutes 6 Point DEL bleu apparaît à la gauche de AM indiquant que la bande AM est sélectionné 7 Point DEL bleu apparaît à la gauche de FM indiquant que la bande FM est sélectionné 8 Alarme 2 Point DEL bleu apparaît à la gauche de lorsque alarme 2 est réglée INFORMATIONS DU PRODUIT Radio réveil recharge USB Guide de démarrage rapide Manuel d instruc...

Page 41: ...on de la pile 14 Heure avancée HA Heure d été 14 Régler la date et l heure 15 Régler alarme 1 et alarme 2 16 Durée de l alarme 18 Minuterie sommeil 18 Somnolence 18 Cycle d affichage 18 Régler la luminosité DEL 19 Écouter la radio 19 Régler Rappel de stations radio 19 Fonction de recharge USB 20 Unité de projection 21 Dépannage 21 Soins et entretien 22 Spécifications 23 Garantie Electrohome 24 Not...

Page 42: ...its préconisés Cette marque indique que ce produit ne doit pas être jeté avec les autres déchets ménagers en Amérique du Nord Pour prévenir les dommages possibles à l environnement ou à la santé humaine par l élimination non contrôlée de déchets ou autres matières recyclez le de façon responsable afin de promouvoir la réutilisation durable des ressources matérielles Pour retourner votre appareil u...

Page 43: ...çues pour fournir une protection raisonnable contre les interférences nuisibles dans le cadre d une installation résidentielle Cet équipement génère utilise et peut émettre de l énergie sous forme de radiofréquences S il n est pas installé et utilisé conformément aux instructions il peut produire des interférences nuisibles aux communications radio Toutefois rien ne garantit que le brouillage ne s...

Page 44: ...liquide a pénétré à l intérieur B Si le produit a été exposé à la pluie l eau ou d autres liquide C Si le produit ne fonctionne pas normalement en suivant les instructions d utilisation Réglez uniquement les commandes qui sont couvertes par les instructions d utilisation Un mauvais réglage des autres commandes peut provoquer des dommages et nécessitera souvent un travail très long par un technicie...

Page 45: ...accessoires précisés par Ie fabricant 13 Débranchez cet appareil durant des orages électriques ou lorsqu il n est pas utilisé pendant des périodes prolongées 14 Confiez toutes réparations de cet appareil à un personnel qualifié Une réparation peut être requise lorsque l appareil a été endommagé de quelque manière que ce soit tel qu un cordon ou une fiche endommagé du liquide déversé ou des objets ...

Page 46: ...mation dans un triangle équilatéral a pour but d avertir l utilisateur que des instructions importantes relatives à l utilisation et à l entretien se trouvent dans le guide d utilisation accompagnant l appareil MISE EN GARDE AFIN D ÉVITERTOUT RISQUE D INCENDIE OU D ÉLECTROCUTION NE BRANCHEZ PAS LE CORDON D ALIMENTATION DE CET APPAREIL SUR UN CORDON PROLONGATEUR DANS LEQUELTOUTES LESTIGES DE LA FIC...

Page 47: ...ation supplémentaire sur les caractéristiques du produit les spécifications ou pour de l aide avec l installation Veuillez nous contacter par l une des méthodes ci dessous Pour plus d information sur nos produits visitez www electrohome com BESOIN D AIDE ARRÊT Soutien www electrohome com support Clavardage en ligne www electrohome com 2 ...

Page 48: ...lire ce manuel attentivement avant de faire fonctionner l appareil pour vous assurer de l utiliser correctement Conservez ce manuel dans un endroit sûr afin de pouvoir vous y référer au besoin EAAC475 Radio réveil recharge USB avec projection de l heure GUIDE DE L UTILISATEUR AM FM PM ...

Reviews: