


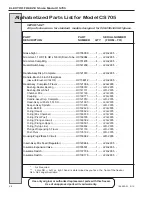
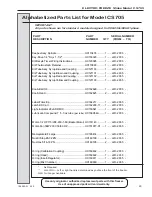

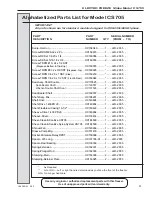
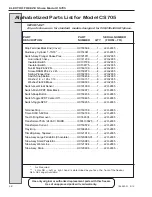

HC184589, Rev 01 3/12
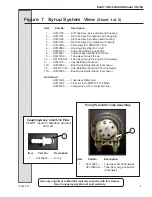
Look through top hole
in tube — you should
see clear through.
Look through top hole in
tube — you should see the
inner white plastic tube
(regulator) blocking the
opening.
ASSEMBLY
(con’t)
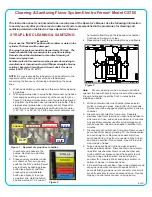
SANITIZING
1.
Wash and sanitize your hands and forearms.
2.
Prepare 2 gallons (7.6 liters) of sanitizing solution in a
container. The sanitizing solution must be mixed accord-
ing to manufacturer’s instructions to yield 100 PPM (parts
per million) available chlorine solution (i.e., Stera-Sheen
or equivalent).
3.
Place the mix feed tube assembly and mix float in the
bottom of the hopper pan. DO NOT INSTALL.
4.
Pour sanitizing solution into the hopper pan. Using a
clean brush, brush the hopper walls, mix level sensor, the
hopper drain opening from the hopper to the cylinder, the
inside of the mix feed tube, and the mix float.
5.
Install mix float on mix level sensor.
6.
When the cylinder has filled with sanitizing solution,
reconnect power, turn the selector switch to the “CLEAN”
position and allow the beater to run for 5 minutes. During
this time period, check for leaks around the head,
plunger, and drain tube.
Important:
Failure to completely remove sanitizer or water
from the freezing cylinder before placing in
“FREEZE” will damage the freezer.
7.
Place an empty container under the dispensing head.
Turn the selector switch “OFF” and drain the solution by
opening the plunger to allow the cylinder and hopper to
empty. Open and close the plunger approximately 10
times while draining to sanitize the port area of the
dispense head.
8.
Sanitizer can be used to sanitize product preparation
container.
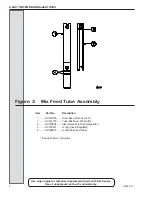
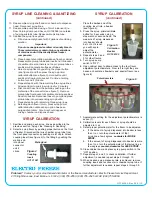
Figure 3
Mix Feed Tube
Figure 5
Pin is in line with hole.
Pin is not in line with hole.
1.
Wash and sanitize your hands and forearms.
2.
Install the mix feed tube assembly into the hopper
inlet port in the closed position as shown in figure 5.
3.
Fill the hopper with 2-1/2 gallons of mix.
4.
Place an empty container under the dispense head.
While holding the plunger open remove the mix feed
tube assembly from the hopper. Allow the mix to
force out all remaining sanitizer. When pure mix
flows from the dispense head close the plunger.
5
.
Allow the mix to flow into the cylinder until the
bubbling from the mix feed hole in the hopper stops.
Install the mix feed tube assembly in the hopper
pushing it all the way down. The regulator must be
in the “OPEN” position as shown in figure 5.
7.
Fill the hopper with mix and install the hopper cover.
Important:
Failure to completely remove sanitizer or water
from the freezing cylinder before placing in
“FREEZE” will damage the freezer.
8.
Turn the selector switch to “FREEZE” to begin the
freezing process.
9.
During long idle periods, the regulator should be
closed —
but remember — when dispensing
product, ensure that the mix feed regulator is
OPEN at all times.
If not open, the flow of mix will be
restricted. If lubricant blocks the inlet hole in the
tube it would also restrict the flow of mix.
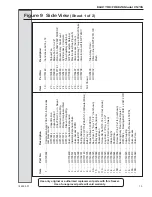
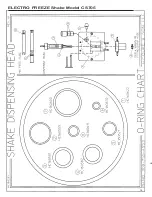
TUBE-MIX
FEED
INSERT-MIX
FEED
FLOAT
O-RING-
INSERT
(Lubricate)
O-RING
MIX FEED
PRIMING
Problem? Contact your local authorized distributor or
the freezer manufacturer, Electro Freeze Service Depart-
ment, 2116 Eighth Avenue, East Moline, IL 61244, (309)
755-4553, (800) 755-4545 or FAX (309) 755-9858.
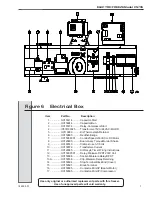
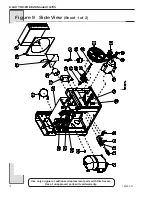
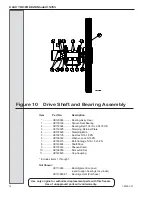
BLADE-
SCRAPER
SHAFT-
BEATER
(Lubricate)
WASHER-
SHAFT SEAL
SEAL-SHAFT
(Lubricate)
BUSHING
BEATER
BLADE-
SCRAPER
Figure 4 Beater Shaft