background image

18

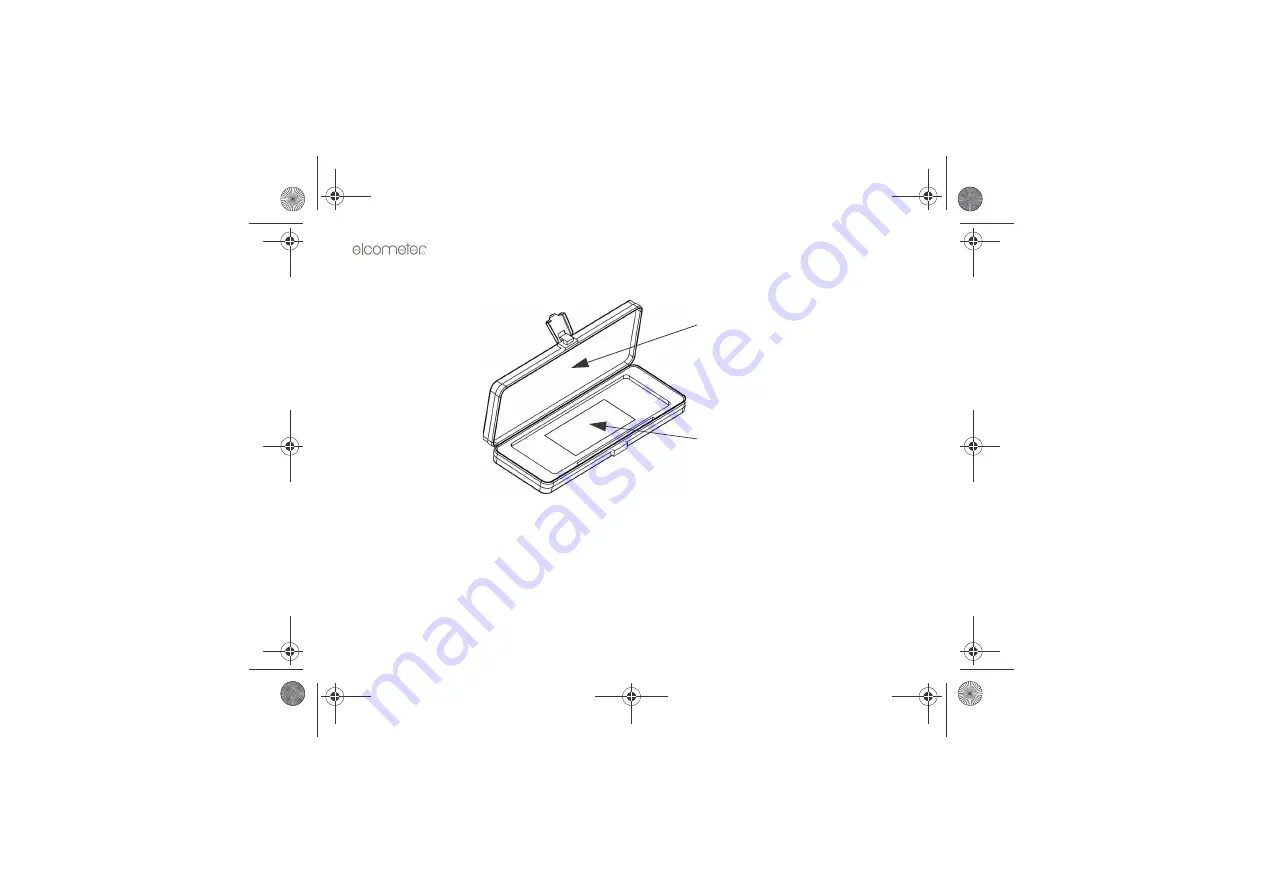
Regular cleaning of the surface of the tile using the cloth provided is recommended. If necessary the tile
can be cleaned using warm soapy water and dried with a soft lint-free cloth.

Figure 5. Certified calibration tile

Foam Lid - 

Zero Gloss 

Value

Calibration Tile - 

High Gloss 

Value

Op_402 TMA-0244 Issue 02.fm  Page 18  Friday, February 9, 2007  12:01 PM

Summary of Contents for Novo-Gloss 402

Page 1: ...English Elcometer 402 Novo Gloss Glossmeter with Statistics Operating Instructions Op_402 TMA 0244 Issue 02 fm Page 1 Friday February 9 2007 12 01 PM ...

Page 2: ... Copyright Elcometer Instruments Ltd 2001 2007 All other trademarks acknowledged All rights reserved No part of this Document may be reproduced transmitted transcribed stored in a retrieval system or otherwise or translated into any language in any form or by any means electronic mechanical magnetic optical manual or otherwise without the prior written permission of Elcometer Instruments Ltd A cop...

Page 3: ...tery 7 2 3 The control panel 7 2 4 Switching the gauge on and off 8 2 5 The display 9 2 6 Changing display language 10 3 Taking a reading 13 4 Deleting data 14 5 Statistics 14 6 Calibration adjustment 17 7 Interfacing with a computer or printer 21 8 Using Novo Soft software 22 9 Gloss measurement overview 24 Op_402 TMA 0244 Issue 02 fm Page 1 Friday February 9 2007 12 01 PM ...

Page 4: ...2 10 Maintenance 25 11 Spares 32 12 Technical specification 33 13 Storage and transit 34 14 Related equipment 34 Op_402 TMA 0244 Issue 02 fm Page 2 Friday February 9 2007 12 01 PM ...
Page 5: ...is a hand held gauge for measuring the gloss on flat surfaces from matt to mirror finishes The Glossmeter is available in three versions single angle dual angle or triple angle These instructions apply to all three models Gloss is measured by directing a light beam at an angle to the test surface and monitoring the light reflected at the same angle Different surfaces will have different levels of ...

Page 6: ...ximum Mean Standard Deviation and Coefficient of Variation of stored values RS232C output to Windows based PC software or printer available Capability to operate in any one of six languages English Français Deutsch Italiano Español or Nederlands Your Elcometer 402 Novo Gloss Glossmeter is accurate and user friendly allowing Statistical Process Control of gloss to be conducted quickly and easily at...

Page 7: ...m package Please ensure that this packaging is disposed of in an environmentally sensitive manner Consult your local Environmental Authority for further guidance Note Before you use your Elcometer 402 for the first time you must charge the battery for a minimum of 16 hours To maximise the benefits of your new Elcometer 402 please take some time to read these Operating Instructions Do not hesitate ...

Page 8: ... 2 1 THE PARTS OF YOUR GAUGE Figure 1 Elcometer 402 Dual angle model Control panel and display RS232 interface Battery charger socket Measurement aperture Op_402 TMA 0244 Issue 02 fm Page 6 Friday February 9 2007 12 01 PM ...

Page 9: ...battery 2 3 THE CONTROL PANEL The layout of the control panel of your gauge will vary according to which model you have Figure 2 shows the front panel for a single or dual angle Glossmeter which is controlled by six buttons Figure 3 shows the control panel for a triple angle Glossmeter which is controlled by nine buttons Figure 2 Control panel of single and dual angle Glossmeters Delete Reset Stat...

Page 10: ...he yellow Stats 2nd button followed by the Delete Reset button This would be written in the text in this manual as 2nd RESET To activate the DELETE function you would only press the Delete Reset button which would be written in this manual as DELETE 2 4 SWITCHING THE GAUGE ON AND OFF Press and release the red ON button The gauge will switch on with a display showing the gauge type and manufacturer...

Page 11: ...econd function button then hold down the ON button 2 5 THE DISPLAY The screen displays four numbers while you are taking readings The information shown on the display will change depending upon which functions are selected ANGLE VALUE STORE CV 60 0 0 0 0 000 Current operating angle 20 60 etc The last value of gloss units GU read The number of stored readings at the angle displayed The Coefficient ...

Page 12: ... is set by means of internal dip switches To change language follow the instructions below 1 Ensure the charger is not plugged in to the gauge 2 Remove the four crosshead screws from the bottom of the case 3 Slide the bottom of the case off the case is a tight fit and will require gentle rocking from side to side to remove 4 Locate the bank of four dip switches Figure 4 located by the mounting pil...

Page 13: ...hes 5 Use a blunt instrument such as a pen to push the numbered dip switches to the required positions as indicated in the table below Up is away from you down is towards you Op_402 TMA 0244 Issue 02 fm Page 11 Friday February 9 2007 12 01 PM ...

Page 14: ...ew language To change the language again repeat the steps above Language Switch 1 Switch 2 Switch 3 Switch 4 English down down down down Français down down down up Español down down up down Deutsch down down up up Italiano down up down down Nederlands down up down up Op_402 TMA 0244 Issue 02 fm Page 12 Friday February 9 2007 12 01 PM ...

Page 15: ... that the button is held until a stable reading is observed The number of readings STORE will increase by one and the Gloss Units reading VALUE appears in the display approximately 1 second after the READ button is pressed All statistical values are updated automatically If you want to take continuous readings keep the READ button pressed and move the gauge across the test surface the reading VALU...

Page 16: ...ess 2nd RESET 2 Display shows ARE YOU SURE PRESS YELLOW BUTTON 3 Press the yellow button to confirm reset any other button to reject 5 STATISTICS Your Elcometer 402 Novo Gloss Glossmeter is capable of storing up to 200 readings per angle in its internal memory The gauge can display a statistical analysis of these readings including minimum maximum mean standard deviation and coefficient of variati...

Page 17: ...e it is in statistics mode it will automatically return to normal mode on switching on again Statistics are defined below For this purpose the individual readings are defined as values x1 x2 xn and xi is any data point Statistical sample population n The current number of stored readings STORE on which the statistical analysis is based Maximum MAX The highest reading Minimum MIN The lowest reading...

Page 18: ...and hold down the OUTPUT button then press and hold down the ON button to switch on After about 1 second the gauge displays a message which flashes between PRESS YELLOW BUTTON and ARE YOU SURE Pressing the yellow button will send the gauge into non stats mode pressing any other button will send it into the normal operating mode In non stats mode readings are not stored and so no statistical functi...

Page 19: ... The calibration tile The calibration tile consists of a black glass tile mounted in matt foam in a protective case Figure 5 The tile is certified with traceability to the BAM standards The calibration tile is supplied certified in a clean and defect free condition A visual inspection for smears or damage is recommended before each subsequent calibration as dirty or defective tiles may lead to ina...

Page 20: ...s recommended If necessary the tile can be cleaned using warm soapy water and dried with a soft lint free cloth Figure 5 Certified calibration tile Foam Lid Zero Gloss Value Calibration Tile High Gloss Value Op_402 TMA 0244 Issue 02 fm Page 18 Friday February 9 2007 12 01 PM ...

Page 21: ...e factory calibration settings of the gauge at all angles quickly and easily The zero offset See 1 Calibrate to zero on page 20 will also be cleared This reset facility is primarily intended to be used prior to calibrating on a tile after replacement of a lamp It is also useful when calibrating a gauge that reads a value greatly different to that assigned to a calibration tile To use the calibrati...

Page 22: ...to the values on the tile 1 Place the aperture of the gauge on the calibration tile in the box supplied with the instrument 2 Press the ANGLE button to select the angle dual and triple angle models only 3 Use the CAL button increase and the CAL button decrease to adjust the value in the display until it matches the value on the calibration tile corresponding to the chosen angle Your gauge is now c...

Page 23: ...in order of measurement in either a standard 2D or eye catching and easy to analyse 3D form Data files may be stored on a hard drive allowing permanent records to be kept and hard copies may also be produced There is also a report producing facility that allows graphs experimental notes and statistical analyses to be printed Data can also be exported to other packages such as Microsoft Excel See U...

Page 24: ...possible to print measurements as they are taken 8 USING NOVO SOFT SOFTWARE 8 1 Installing the program Close all running applications in your PC before installing Novo Soft software Insert the supplied CD ROM in your CD ROM drive If the installation wizard does not start automatically search for and then run the ElcometerNovoSoftInstall EXE file on the supplied CD ROM and follow the installation i...

Page 25: ...ogram Click Start All programs Novo Soft Novo Soft The following screen will appear 8 4 Sample Data To enable you to test some of the features of Novo Soft before downloading any real data files containing sample data are installed with the software Op_402 TMA 0244 Issue 02 fm Page 23 Friday February 9 2007 12 01 PM ...

Page 26: ...lane of the instrument so the test surface must be in contact with the base plate to obtain accurate readings This applies also to silver backed glass mirrors where the instrument will be separated from the primary reflecting surface by the thickness of the glass When measuring textured materials such as leather gloss readings may be slightly lower than expected after a visual examination This is ...

Page 27: ... many years reliable service under normal operating and storage conditions With the exception of replacement of the lamp s the gauge does not contain any user serviceable components In the unlikely event of a fault the Elcometer 402 should be returned to your local Elcometer supplier or direct to Elcometer Contact details can be found on the outside cover of these instructions and at www elcometer...

Page 28: ...hs is permitted The tile must be calibrated at both angles when it is to be used with dual angle gauges Standards can be re calibrated by returning the standard to Elcometer your local Elcometer supplier or to a recognised gloss calibration facility such as BAM Germany or NRC Canada 10 2 Gauge The Elcometer 402 should always be checked to ensure that the metal base is clean Care must be taken to e...

Page 29: ...ed LCD display blank NiCad battery flat either recharge instrument or operate using mains adapter faulty charger if possible check output of charger using a voltmeter internal fault contact Elcometer or your local supplier erratic rapidly fluctuating readings blown lamp replace lamp see section 10 5 reads low or zero set cal function not operated follow instructions for calibration reset see secti...

Page 30: ...ove instrument case See Case removal and refitting on page 27 2 Identify the blown bulb which will have a broken filament and may also be blackened Remove the two retaining screws Figure 6 so that it may be released Figure 6 Bulb retaining screws 3 Fit the new bulb aligning it so that the filament is perpendicular to the angle at which the beam will be directed Figure 7 Op_402 TMA 0244 Issue 02 fm...

Page 31: ...tile and hold down the green READ button Use a small screwdriver to adjust the internal calibration screw s located at the left hand end of the bottom PCB Figure 8 determine which screw to adjust using the table below Gauge type Angle Adjust this screw Single angle 20 45 60 75 85 C Dual angle 20 C Dual angle 60 B Triple angle 20 C Triple angle 60 B Triple angle 75 85 A Op_402 TMA 0244 Issue 02 fm ...

Page 32: ...on bottom PCB 7 When the correct value is reached do not adjust the screw any further and release the green READ button 8 On dual and triple angle instruments move through the angles using the ANGLE button to check calibration for each adjusting if necessary 9 Refit case A B C Op_402 TMA 0244 Issue 02 fm Page 30 Friday February 9 2007 12 01 PM ...

Page 33: ...h it automatically takes samples and counts the number of samples taken The display will show the total number of samples after every 25 samples The instrument will automatically switch off when it detects that the battery is discharged If required to abort the soak test press and hold the On button 2 Once the battery has discharged connect the charger and charge for 16 consecutive hours 3 Repeat ...

Page 34: ...ge replacements may be required The following replacement items are available from Elcometer or your local supplier Description Sales Part No 20 Gloss Standard with Certificate T40016350 60 Gloss Standard with Certificate T40016351 85 Gloss Standard with Certificate T40016352 20 60 Gloss Standard with Certificate T40016353 20 60 85 Gloss Standard with Certificate T40016354 UK Charger Unit 230V BS ...

Page 35: ...Triple Angle 180mm x 50mm x 110mm 7 x 2 x 4 5 Weight Single Angle 0 9 kg 1 98lb Dual Angle 1 1 kg 2 42lb Triple Angle 1 2 kg 2 64lb Measurement Range 0 GU to 1999 GU Accuracy 0 5 GU 0 GU to 200 GU 0 2 200 GU Repeatability 24 Hours 0 5 GU 0 GU to 200 GU 0 5 200 GU Battery Internal rechargeable NiCad Automatic switch off delay 2 minutes Lamp life 200 hours nominal Op_402 TMA 0244 Issue 02 fm Page 33...

Page 36: ...er Elcometer produces a wide range of other equipment for measuring the appearance of surface coatings Users of the Elcometer 402 may also benefit from the following Elcometer products Elcometer 400 Novo Curve Glossmeter for curved surfaces Elcometer Haze Shade and Opacity Meters Elcometer RAL Colour Charts Elcometer Spectrophotometers portable and benchtop Elcometer Colour Analysis Software For f...

Reviews: