Assembly and disassembly
Assembly
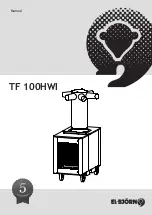
Position the machine in its designated place. Release the air
distributor. Lock the wheels on the machine so that it cannot
roll away. Closest distance to wall is 0.5 m.
Speak with the responsible ventilation/heating/water
contractor. Connect the electrical cable (16 A) to a power
distribution box with a residual current trip.
Start the machine by turning the knob to ON position
The machine has a frost protection thermostat which turns
off the fan if the return water temperature drops below +5°C.
This is indicated by a lamp on the panel.
Disassembly
When disassembling: Turn off incoming water.
Turn off power to the machine and remove the electrical cable.
Start by releasing water from the supply hose’s venting nipples.
Once the pressure has dropped, loosen the hoses from the
incoming water. Disconnect the hoses one at a time, bearing in
mind that the hoses still contain water.
Remove the hoses from the machine and lift up the rear of the
machine on a board and open the ballofix valve on the bottom
of the water heater to get all the water out. Pour in antifreeze,
see “Transportation and storage”.
NOTE! Be aware of the risk for freezing. Be very careful
when draining out the water.
The machine can now be transported.
Troubleshooting
The machine does not start
• Check that the fuses in the electrical cabinet are intact.
• Check that the heated battery temperature is >5°C. The
frost guard inhibits starting (at temp <5°C), this is indicated
with a lamp.
• Make sure the potentiometer is in position 8.
The machine emits too little air
•
If the fabric air distributor does not inflate, check whether
the filter is blocked.
• Check whether the yellow indicator light is shining
(filter guard).
• Make sure the potentiometer is in position 8.
There is no hot air supply
• Feel the temperature of the incoming water hose. If it is
cold, try releasing a small amount of water through the ball
valve at the bottom of the water heater, to help circulation
and vent any air.
• If there is still no hot water, check the heat source.
• Make sure there are no kinks in the hose that could restrict
water flow.
GB
Machine data
Machine dimensions
H incl. air distributor
2,200 mm
H excl. air distributor
1,310 mm
W
760 mm
D
1,450 mm
Weight
200 kg
Noise level
74 dB(A)
Motor and air side
Potentiometer 1-10
Std 68.
(Max 10)
Rated voltage
400 V
Power output
2,1 kW (Max 3,35kW)
Rated current
3,3 A (Max 5,2 A)
Electrical connection
3N~400 V
Air flow with distributor 6000 m³/h (Max 8000m
3
)
Fuse
16
A
Water side
Connector Camlock
32 mm
Max. water temp. in
80°C
Max. incoming water pressure
10 bar
Protection rating
IP 44
Power output 95 kW at following values:
-Water temp. 80–50°C
-Water flow 0.77 l/s
-Incoming air temp. +5°C
Power output 75 kW at following values:
-Water temp. 80–50°C
-Water flow 0.6 l/s
-Incoming air temp. +15°C
EU Declaration of Conformity see www.elbjorn.com
Function and control
Start & stop
Normally use the ON/OFF knob for starting and stopping.
Adjusting the air temperature
Turn the thermostat to the required position. The scale is
1–5 where 5 is maximum temperature. Position 3 corresponds
to a room temperature of
approx.: 15–18°C.
Replacement of filter
Replace the filter every 8 weeks or when the yellow indicator
lamp signals that it needs replacing.
Turn the machine off using the motor protection breaker.
Disconnect the power cable and open the hatch. Replace the
filter. Close the hatch and reconnect the electrical cable.
Restart the machine.
Warning!
The water heater can get very hot.


