8
Chapter1Introduction
Note
• This monitor supports the portrait display. This function allows you to change the orientation of the Adjustment
menu when using the monitor screen in vertical display position (see
“3-3. Setting Orientation “Orientation”” (page 24)
).
• For using the monitor with “Portrait” position, the graphics board supporting portrait display is required. When
placing the monitor in a “Portrait” position, settings of your graphics board need to be changed. Refer to the User’s
Manual of the graphics board for details.
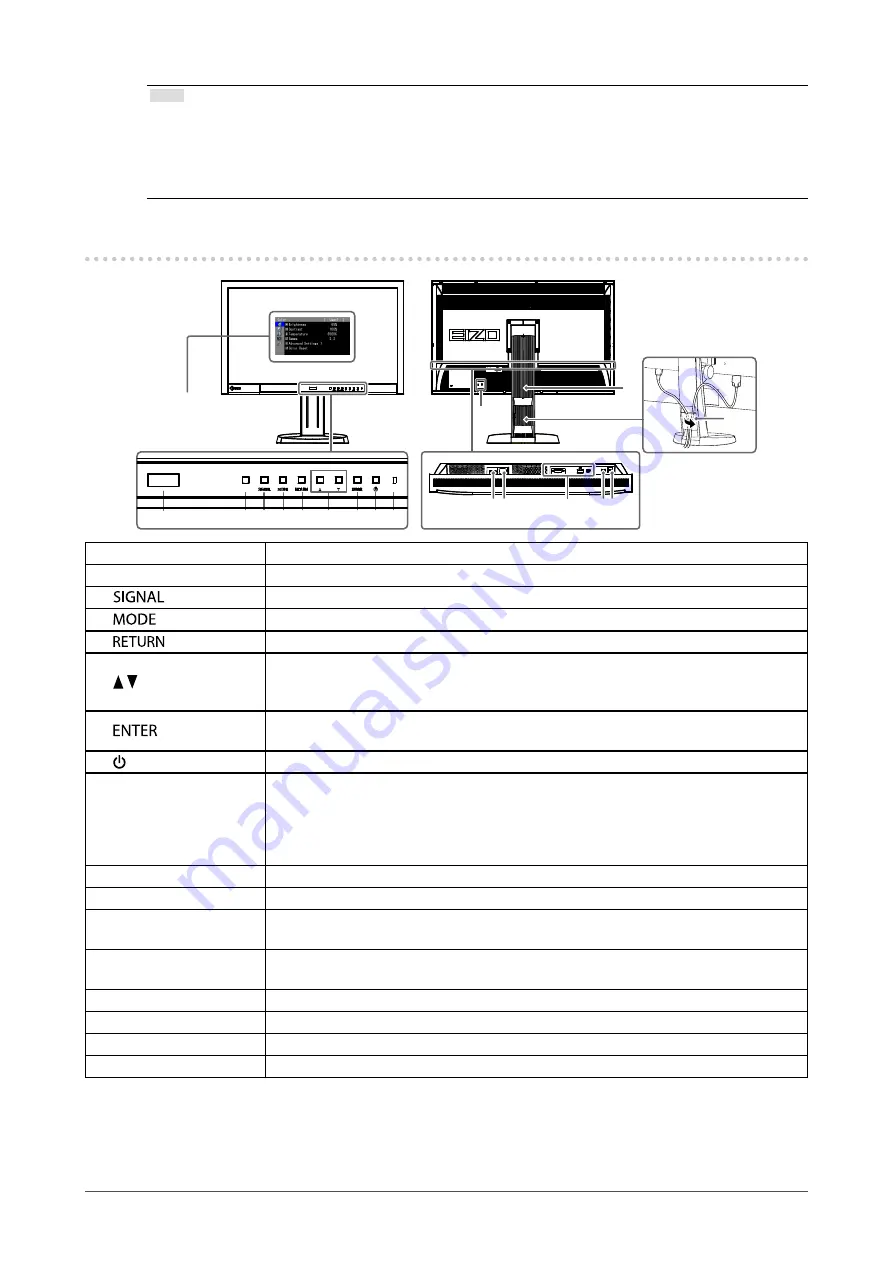
1-2. Controls and Functions
Adjustmentmenu
*1
15
16
1
2 3 4 5
6
7 8 9
17
1011
12
1314
1. EcoView Sense sensor
Detectsthemovementofapersoninfrontofthemonitor.EcoViewSensefunction(
).
2. Auto EcoView sensor
Detectsambientbrightness.AutoEcoViewfunction(
).
3.
button
Switchesinputsignalsfordisplay(
).
4.
button
ChangesFineContrastmode(
).
5.
button
Cancelsthesetting/adjustmentandexitstheAdjustmentmenu.
6. button
• Choosesandincreases/decreasesadjustmentsettingsforadvancedadjustment
usingtheAdjustmentmenu.
• DisplaystheBrightnessmenu(
).
7.
button
DisplaystheAdjustmentmenu,determinesanitemonthemenuscreen,andsaves
valuesadjusted(
).
8. button
Turnsthepoweronoroff.
9. Power indicator
Indicatesthemonitor’soperationstatus.
Blue:
Operating
Orange:
Powersavingmode
OFF:
Mainpower/Poweroff
10. Main power switch
Turnsthemainpoweronoroff.
11. Power connector
Connectsthepowercord.
12. Input signal connector
Left:DVI-Dconnector/Center:DisplayPortconnector/Right:MiniDisplayPort
connector
13. USB port (Up)
ConnectstheUSBcabletousethesoftwarethatneedsUSBconnection,ortouseUSB
hubfunction(
).
14. USB port (Down)
ConnectsaperipheralUSBdevice.
15. Stand
*2
Usedtoadjusttheheightandangleofthemonitorscreen.
16. Security lock slot
ComplieswithKensington’sMicroSaversecuritysystem.
17. Cable holder
Coversthemonitorcables.
*1
See
“1-4.BasicOperationsandFunctions”(page9)
forhowtouse.
*2
Anoptionalarm(oranoptionalstand)canbeattachedbyremovingthestand(see
“6-1.HowtoAttachtheOptional
).


