background image

Cloning Live Data to Additional Encoders (Clone Module)

The Clone feature re-transmits all control commands and caption data to one or more additional caption encoders.
The additional encoders can be connected either through RS-232, or through the Clone TCP/IP interface.

To determine if Clone is installed on your unit, access your encoder’s web interface, look for an entry that says
Clone on the left side menu and select itIf you are prompted for a license key, the feature is not installed and can
be purchased by contacting the EEG sales team.

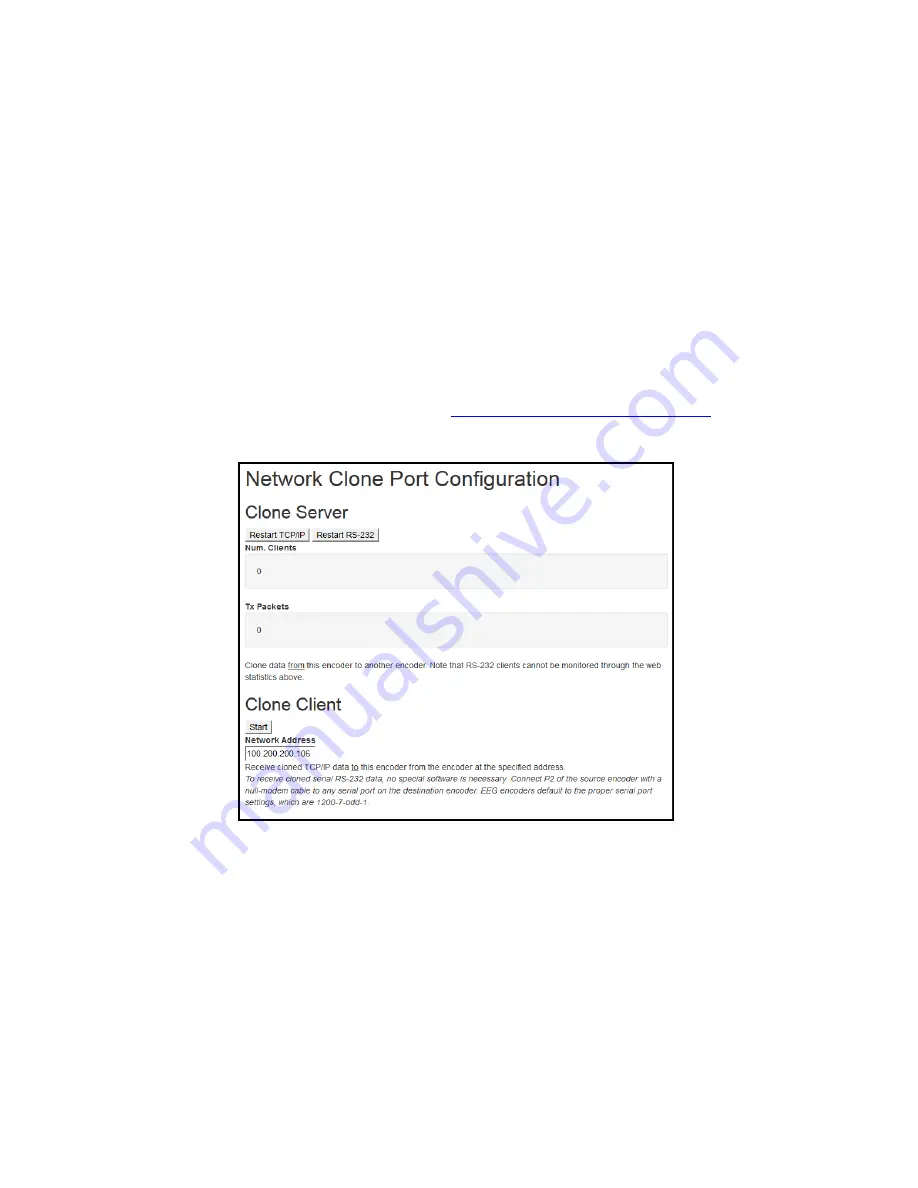
The master encoder must have the Clone port optional software installed, and then set up through the Clone
section of the web interface. When any “Clone Server” option is enabled, the encoder will copy commands and
data that are received through the dial up modem (MA), iCap, telnet, or RS-232 (P1, plus P2 if it is being used for
input and not Clone output). You can also choose to copy these commands to the RS-232 port (Start RS-232).

Further documentation for this feature may be found at

https://eegent.com/support/resources

Figure 15: Clone Settings on the Encoder Web Interface

23

Copyright © 2021 EEG Enterprises, Inc.

All Rights Reserved.

Summary of Contents for iCap HD492

Page 1: ...HD492 iCap Encoder EEG Enterprises Inc 586 Main Street Farmingdale New York 11735 TEL 516 293 7472 FAX 516 293 7417 Copyright EEG Enterprises Inc 2021 All rights reserved ...

Page 2: ... This page left intentionally blank 1 Copyright 2021 EEG Enterprises Inc All Rights Reserved ...

Page 3: ... Module 21 Record Store As Run Caption Data CCRecord Module 22 Caption Uplink to Streaming Media Servers Streaming Module 23 Cloning Live Data to Additional Encoders Clone Module 24 SCTE 104 Trigger Insertion SCTE 104 Module 25 ComCC Backup Redundancy ComCC Module 26 AFD Insertion AFD Module 27 XDS Insertion XDS Module 28 Caption Decoder Open Caption Display 28 Additional Features 29 Caption Absen...

Page 4: ... This page left intentionally blank 3 Copyright 2021 EEG Enterprises Inc All Rights Reserved ...

Page 5: ...ssible with legacy captioning systems List of Features iCap connectivity for secure real time captioning over a standard broadband connection without the use of dial up phone lines or external audio couplers Connectivity to EEG s Cloud hosted Automatic Captioning service Lexi Encoding of caption data sourced from previously encoded video sources two RS232 serial ports or a dial up modem optional C...

Page 6: ...b on the web portal See additional Lexi setup instructions on Page 6 As an alternative to these recommended steps you may also set up the encoder for DHCP Selecting DHCP will automatically pull available IP gateway and subnet information from your network IMPORTANT With DHCP your encoder s assigned IP may change on its own which will affect how you access the web interface for your encoder Video I...

Page 7: ... not currently support direct input of Dolby E or other compressed audio signals Peak Level Dynamically displays the peak signal level at the audio input A warning message will be displayed when clipping is detected at the input For optimal sound quality the peak level bar should reach at least 60 across the screen but should never display Clipping Scale Audio Adjusts the audio input level without...

Page 8: ... using the correct IP to access the web interface Security Modes and Password Protection To limit access to the encoder s web interface you may set up a password through the front panel of your encoder via Setup Security Security Mode This password will be required for access to the encoder s web interface not the front panel LCD menu See below for a complete description of all Security Mode optio...

Page 9: ... the update file downloaded from our website then click Upload and finally click Proceed USB LCD Transfer the update file to any USB stick Insert the memory stick into the front panel USB port navigate to the System Setup Update from the LCD menu and press enter to proceed and install the update A message will appear on the LCD screen when the update has finished Do not remove the memory device wh...

Page 10: ...ct iCap From the Encoder s Web Interface Select iCap from the menu on the left and confirm that the Company Name User Name and Password are all present and correct On the same page confirm that iCap Status says Connected Additionally the iCap LED on the front panel of your encoder should be green This also means the encoder is connected to iCap If all information is correct and the status does NOT...

Page 11: ...requires your caption provider to connect to your encoder from their iCap software You MUST connect your audio video input to the encoder BEFOREHAND Once you ve provided your access code to the captioner and connected your program video audio to the encoder you will test your connection to ensure audio is reaching them and caption data is coming in Enter the iCap Admin portal In the Users tab conf...

Page 12: ...e following additional measures in the web interface Check the Audio Packets Sent under the iCap menu in the encoder web interface If the number is growing then Audio is being sent to the captioner If it says 0 check with your captioner to ensure they have connected Check caption activity by selecting Logs from the side menu on the encoder web interface Then look for iCap and select the log with t...

Page 13: ...Cap Admin and select the Logs tab Next select either the encoder name or access code you want to see history for Once you ve selected the desired encoder an event log will appear that you can view to see all activity on your encoder Figure 5 iCap Admin Logs Tab Copyright 2021 EEG Enterprises Inc 12 All Rights Reserved ...

Page 14: ...xi over a standard broadband connection 1 Confirm iCap Connectivity and Know Your iCap Access Code From the main page of HD492 web interface confirm the iCap Status says Connected to remote server If inactive contact EEG support for credentials Your iCap Access Code can be found in the shipping documentation provided with your Encoder This will be used in the next step to enable Lexi to access liv...

Page 15: ...l preferences are configured as desired Below are descriptions for each setting field Once this is complete you may click Apply Settings Figure 7 Lexi Module on Encoder s Web Interface Main Page Speech Recognition Language The base language models supported by Lexi currently include English US English UK and Spanish Custom Model Through the EEG Cloud web site you can manage your Lexi account and c...

Page 16: ...d immediately upon enabling the client module When Require GPI E is selected a Lexi captioning job will start when GPI 5 is asserted and will run until GPI E is de asserted Inactivity Timeout A Lexi job that runs for this amount of time without any dialog being transcribed will be terminated automatically by the server Set to None if you want jobs to be able to run indefinitely without dialog Bloc...

Page 17: ...rvice provider the port number and public IP address RS 232 RS 422 Teleprompters or Other Devices See hardware section for cabling detail Serial port settings are controlled through the web interface of the encoder by selecting Serial Ports from the left side menu or by navigating to System Setup P1 Mode from the front panel LCD menu of the encoder The HD492 supports RS 232 RS 422 and RS 422 Sony ...

Page 18: ...C SD SDI is present on the AUX input the Master output will be closed captioned 1080i60 HD SDI and the AUX output will be closed captioned NTSC SD SDI GPI Relocation GPI Relocation allows on command placement control of closed captions on your output to avoid blocking essential action such as screen crawls and emergency information You can control this feature by accessing the Main section of the ...

Page 19: ...ime configured to allow your captioner to hear the audio and return captions See Figure 8 An effective delay is likely to be between 2 or 3 seconds consisting of a transcription delay of approximately 3 seconds and an audio transmission delay that can be nearly as low as zero or as high as 5 seconds depending on the means of audio delivery to the captioner Figure 10 Workflow with CCMatch Enabled S...

Page 20: ... The receiving unit must be a member of the same subnet as the encoder For the port number to connect to use 2400 If these settings are correct the Scoreboard Interface should accept your connection immediately At this point you will receive ASCII text data over the connection which is a copy of the current CC1 caption data The output text is formatted using blank spaces and line breaks to approxi...

Page 21: ... installed and can be purchased by contacting the EEG sales team To import caption files into CCPlay go to the CCPlay tab on the encoder s web interface Then click on the Upload sub tab Click in the box labeled Please select your file and an open dialog will appear allowing you to navigate the drives accessible from your local computer Click Open when you have selected a file and then press Upload...

Page 22: ...cording in and out times for CCRecord files are triggered in real time through one of four GPI switches The switch number is configurable to provide maximum flexibility with a variety of encoder module configurations The switch is used to begin recording on the rising edge and to end a recording on the falling edge A new recording can be engaged immediately once the prior recording is ended Each r...

Page 23: ...plink module is active all closed captions through the encoder will be passed to the streaming server These captions may be locally inserted to the video through iCap telnet or dial up mechanisms encoders only or they may be present on the input video and originally coded using either real time roll up or offline pop on workflows Before using the Streaming feature you will need a stream URL for po...

Page 24: ...talled and can be purchased by contacting the EEG sales team The master encoder must have the Clone port optional software installed and then set up through the Clone section of the web interface When any Clone Server option is enabled the encoder will copy commands and data that are received through the dial up modem MA iCap telnet or RS 232 P1 plus P2 if it is being used for input and not Clone ...

Page 25: ...ide menu and select it If you are prompted for a license key the feature is not installed and can be purchased by contacting the EEG sales team SCTE 104 messages can either be authored using a built in preset editor and triggered via GPI see Figure 13 or can be sent from an external source using the SCTE 104 network protocol over TCP IP Further documentation for this feature may be found at https ...

Page 26: ...ide Your iCap encoder already has a modem built in so you do not need ComCC to use a modem connection however ComCC s audio coupler allows more efficient use of a phone line to communicate to multiple encoders and is a great back up solution To determine if ComCC is installed on your unit access your encoder s web interface look for an entry that says ComCC on the left side menu and select it If y...

Page 27: ...the output signal Additionally users have the ability to set code swap rules that enable dynamic mapping from one AFD code at the input to another at the output To determine if the AFD feature is installed on your unit access your encoder s web interface look for an entry that says AFD on the left side menu and select it If you are prompted for a license key the feature is not installed and can be...

Page 28: ...r any specified time period Each individual packet type can be independently set for upstream or local priority and permanent packets can be stored in Non Volatile Memory and inserted automatically whenever the Encoder is operating A List of XDS commands may be found in the Command Reference section of this manual Caption Decoder Open Caption Display The unit s built in decoder allows for an open ...

Page 29: ... Blocks caption input from Serial Port 2 Force Regen Blocks caption input from Modem P2 and iCap Capturing Incoming VANC or 608 Data for Analysis You can capture and save VANC data from the master video input to a USB stick for review or troubleshooting Place a USB stick into the USB port on the front panel of your encoder and navigate to Utilities Capture All VANC from the front panel LCD Press E...

Page 30: ... the master input of the unit to operate and provides open captions over black video on the Aux Mon output Decoder Output only Turn Video Blanking on off by navigating to Decoder Setup Blank Output from the front panel LCD Black 1080i Video Generation The Black 1080i Video Generation feature creates a high definition black video on all outputs with closed captions displayed open captions will disp...

Page 31: ...rough to the master video output while the signal at the auxiliary video input is routed directly through to the auxiliary video output Video output 2 is inactive Active On LED The Active On LED will light green when the unit is in active operating mode The LED will turn off when the Encoder is in Relay Bypass mode LCD Screen The LCD Screen provides access to the unit s front panel configuration m...

Page 32: ...ideo output Video Out 2 Non relay bypass protected copy of the primary video output signal Decoder Out If dual video encode is on then this acts as secondary video output otherwise it outputs open caption data for monitoring Aux Video In The Aux Video In can be used as a source of caption data when connected to a captioned HD SDI or SD SDI video source Caption data from the Aux Video In will be up...

Page 33: ...anel configuration menu GP In Out Two blocks of 8 GPI input switches and 8 GPO output notifications Switch functions vary based on software configurations Time Code In Balanced audio input for LTC time code Useful for operating CCPlay feature Audio In Balanced audio input for program companion audio in analog or AES digital format If using AES digital audio an AES pair of PCM encoded audio at 48kH...

Page 34: ...GPI Pin Assignments The GPIs use the upper 16 pin connector 15 13 11 9 7 5 3 1 16 14 12 10 8 6 4 2 Pin s Input 1 3 5 7 9 11 13 15 Ground 2 A 4 B 6 C 8 D 10 E 12 F 14 G 16 H GPO Pin Assignments The GPOs use the lower 16 pin connector 2 4 6 8 10 12 14 16 1 3 5 7 9 11 13 15 Pins Output 1 2 1 3 4 2 5 6 3 7 8 4 9 10 5 11 12 6 13 14 7 15 16 8 33 Copyright 2021 EEG Enterprises Inc All Rights Reserved ...

Page 35: ...m user will be cut off from entering more data GPI C Port 2 Lockout Activating this function disables P2 for data input Users connected to P2 will not be able to enter any caption data and if a user is inputting data and then the switch is closed the serial port user will be cut off from entering more data GPI D Force Regeneration Activating this function causes all locally input caption data to b...

Page 36: ...ny See the following pin assignments RS 232 Protocol Pin Master HD492 1 2 Rx Tx 3 Tx Rx 4 5 Ground Ground 6 9 RS 422 Pin Master HD492 1 Rx Tx 2 Rx Tx 3 Tx Rx 4 Tx Rx 5 Ground Ground 6 9 RS 422 Sony Pin Master HD492 1 2 Rx Tx 3 Tx Rx 4 5 Ground Ground 6 7 Rx Tx 8 Tx Rx 9 35 Copyright 2021 EEG Enterprises Inc All Rights Reserved ...

Page 37: ... pin three wire straight serial cable A null modem cable MAY NOT be used for this purpose since it will reverse the connections of pins 2 and 3 Null Modem cable may be used only when the intent is to connect two encoders together via the serial port see Cloning on page 17 Copyright 2021 EEG Enterprises Inc 36 All Rights Reserved ...

Page 38: ...cks Selectable RS 232C RS 422 Serial Data Input Format 7 data bits odd parity 1 stop bit settable between 1200 38400 baud Modem Paid Option One RJ 11 telephone jacks 1200 2400 baud GPI GPO Two ports which each mate to Omron XG5N 161 U connectors Normally open GPO relays rated to 2A 30 VDC Open collector optocoupler based GPIs AUDIO PORTS Port 1 LTC time code input Port 2 Program audio input for st...

Page 39: ... may be found at the end of this section Telnet Commands may be entered through a telnet connection to your encoder only after you ve enabled a telnet connection through your encoders web interface select Telnet from the side menu Web Terminal The Command Terminal is found on the web interface of your encoder select Terminal from the side menu This emulates the serial port interface to your encode...

Page 40: ...y selecting Startup Settings from the side menu To use the Startup Settings editor type any Smart Encoder command into the command box Omit the CTRL A character entirely as this character is implied at the beginning of each line To add additional commands press the button and more lines will appear When you have entered commands for all the settings that you want to make sticky click Update Startu...

Page 41: ...N ENTER VANC Line Change CTRL A f 334 Line ENTER VANC No 333 Detection CTRL A f vanc Line ENTER 333 Serial Output 333 Output Manual configure CTRL A f 333 ENTER GA Serial Output GA Serial Output CTRL A f ga ENTER XDS Insertion XDS Entry Enable XDS Entry CTRL A O XDS O ENTER Load XDS Packet CTRL A P Packet Duration Content Priority ENTER Sample XDS entries CTRL A P 103 1 Evening News ENTER CTRL A P...

Page 42: ...v t p C510 ENTER CTRL C Output Message CTRL A 1 Title Channel Repeat K D O H N L ENTER Remove Message from Queue CTRL A 4 Title K D ENTER Display Message Status CTRL A 9 Channel ENTER Begin Set Output Queue CTRL A 8 Channel ENTER End Set Output Queue CTRL C Display Output Queue CTRL A B ENTER Encoder Status Commands Status Commands Report Identification CTRL A ENTER Report Port Activity CTRL A O E...

Reviews: