EcLine EC-PM-530B Series User Manual Download Page 62

EC-PM-530B User's Manual


- 55 - 


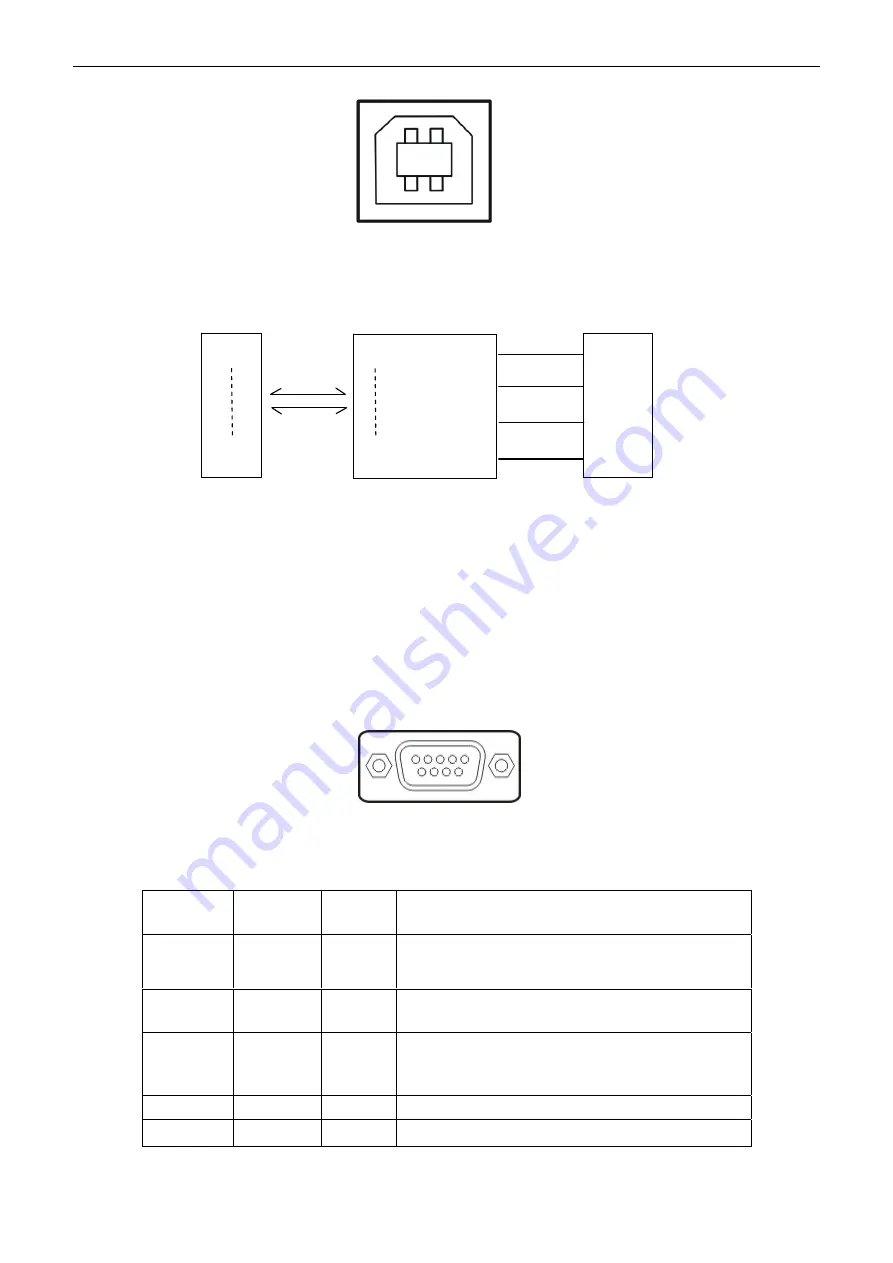
2. The connection figure of printer and computer with USB interface (as shown in Figure 5-5).


USB Interface is 2.0 Full-Speed interface, and displayed as a USB port on the computer finally. User 
can carry out USB printing by selecting corresponding USB port. 


5.2.4 Serial Interface 

EC-PM-530B printer’s serial interface is compatible with RS-232C protocol, supporting RTS/CTS 
and XON/XOFF handshaking protocol. Its connector is a DB-9 type connector and pin number of 
serial interface connector is shown as below. 


Signal definition of each pin is shown as Table A-3: 


Pin 

Number 

Signal 

From 

Description 

2 RXD 

Host 

Printer receives data from Host 

3 TXD 

Printer 

Printer sends control code X-ON/X-OFF and 
data to the Host 

8 CTS 

Printer 

“MARK” state means printer is too busy to 
receive data; “SPACE” means printer is ready to 
receive data. 

5 GND 

— 

Signal 

GND 

DTR 

Printer 

Data terminal is ready 

Figure 5-4 USB-B type connector 

Figure 5-5 Connection figure of printer and computer with USB interface 

2   1 
3   4 

D0 


D7 

VBUS 

GND 

D+ 

D- 

D0 


PDIUSBD12

D7 

Printer’s 26PIN connector 

PDIUSBD12 chip 

USB-B connector 

Figure 5-6 Pin number of serial interface connector


Table A-3 Signal of the serial interface pin


5              1 

9            6 

EC Electronics, Ltd.

www.eclinepos.com

EC Electronics, Ltd 

No. 221 Wai Yip Street, Kwun Tong 

Kowloon, Hong Kong

TEL : (852) 3590 6397 

FAX : (852) 3590 6497 

E-MAIL : [email protected]

Summary of Contents for EC-PM-530B Series

Page 1: ...User s Manual EC PM 530B Series Printer...

Page 2: ...names of the corporation EPSON and ESC POS are the registered trademarks of Seiko Epson Corporation Windows is a registered trademark of Microsoft Corporation EC Electronics Ltd www eclinepos com EC...

Page 3: ...efully to avoid bodily injury Caution Cautions must be observed to avoid damage to your equipment Note Notes contain important information and useful tips on the operation of your printer EC Electroni...

Page 4: ...d AC adapter 9 Do not use in locations subject to high humidity or dust levels 10 Never push objects of any kind into this product through cabinet slots as they may touch dangerous voltage dots or sho...

Page 5: ...All the parts of the printer can be recycled When it is abandoned we can call it back freely Please contact us when you abandon it EC Electronics Ltd www eclinepos com EC Electronics Ltd No 221 Wai Yi...

Page 6: ...the Cutter 10 2 8 Installing Bluetooth Interface Driver 11 2 9 Network Settings 14 2 9 1 Connecting Printer 14 2 9 2 Setting IP Address 14 2 10 Wi Fi Setting of EC Printer 16 2 10 1 Connecting the Pr...

Page 7: ...face 56 5 2 6 Power Supply Inlet 56 5 3 Auto cutter Specification 57 Chapter 6 Maintenance and Technical Service 58 6 1 Cleaning the Printer 58 6 2 Problems and Solutions 58 6 3 Contact the Technical...

Page 8: ...EC PM 530B USE denotes USB interface Serial interface Ethernet interface EC PM 530B B denotes USB interface Bluetooth EC PM 530B W denotes Wi Fi interface 1 2 Application y Embedded installation and p...

Page 9: ...e Please take the specific interface as standard Power Supply Inlet Data Interface Cash Drawer Interface EC Electronics Ltd www eclinepos com EC Electronics Ltd No 221 Wai Yip Street Kwun Tong Kowloon...

Page 10: ...nter to the computer with correct cable 2 3 1 Connecting the Cash Drawer Cable Make sure the printer is turned off Plug one end of the cable into the cash drawer interface of the printer and the other...

Page 11: ...of USB cable flat shape into the computer s USB interface connector 2 Plug the B end of USB cable square shape into the printer s USB interface connector As shown in figure 2 4 Figure 2 3 Connecting t...

Page 12: ...the cable fixed 2 3 5 Connecting the Ethernet Cable Plug the crystal end of the Ethernet cable RJ 45 into the printer s Ethernet interface and then plug the other end into the LAN s entrance Shown as...

Page 13: ...n press down another side until the ribbon is locked in place 5 Turn the ribbon knob in the direction shown by the arrow again to tighten the ribbon 6 Close the rear cover and front cover and the inst...

Page 14: ...ridge with your thumb and middle finger and then lift up the left side of the ribbon cartridge and then take out the ribbon cartridge Install a new one as the above steps 3 Please use the original rib...

Page 15: ...e pops up Welcome to the new hardware wizard 2 Select the Install from the list or specific position then click Next 3 A window of Please choose your search and installation options pops up choose Don...

Page 16: ...pops up check Specify a location L click Browse select the path as follows CD ROM Drivers WIN98 WINME USBdriver then click OK 5 Return to the window of Add New Hardware Wizard click Next a window of W...

Page 17: ...r after printing please select the Full cut or Partial cut in the Paper Quality page after clicking the Printing Preferences button which lies in the General page of the driver properties Referring fi...

Page 18: ...rn on the printer search Bluetooth device in Window XP system and click Add 3 Tick off the option of My device is set up and ready to be found Click Next to continue Note Select to install this driver...

Page 19: ...Tick off the option of Let me choose my own passkey and enter 1234 as shown then click Next EC PM 530B EC Electronics Ltd www eclinepos com EC Electronics Ltd No 221 Wai Yip Street Kwun Tong Kowloon...

Page 20: ...port as the outgoing port and the installation is finished Note Every Bluetooth device has its own address Please reinstall it when replacing the Bluetooth device EC Electronics Ltd www eclinepos com...

Page 21: ...igure of the software is shown as follows 2 Search printer Click Search button in the main interface the dialog box appearing will begin searching automatically and displays the status listing a print...

Page 22: ...s the IP and MAC address What s more the assign mode dynamic static is noted behind the IP address 1 Correlative description for IP address settings In order to search and set printer s IP address con...

Page 23: ...k Use DHCP and fill in IP address Subnet Mask and Default Gateway If there is no gateway in the network fill 255 255 255 255 in the Default gateway IP address and Subnet Mask should obey the assigning...

Page 24: ...6 numbers and letters as shown in Figure 1 2 Connecting to the equipment in Android Take the mobile phone of Android 4 4 as an example to show how to connect the printer with the equipment in Android...

Page 25: ...on 30 seconds after the printer is on 2 Click Settings and the interface pops up Select the WLAN function to ON then click the printer Wi Fi searched by the mobile phone to connect The printer Wi Fi d...

Page 26: ...setting interface pops up The display style of setting interface may differ in different systems but the parameter items are the same Take Windows XP as an example in the following as shown in Figure...

Page 27: ...e is English When you need to change the language just select the language you need in the Select Language and then click Apply as shown in Figure 5 Figure 5 Figure 4 EC Electronics Ltd www eclinepos...

Page 28: ...de of Update Firmware Then the countdown interface of saving the modification appears and the wireless equipment can conduct communications with the printer as soon as the countdown is over Descriptio...

Page 29: ...f the printer wireless card in AP Client which is the MAC address Valid when it s in AP connected printing Channel Select the corresponding channel according to the hotspot setting Automatic is recomm...

Page 30: ...shown in Figure 8 The dialog box Wireless Network Connection Status pops up then click Properties as shown in Figure 9 Figure 9 Figure 8 Double click it EC Electronics Ltd www eclinepos com EC Electr...

Page 31: ...x as shown in Figure 10 Select the current wireless network name in Preferred networks and then click Properties as shown in Figure 11 Figure 10 EC Electronics Ltd www eclinepos com EC Electronics Ltd...

Page 32: ...ind out the security mode and encrypt type in Wireless network key as shown in Figure 12 Figure 11 EC Electronics Ltd www eclinepos com EC Electronics Ltd No 221 Wai Yip Street Kwun Tong Kowloon Hong...

Page 33: ...hown in Figure 13 When the window of Wireless Network Connection pops up double click the current hotspot and the connection will be disconnected as shown in Figure 14 Figure 12 Encrypt type Security...

Page 34: ...PM 530B User s Manual 27 Figure 13 EC Electronics Ltd www eclinepos com EC Electronics Ltd No 221 Wai Yip Street Kwun Tong Kowloon Hong Kong TEL 852 3590 6397 FAX 852 3590 6497 E MAIL sales ecline com...

Page 35: ...HCP Auto config and Static Assigned IP You can select the corresponding assignment way according to your need When selecting DHCP Auto config the IP Address and Subnet Mask can be acquired automatical...

Page 36: ...ot Update Firmware Upgrade the wireless module of the printer as shown in Figure 16 and you can neglect it if there is no need to upgrade 2 10 3 Wi Fi Interface Status Display and Parameters Reset Wi...

Page 37: ...eless printing the iPhone iOS equipment does not need to install any plug in EC PM 530 which is equipped with Wi Fi interface is taken as an example to describe printing application Network name SSID...

Page 38: ...on to ON and select the EC PM 530 hotspot as shown in Figure 20 3 Turn on the print service 3 1 Enter into the Settings of the system as shown in Figure 18 3 2 Find out Printing in Settings interface...

Page 39: ...lly and show the printer if found as shown in Figure 24 Figure 21 Figure 22 Figure 23 Figure 24 Note If there is no function switch in the upper right of EC Print Service interface it means the curren...

Page 40: ...printed in the software then click the Tools button as shown in Figure 26 4 3 When the menu pops up select Print as shown in Figure 27 4 4 When the Print interface pops up click Print as shown in Fig...

Page 41: ...ding printing parameters are correct click Print as shown in Figure 31 4 8 The system sends print data to the printer when the printer finishes receiving a prompt Print job completed will be shown as...

Page 42: ...the Settings of the system as shown in Figure 33 1 2 Find out WLAN in Settings interface and enter into as shown in Figure 34 1 3 Turn on the WLAN function equipment will search automatically and sho...

Page 43: ...Click the menu icon on the upper left of the Word software interface as shown in Figure 39 2 4 When the menu pops up click Print as shown in Figure 40 2 5 When the Printer Options interface pops up cl...

Page 44: ...the printer driver hasn t been installed on the PC adopt newly install way whose steps are shown in Newly install printer network driver If the printer driver has been installed on the PC adopt Upgrad...

Page 45: ...andard TCP IP Port in the port and click Next 5 A window of Add standard TCP IP Printer Port Wizard pops up click Next 6 A window of Add Port pops up enter the IP address reported by the Setting print...

Page 46: ...k Settings 8 A window of Port Settings pops up Affirm that Port Name and Printer Name or IP Address are correct Protocol is RAW and Port Number is 9100 click OK EC Electronics Ltd www eclinepos com EC...

Page 47: ...Follow the guide and click Next gradually till the installation is finished At this time printer network driver is installed completely 2 Upgrade install printer network driver setting driver s networ...

Page 48: ...P Address column Take IP address 192 168 0 240 for example Port Name is created automatically after finishing filling in IP address Click Next 7 A window of Additional Port Information Required pops u...

Page 49: ...at Port Name and Printer Name or IP Address are correct Protocol is RAW and Port Number is 9100 click OK EC Electronics Ltd www eclinepos com EC Electronics Ltd No 221 Wai Yip Street Kwun Tong Kowloon...

Page 50: ...click Finish 11 Return to Printer Ports click Close 12 Return to Properties make sure the network port is selected click Apply and then click Close Thus printer s network port setting is finished EC...

Page 51: ...Five beeps Initialize the printer Six beeps Aging test 3 2 Self Test and Parameter Settings 3 2 1 Function Mode Setting Self Test Mode While pressing the FEED key and holding on turn on the printer T...

Page 52: ...th the driver installed in The concrete setting steps are shown as follows 1 Make sure that the computer and the printer are connected with an USB cable and both the computer and the printer are turne...

Page 53: ...d automatically when opening each parameters settings window If the printer isn t online or the printer port is set incorrectly the current settings will be blank therefore please set the printer to o...

Page 54: ...ontrol buttons After selecting the corresponding parameter click Set the printer will change the setting at the moment it receives the change command Click Cancel to return to the upper window Click D...

Page 55: ...al or unidirectional Form Width Select the bill width Cutter When the setting of the cutter is valid the printer can execute the paper cut instruction to cut paper Baud Rate Select the printer serial...

Page 56: ...st install the roll paper guide 2 Place the roll paper into the paper holder 3 Pull out a small amount of paper and then close the rear cover Correct Wrong Roll Paper Rear Cover Note Paper head should...

Page 57: ...acter set International character set ASCII 1 252 2 42 Character size Character dot matrix 7 8 15 16 Character pitch ASCII 16 CPI Line spacing 1 6 inch or by programmable in 1 144 inch increments Emul...

Page 58: ...t 2 9 Kg Noise 65 dB A ISO7779 standard Control panel 1 key and 3 LED indicators Physical dimensions 162 mm Width 253 mm Depth 140 mm Height Power consumption Operating 25 W Standby Approximately 3 2...

Page 59: ...24V DC 1A Output 3 Cash drawer Open closed signal TTL Input 4 24V DC Power 5 NC 6 Cash drawer Open closed signal GND Drive current 24V 1A 5 2 2 Parallel Interface 1 Technology specifications a Select...

Page 60: ...en data is being imported 2 When the printer is printing 3 When the printer is offline 4 When error occurs 12 30 PE Paper out OUT High level means paper out 13 SLCT Printer is selected OUT Pull up to...

Page 61: ...nsmit data The Direction in the title column means the flow direction of printer signal to the printer The Return in the title column means pair twist return You must confirm that the interface cable...

Page 62: ...umber Signal From Description 2 RXD Host Printer receives data from Host 3 TXD Printer Printer sends control code X ON X OFF and data to the Host 8 CTS Printer MARK state means printer is too busy to...

Page 63: ...Supply Inlet EC PM 530B printer connects with AC adapter of 24V 10 and 2 5A The power supply inlet is shown as Figure 5 10 Figure 5 9 Ethernet interface Figure 5 8 The connection figure of host 25 PIN...

Page 64: ...4 mm Cutting mode full cut or partially cut leaving point leaving 1 point 2mm Operation voltage V Motor 24 detector 3 3 Startup current A 0 8 Cutting speed second cut period 1S Cutting frequency cuts...

Page 65: ...roperly 2 Self test is normal but online printing is disabled Please make sure that the printer is connected with the computer correctly and the paper is already loaded If it still can t print in onli...

Page 66: ...ssing the FEED key and turn on the printer at the same time when the printer beeps five times loosen the FEED key the printer is initialized automatically 6 Print character Phenomenon The printer can...

Page 67: ...on to the next horizontal tab position If the current printing position exceeds the last horizontal tab position the HT command will not be executed Horizontal tab positions are set by ESC D command L...

Page 68: ...the lowest bit is valid When n 1 B the user defined character set is selected When n 0 B the inner character set is selected When 0 n 255 default n 0 ESC Define user defined characters Format ASCII ES...

Page 69: ...r setting dot matrix figure mode m and setting the transverse dots number n1 n2 of dot matrix figure m 0 1 0 n1 255 0 n2 3 0 d 255 n1 n2 is hexadecimal figure with two bits n1 is low byte and n2 is hi...

Page 70: ...defined character n This command function can be canceled only after the computer is restarted ESC Initialize printer Format ASCII ESC Decimal 27 64 Hex 1B 40 Description This command is used for ini...

Page 71: ...ng the kind and size of characters will not affect tab positions already set This can guarantee that tab is put in order when Chinese characters mix with common characters in one line or when characte...

Page 72: ...x 1B 63 34 n Description Select the paper sensor to stop printing when paper out is detected n 0 255 n 05H select the paper sensor to stop printing when paper out is detected n 0 when paper out is det...

Page 73: ...feed paper directly n 0 48 ESC m Partial cut Format ASCII ESC m Decimal 27 109 Hex 1B 6D Description The printer controls the paper cutter to execute a partial cut of paper ESC p Generate cash drawer...

Page 74: ...ode FS Set Chinese underline mode Format ASCII FS n Decimal 28 45 n Hex 1C 2D n Description When n 0 underline has no effect on Chinese characters When n 1 Chinese characters are set to single underli...

Page 75: ...1D 28 41 pL pH n m Description pL 2 pH 0 n 0 m 1 49 Enter HEX print mode HEX DUMP To cancel this command you must restart the printer GS F Set offset of black mark orientation Format ASCII GS F pL pH...

Page 76: ...hanical value L0 of the printer and the distance Q between the cutting tearing position and the beginning print position is the same with the inherent mechanical value Q0 of the printer shown as figur...

Page 77: ...trol command of specified bill Take D model as an example The examples below assume that the paper tear position is on the printer tearing part L0 67mm Q0 29mm as Figure 1 shows Example 1 Bill require...

Page 78: ...nt position is 16mm from the cutting tearing position z Calculating the cutting tearing position offset As the distance between the black mark and the cutting tearing position is less than L0 67mm the...

Page 79: ...114 n Hex 1D 72 n Description This command is effective at serial interface If n 1 or n 49 paper status is returned If there is paper the bit2 3 of the returned byte is 0 if there is no Cutting tearin...

Page 80: ...ct the default codepage 0 PC437 1 PC850 2 PC860 3 KU42 4 TIS11 5 TIS18 6 TIS26 7 JAPAN932 8 RUSSIAN 9 IRAN01 10 IRAN02 11 VIETNAM 12 HEBREW 13 PC1252 14 PC852II 15 PC855_0EM 16 TURKEY_857 17 PC1256 18...

Page 81: ...dby position ESC n 1B 3F n Cancel user defined character n ESC 1B 40 Initialize printer ESC C 1B 43 n Set the page length according to line spacing ESC D 1B 44 n1 nk NULL Set horizontal tab positions...

Page 82: ...spacing FS W 1C 57 n Turn quadruple size mode on off for Chinese characters GS FF 1D 0C Black mark detection GS A pL pH n m 1D 28 41 pL pH n m Enter the Hex print mode HEX DUMP pL 2 pH 0 n 0 m 1 49 GS...

Page 83: ...EC Line product For service please contact service ecline com hk www eclinepos com EC Electronics Ltd www eclinepos com EC Electronics Ltd No 221 Wai Yip Street Kwun Tong Kowloon Hong Kong TEL 852 359...

Reviews: