


44
ARM ROBOT
MANUAL
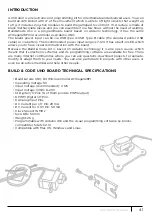
BUILD & CODE THE ARM ROBOT
To assemble the Arm Robot you will need to build its structure, gripper and the gamepad with
the included pieces; then you have to do the cable connections between the Servomotors and
the Build & Code UNO board. Finally, you have to code its function and upload the program to
the Build & Code UNO board so you can use the Arm Robot.
The Arm Robot functions when it is connected to the computer or when it is connected to a 9V
battery using the battery holder included.
Mounting the Arm Robot
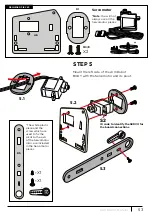
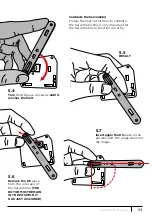
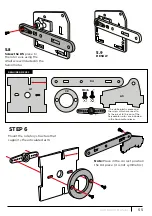
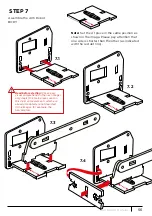
Please follow carefully the mounting instructions. It is necessary that you read all the notes
which are complementary to the images in order to assemble correctly the Arm Robot.
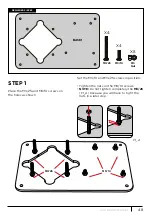
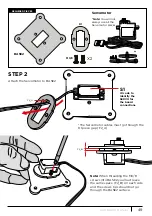
It is very important that you set the pieces in the correct position, as shown in the images,
and that you calibrate correctly the Servomotors as indicated. Setting a piece in an incorrect
position may suppose that in later steps you won’t be able to continue mounting the Arm
Robot or that it won’t move correctly when it is completely mounted with the risk of breaking it.
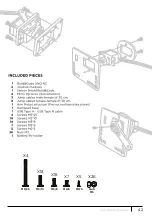
The main steps of the Arm Robot assembly are:
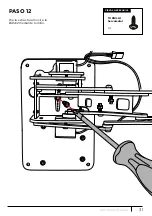
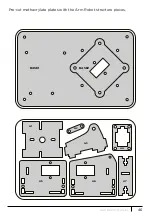
• Build main piece #1 Arm Robot BASE (p. 10 – 12 )
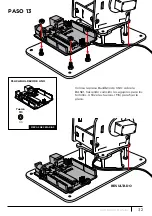
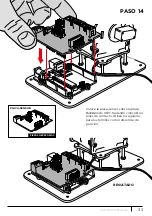
• Build main piece #2 BODY (p. 13 – 20 )
• Build main piece #3 FOREARM AND GRIPPER (p. 21 – 27 )
• Assemble the 3 main pieces with each other (p. 28 – 32 )
• Build the double joystick gamepad (p. 33 )
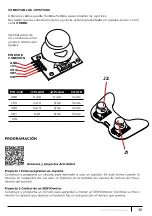
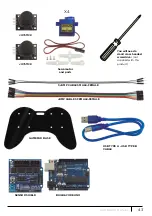
Connections
The Arm Robot uses the Build&Code UNO board, over it you have to place the Build&Code
Sensor-Shield which makes it easier to connect the 4 Servomotors and the 2 joysticks cables.
The 4 Servomotors connect to the PWM digital pins, and the 2 joysticks connect to 4 analog
inputs, each joystick needs 2 analog inputs (one for X-axis and another one for Y-axis).
You must verify that the connections are correctly done otherwise the Arm Robot movements
will not resemble to those you indicate.
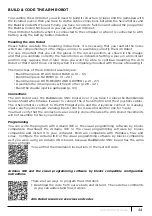
Programming
You can write the program with Arduino IDE or the visual programming software by blocks
compatible. Download the Arduino IDE or the visual programming software by blocks
compatible and install it in your computer. Both are compatible with Windows, Mac and
Linux. Configure the Arduino IDE or the visual programming software by blocks compatible
as if you were using an Arduino UNO board, because Build&Code UNO board has the same
microcontroller.
You can find the installation instructions in the next QR code:
Arduino IDE and the visual programming software by blocks compatible configuration
instructions.
There are two ways to program the Arm Robot:
1. Download the code from our website and install it. The code has comments
so you can understand how it works.
Arm Robot resources: exercises and codes
Summary of Contents for Arm Robot
Page 2: ...LANGUAGE INDEX Choose the language SPANISH FRENCH ITALIAN ENGLISH DEUTSCHLAND...
Page 3: ...ndice Interactivo 3 ARM ROBOT MANUAL...
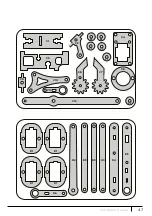
Page 5: ...5 ARM ROBOT MANUAL M3 25 M3 10 M3 8 M3 6 M2 5 TUERCA M3 X4 X18 X18 X7 X5 X26...
Page 38: ...38 ARM ROBOT MANUAL...
Page 39: ...39 ARM ROBOT MANUAL...
Page 40: ...Interactive index 40 ARM ROBOT MANUAL ENG...
Page 42: ...42 ARM ROBOT MANUAL M3 25 M3 10 M3 8 M3 6 M2 5 Nuts M3 X4 X18 X18 X7 X5 X26...
Page 75: ...75 ARM ROBOT MANUAL...
Page 76: ...76 ARM ROBOT MANUAL...
Page 77: ...Interactif sommaire 77 ARM ROBOT MANUAL FR...
Page 79: ...79 ARM ROBOT MANUAL M3 25 M3 10 M3 8 M3 6 M2 5 crous M3 X4 X18 X18 X7 X5 X26...
Page 112: ...112 ARM ROBOT MANUAL...
Page 113: ...113 ARM ROBOT MANUAL...
Page 114: ...Indice Interattivo 114 ARM ROBOT MANUAL IT...
Page 116: ...116 ARM ROBOT MANUAL M3 25 M3 10 M3 8 M3 6 M2 5 DADO M3 X4 X18 X18 X7 X5 X26...
Page 149: ...149 ARM ROBOT MANUAL...
Page 150: ...150 ARM ROBOT MANUAL...
Page 151: ...Interaktive Index 151 ARM ROBOT MANUAL DE...
Page 188: ...Arm Robot Electronic and programming kit Arm Robot and double joystick gamepad ebotics com...


