background image

4

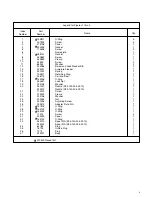
Legend for Figures 1 thru 4

1
2
3
4
5
6
7
8
9

10

11

12
13
14
15
16
17
18
19
20

21
22
23
24
25
26
27
28
29
30
31
32
33

34
35
36
37

199811
207892
376706
323926
174638
    –
286122
353860
353859
42590
68904
344966
323931
351042
102671
346773
154006
352641
233106
351437
343410
112201
323933
233106
200345
351436
343414
157515
154139
154004
11012
323923
154140
942070
942320
64765
16794
7074
323921

O-Ring
Screw
Cover
Gasket
Screw
Nameplate
Gasket
Screw
Clamp
Screw 
Washer
Screw and Lock Washer S/A
Armature Flapper
Spring
Retaining Ring
Coil and Seal
O-Ring
Lock Nut
Washer
Nozzle (SF4-100-30-002-10)
Nozzle (SF4-140-20-002-10)
Screw
Frame
Washer
Nut
Adjusting Screw
Adapter Plate S/A
O-Ring
O-Ring
O-Ring
Screw
Cover
O-Ring
Spool S/A (SF4-140-20-002-10)
Spool S/A (SF4-100-30-002-10)
Plug
Orifice Plug
Plug
Body

5
4
1
1
4
1
1
1
1
2
2
2
1
1
1
1
1
1
1
1
1
1
1
1
1
1
1
1
1
1
4
1
1
1
1
1
1
1
1

Y

Y

Y

Y

Y

Y

Y

Y

Index

Number

Part

Number

Name

Qty.

Y

 919529 Gasket Kit

Summary of Contents for Vickers SF4-100-30-002-10

Page 1: ...Two Stage Flapper Type Servo Valve SF4 140 20 002 10 SF4 100 30 002 10 Overhaul Manual I 3063 S Revised 02 01 74 Vickers Valves...

Page 2: ...ction 3 A Reference Material 3 B Kits 3 II Overhaul 5 A Unit Removal 5 B Special Tools 5 C Improvised Tools 5 D Disassembly 5 E Cleaning 5 F Inspection Repair and Replacement 5 G Assembly 6 H Unit Ins...

Page 3: ...w O Rings and gaskets be used during overhaul The part number of the kit is 919529 x 100 Equals Supply Pressure in psi 3 5 1 3 4 5 1 2 2 Table 1 Model Code Breakdown Servo Valve series 4 way x 0 1 Equ...

Page 4: ...16794 7074 323921 O Ring Screw Cover Gasket Screw Nameplate Gasket Screw Clamp Screw Washer Screw and Lock Washer S A Armature Flapper Spring Retaining Ring Coil and Seal O Ring Lock Nut Washer Nozzle...

Page 5: ...eaning All parts must be thoroughly cleaned and kept clean during inspection and assembly The close tolerance of servo valves makes this requirement more stringent than usual Use a commercial solvent...

Page 6: ...e valve as follows a Assemble parts 26 22 21 and 20 b Install adjusting screw 25 thru the adapter 26 attach standard nut 24 and washer 23 and turn the nut on until it bottoms against the shoulder of t...

Page 7: ...nnector with body hole while installing See Figure 4 Tighten the adapter holding screws 10 and washers 11 alternately until the pilot stage is flush against the valve 5 Check spool to see that it does...

Page 8: ...el Surface finish 125 except where specified H Unit Installation Flush the system through 10 micron full flow filters prior to installing the servo valve A flushing plate can be manufac tured See Figu...

Page 9: ...g of 190 milliamps is observed on meter c Energize the hydraulic system and adjust for hydrau lic null no movement of hydraulic motor or cylinder with adjustment screw 25 See Figure 1 d Slowly vary th...

Reviews: