‐
6
‐
Simple
four
step
installation
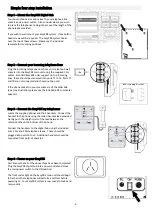
Step
1
–
Mount
the
EasyPBX
Digital
Hub
You
should
choose
a
location
close
to
your
telephone
line
sockets
and
a
power
outlet.
Also
consider
where
you
wish
to
place
the
telephones,
taking
into
account
the
length
of
the
phone
leads
provided.
If
you
wish
to
wall
mount
your
EasyPBX
system,
three
button
head
screws
will
be
required.
The
EasyPBX
system
hooks
over
the
top
of
these
screws.
Please
see
the
included
template
for
mounting
positions.
Step
2
–
Connect
your
incoming
telephone
lines
Plug
the
incoming
telephone
lines
from
your
telephone
wall
sockets
into
the
EasyPBX
main
unit
using
the
supplied
1.5m
cables.
Standard
EasyPBX
units
support
up
to
6
incoming
lines,
these
should
be
connected
into
ports
T1
to
T6.
Ports
T7
and
T8
are
not
connected
and
should
not
be
used.
If
the
phone
sockets
in
your
premises
are
of
the
older
606
type
(see
illustration)
please
use
the
included
606
to
modular
adapters.
606
style
plug
&
socket
Step
3
–
Connect
the
EasyPBX
key
telephones
Locate
the
supplied
phones
and
their
handsets.
Connect
the
handset
to
the
phone
using
the
coiled
handset
lead
provided.
Gently
push
the
straight
part
of
the
lead
between
the
retention
tabs
on
the
bottom
of
the
phone.
Connect
the
handsets
to
the
digital
hub
using
the
included
10m,
20m
and
30m
telephone
leads.
These
should
be
plugged
into
ports
L0
to
L3.
Additional
handsets
should
be
connected
from
ports
L4
onwards.
Step
4
–
Power
on
your
EasyPBX
First
Ensure
that
all
of
the
above
steps
have
been
completed.
Plug
the
EasyPBX
digital
hub
into
a
power
outlet
and
move
the
main
power
switch
to
the
ON
position.
The
front
status
light
on
the
EasyPBX
main
unit
should
begin
to
flash
and
the
telephones
will
perform
a
self
‐
test
before
powering
on.
Your
EasyPBX
system
is
now
ready
to
make
and
receive
calls.
Summary of Contents for EPDH008
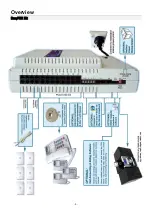
Page 4: ...3 Overview EasyPBX Kit...
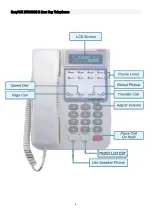
Page 5: ...4 EasyPBX EPDH008 8 Line Key Telephone...
Page 19: ...18 Notes...
Page 20: ...19 Copyright 2008 RhinoCo Technology All rights reserved...


