M500 USER MANUAL AND PROGRAMMER SDK
Page 29
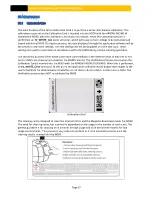
If there is dust on the mirrors, you will see a dust line (as illustrated by the number 1 on the figure
below) on the left section (number2) of the image. The Left section (number 2) is the uncorrected side
of the image and the Right Section (number 3) is the corrected side of the image. This method helps to
see the raw uncorrected image which allows the dust line to be visible. If such a line exists there is dust
on the mirrors, and you should proceed to the Cleaning process, Step 3.
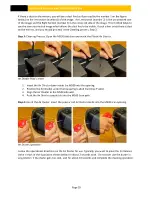
Step 3: Cleaning Process. Open the M500 side door and insert the Plastic Air Divider.
Air Divider Plastic insert
1.
Insert the Air Divider down inside the M500 into the opening.
2.
Position the Air Divider under the top spring loaded line (Grey Plastic).
3.
Align the Air Divider to the M500 side wall.
4.
Push the Air Divider completely into the M500 Scan path.
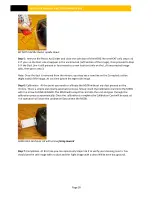
Step 4: Use of the Air Duster. Insert the pressurized Air Duster nozzle into the M500 scan opening.
Air Duster operation
Follow the operational directions on the Air Duster for use. Typically, you want to press the Air Release
Valve in each of the 4 positions shown below for about 2 seconds each. Do not over use the duster in
any position, if the duster gets too cold, wait for about 10 seconds and complete the cleaning operation.


