background image

20

© e.Digital Corporation Odyssey 200 User’s Guide

3.

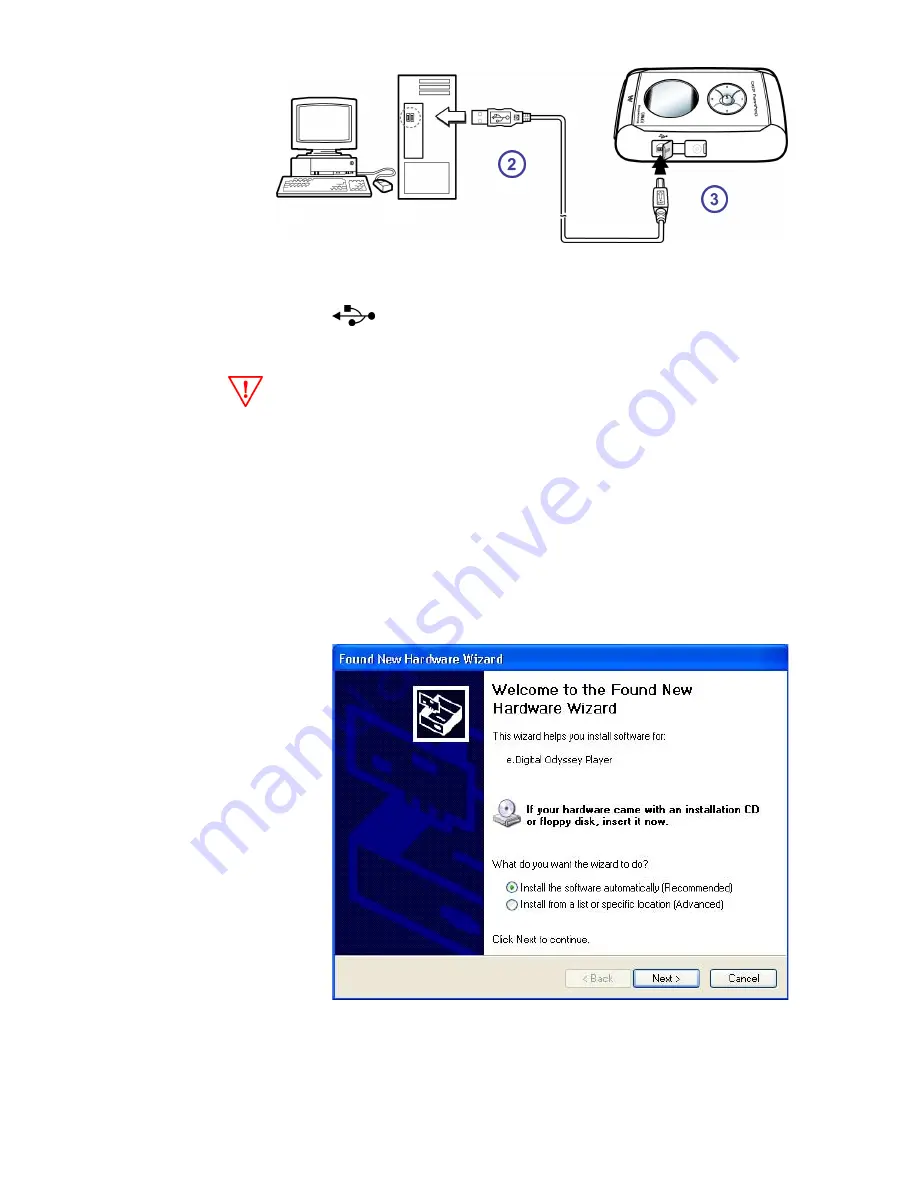
On the player, open the rubber lid of the USB 

 port and connect the smaller end of the 

cable to the player.
The USB connector should slide easily into the 
port; do not use force.

4.

Turn on the player.

5.

The player LCD shows 

USB CONNECTED.

6.

Windows XP recognizes that a new device is 
attached and displays a dialog; click the 

Next


button.

7.

The New Hardware Wizard searches the instal-
lation CD for the Odyssey 200 USB driver.

Summary of Contents for Odyssey 200

Page 1: ...User s Guide www edig com e Digital ...

Page 2: ... of e Digital Corporation Microsoft and Windows are trademarks or registered trademarks of the Microsoft Corporation MusicMatch is a trademark or registered trademark of MusicMatch Incorporated All other product service and company names are the property of their respective owners All contents of the installation CD included with this product are copyrighted by e Digital Corporation or used with t...

Page 3: ...OVERVIEW 5 Accessories Included with your Odyssey 200 6 Odyssey 200 Features and Controls Overview 7 Remote Control optional 9 Battery Installation 9 Power Odyssey 200 On and Off 10 Description of Player s LCD 11 Overview of Player Modes 12 CHAPTER 3 INSTALL SOFTWARE 15 Install Odyssey Manager Software 16 Install MusicMatch Software 18 ...

Page 4: ...Player 31 Transfer Music 32 Transfer Other Files 33 Upload Files From Player 33 Change Playback Order 35 Erase Files from Player 36 Disconnect the USB Cable for Windows 38 CHAPTER 5 PLAY RADIO AND RECORD MODE 39 Play Mode 40 Playback State 40 Pause Playback 41 Replay Segment 41 Radio Mode 42 Use the Joystick To Change Stations 43 Favorite Radio Stations 43 Radio Equalizer 44 Record Mode 44 Create ...

Page 5: ... TROUBLESHOOTING SPECIFICATIONS 51 Safety Precautions 51 Player Issues 52 Sound Problems 53 Problems Connecting to PC 53 MusicMatch 54 Technical Specifications 54 Approvals 55 Limited Warranty 56 Obtaining Warranty Service 57 INDEX 59 ...

Page 6: ...iv e Digital Corporation Odyssey 200 User s Guide ...

Page 7: ...o carry a library of your favorite music wherever you go WHAT IS MP3 MP3 stands for MPEG 1 or MPEG 2 layer 3 MP3 files can be compressed up to 1 20th of the size of original Wave files You can download MP3 files from the Internet or create them from your personal music CDs by using the MusicMatch software Then you down load the MP3 files to your player for CD quality sound without the need for bul...

Page 8: ...ble Transfer music to Odyssey 200 USE PLAYER FEATURES Play tracks Listen to a radio station Create voice recordings Erase and manage files on your player DOCUMENT CONVENTIONS To use the Odyssey 200 and related software you must have at least basic skills in using the Windows or Mac operating system This document uses con ventions described below A note symbol indicates a useful tip A caution symbo...

Page 9: ...oss refer ence to a section in the User s Guide In the PDF version of the documentation available from the Odyssey Manager Help menu you can click on the phrase to jump to the content This character is used to describe menu submenu selections For example select the File New menu ...

Page 10: ...4 e Digital Corporation Odyssey 200 User s Guide ...

Page 11: ...w This chapter describes Accessories Included with your Odyssey 200 on page 6 Odyssey 200 Features and Controls Overview on page 7 How to Power Odyssey 200 On and Off on page 10 Description of Player s LCD on page 11 Overview of Player Modes on page 12 ...

Page 12: ...0 When you unpack your player you will find the fol lowing items User s Guide Installation CD e Digital Odyssey Manager MusicMatch software Adobe Acrobat Reader PDF of User s Guide Shielded USB cable Compact stereo earphones One 1 5V AA battery Carrying case optional Remote Control optional ...

Page 13: ... player from various perspectives and identifies features and controls The Joystick performs a variety of functions depending on which mode the player is in For example press and release the Joystick to power the player on and off Microphone LCD Joystick Smart Media Card SMC Slot Eject Slider for SMC Battery Cover ...

Page 14: ...8 e Digital Corporation Odyssey 200 User s Guide Earphone Jack Hold Slider to lock player Mode Repeat or Set Radio Channel Equalizer Record on off or Mark Replay or Backlight USB Port ...

Page 15: ...ote control connector into the player s earphone jack 2 Next insert the earphone connector into the remote control s earphone jack BATTERY INSTALLATION The AA battery included with your Odyssey 200 will last for up to 12 hours of play To replace the battery 1 Loosen the battery cover on the back of the player by sliding the cover downward Earphone Jack Forward Volume Up or Previous Hold Slider Pow...

Page 16: ...ready to use POWER ODYSSEY 200 ON AND OFF POWER ON To turn on the player press and release the button You will see an animated display followed by a check of the player s internal memory and if installed SMC memory POWER OFF To shut off your Odyssey 200 press and hold the button Or the player will automatically shut off after three minutes of inactivity for example in Play Mode but not during musi...

Page 17: ...EQUALIZER OPTIONS The Odyssey 200 equalizer adjusts bass or treble to one of five options to enhance the sound This option is adjusted in Play Mode or Record Mode only by pressing the EQ button until the LCD shows the setting you want The player auto matically returns to the previous display after each EQ button press and displays an icon letter indicat ing the current equalizer setting The five o...

Page 18: ...This option is adjusted in Play Mode or Record Mode only Press the REP button to one of the following options OVERVIEW OF PLAYER MODES Each time you press the Mode button on the right side of the player the LCD shows the next mode cycling through a total of four Plays the first 10 seconds of each track Plays all tracks sequentially from the start to the end of each track Plays all stored tracks co...

Page 19: ...ls For more information see Radio Mode on page 42 Record Mode is used to create a voice recording by speaking into the internal microphone When there are no voice recordings on the player NO TRACK shows on the LCD However once you create voice recordings the tracks are listed in this mode For more information see Record Mode on page 44 There are two ways to remove files from your player by using t...

Page 20: ...14 e Digital Corporation Odyssey 200 User s Guide ...

Page 21: ...ch is third party software that you can use on your PC to rip create MP3 files from a music CD The Odyssey Manager software provides the ability to manage and transfer files between your PC and player Install the Odyssey Manager software before connecting your player to the USB cable and your PC otherwise your PC will have problems recognizing the USB driver for your Odyssey 200 ...

Page 22: ... install the e Digital Odyssey Manager software on your PC 1 Insert the installation CD into your PC s CD drive 2 From the installation page click the Odyssey Manager button 3 From the InstallShield Wizard dialog click Next 4 In the License Agreement dialog read the terms and then click Yes to accept and continue with the installation 5 In the Choose Destination Location dialog click Next to selec...

Page 23: ...ck Next to select the default Program Folder 7 The e Digital Odyssey Manager software begins to install and progress is displayed in the Setup Status dialog Once the e Digital Odyssey Manager software installation is complete the next step is to Install MusicMatch Software ...

Page 24: ...that instead MusicMatch for Windows software is included on the e Digital installation CD However if you use a Mac you may have to download the Mac version from www edig com product support in Step 3 a In most cases the default installation options are suitable To install the MusicMatch software 1 The installation CD should still be in your PC s CD drive from the Odyssey Manager installa tion desc...

Page 25: ...When the installation is complete click the exit icon Now you are ready to Rip and Add Music to your player If you use Microsoft Windows XP on your computer refer to the next section WINDOWS XP SPECIAL PROCEDURE Windows XP computers require one more installa tion procedure after you install the software The following procedure ensures that the Odyssey 200 USB driver is correctly installed CONNECT ...

Page 26: ...the cable to the player The USB connector should slide easily into the port do not use force 4 Turn on the player 5 The player LCD shows USB CONNECTED 6 Windows XP recognizes that a new device is attached and displays a dialog click the Next button 7 The New Hardware Wizard searches the instal lation CD for the Odyssey 200 USB driver ...

Page 27: ...In the Hardware Installation dialog click the Continue Anyway button 9 The Odyssey 200 USB driver is installed click the Finish button 10 Remove the installation CD from the drive Now you are ready to Rip and Add Music to your player ...

Page 28: ...22 e Digital Corporation Odyssey 200 User s Guide ...

Page 29: ...chapter describes how to Create Digital Music Files Configure MusicMatch for Windows on page 24 Configure MusicMatch for Macs on page 28 Connect the USB Cable on page 30 Download Files To Player on page 31 Upload Files From Player on page 33 Change Playback Order on page 35 Erase Files from Player on page 36 Disconnect the USB Cable for Windows on page 38 ...

Page 30: ...n page 30 and then Download Files To Player on page 31 If your PC uses Microsoft Windows follow the below instructions If you are using a Mac go to Configure MusicMatch for Macs on page 28 Configure MusicMatch for Windows Before you can start ripping music you must con figure which encoding rate you want to use and where the new files will be stored on your PC MusicMatch includes a CD Lookup featu...

Page 31: ... box near the top of the dia log select MP3 128 kbps At this Recording Quality one minute of music requires about one megabyte of memory storage 5 Click the Tracks Directory button 6 Specify where the new files will be stored after they are converted If desired type a directory path or click the button and browse to a direc tory ...

Page 32: ... dialog Now your are ready to rip music as described in the next section Rip Music for Windows Once you have specified the MusicMatch Settings described in the preceding section follow these instructions to rip music 1 Insert a music CD into the PC CD drive 2 Start the MusicMatch program 3 The first window to display is the MusicMatch player ...

Page 33: ...r window by clicking the record button 4 In the Recorder window select checkboxes to indicate which CD tracks you want to rip 5 Click the Record button MusicMatch will take a few moments to rip the selected tracks into digital music files and store them in the directory you specified in Step 6 on page 25 ...

Page 34: ...e Internet otherwise each track is labeled with a number The settings described in the following pages are suitable for most users If you require additional information about MusicMatch Preferences refer to the MusicMatch Help 1 Open MusicMatch 2 Select the Edit Preferences menu 3 Select the Encoding tab 4 In the CD Quality box near the top of the dia log select MP3 128 kbps At this Encoding Quali...

Page 35: ... your are ready to rip music as described in the next section Rip Music for Macs Once you have specified the MusicMatch Prefer ences described in the preceding section follow these instructions to rip music 1 Insert a music CD into the Mac CD drive 2 Start the MusicMatch program ...

Page 36: ...s Recorder menu 4 In the Recorder window select which CD tracks you want to rip 5 Click the Record button MusicMatch will take a few moments to rip the selected tracks into digital music files and store them in the folder you specified in Step 5 on page 28 CONNECT THE USB CABLE Once you have MP3 files on your PC you can con nect your Odyssey 200 and PC and then Down load Files To Player as describ...

Page 37: ...button 4 The player LCD shows USB CONNECTED Once you re finished transferring files be sure to Disconnect the USB Cable for Windows from the player as described on page 38 If your PC uses Windows XP and you are connect ing the USB cable for the first time since you installed the Odyssey Manager a Found New Hardware Wizard dialog displays therefore you must complete the one time installation proced...

Page 38: ...Start the Odyssey Manager software 3 In the upper part of the window select the files to be transferred 4 In the lower part of the window select the desti nation where the files will be transferred That is click on Internal Memory or click on Memory Card to transfer the files to the optional SMC 5 Use one of these methods to complete the transfer ...

Page 39: ... the player Transfer Other Files With the Odyssey Manager software you can also transfer non music files to your player and use your Odyssey 200 as a transport device for data files To transfer other file types use the same instruc tions described in the previous section but instead of selecting music select the other files UPLOAD FILES FROM PLAYER With the Odyssey Manager software you can also mo...

Page 40: ... the desti nation folder where the files will be transferred 4 In the lower part of the window select the file s to be transferred 5 Use one of these methods to complete the transfer Click and drag the selected files from the lower part to the upper part of the window Click the upload button MENUBAR Select the File Upload menu ...

Page 41: ...ential name given by the player during encoding VOICE00X WAV CHANGE PLAYBACK ORDER The order that tracks play depends on how they were transferred to your player or as a result of a repeat option you specified The repeat icon on the LCD indicates all tracks play sequentially If some other icon displays try changing the Repeat Option Otherwise follow the steps described below To change the playback...

Page 42: ...yssey Manager window ERASE FILES FROM PLAYER You can remove files you no longer want on your player by using the Joystick or by using the Odys sey Manager software ERASE USING PLAYER CONTROLS This method permits you remove files one file at a time or all files at once If you want to erase multi ple files but not all files it may be more convenient to Erase Using Odyssey Manager Software described ...

Page 43: ...cancel Erase mode before confirming the deletion by pressing the Mode button ERASE USING ODYSSEY MANAGER SOFTWARE If you would like to use the Odyssey Manager soft ware to remove files 1 Connect the USB Cable between your player and PC 2 Start the Odyssey Manager software 3 Highlight the files to be deleted 4 Use one of three ways to remove the selected files MENUBAR Select the File Erase menu DEL...

Page 44: ...hat you use these instructions to disconnect the USB cable If you use a Mac just disconnect the cable this pro cedure is not required 1 Click the USB icon on the Windows taskbar usually located at the bottom right of the Win dows Desktop 2 From the popup menu select Stop e Digital Odyssey Player 3 After a message displays you may disconnect the cable from the player ...

Page 45: ...de The following section describes three of the four primary player modes Play Mode on page 40 Radio Mode on page 42 Record Mode on page 44 Note since there are two ways to remove files from your player Erase Mode is described in Erase Files from Player on page 36 ...

Page 46: ...k the LCD shows information like this While a track is in this playback state the Joystick has the following features Slide and release the Joystick up or down to high light the next or previous file in the list Slide and release the Joystick to the right to list the next page of three files Slide and release the Joystick to the left to list the previous page of three files Press the Joystick down...

Page 47: ...he segment Notice the middle line of the LCD shows the timestamp when you pressed the button 2 The Odyssey 200 continues playing Short slide of the Joystick to the left moves to the beginning of the current song Two quick short slides to the left moves to the previous song Slide and hold the Joystick to the right to fast for ward the current song Release the Joystick when you reach the track time ...

Page 48: ...he marked segment as often as you require press to stop the replay The LCD shows the Play Mode high lighting the same track you listened to 6 You can select another track or play the same track by pressing the button playback resumes normally at the timecode at which you stopped in Step 5 RADIO MODE You can use your Odyssey 200 to listen to your favorite FM radio stations This section describes ho...

Page 49: ...resets follow these steps 1 Press the MODE button until the player is in FM Radio Mode Short slide of the Joystick to the right will tune up by a frequency of 0 05MHz Short slide of the Joystick to the left will tune down by a frequency of 0 05MHz Longer slide of the Joystick to the right activates the seek feature which scans frequencies forward and automatically stops at a station with good rece...

Page 50: ...ect and listen to a radio Channel preset 1 Press the MODE button until the player is in FM Radio Mode 2 Attach the earphones to the player to improve reception 3 Press to cycle through each preset until you reach the channel you want If you wish to manually tune to another station you can use the methods described in Use the Joy stick To Change Stations on page 43 4 Attach the earphones to the pla...

Page 51: ...our recording and Erase Files from Player to free up storage To create a voice recording on the player 1 If you are currently listening to music press the button to stop the player 2 Press the MODE button until the player is in Record Mode indicated by the icon 3 To begin recording press the Record but ton You will notice the LCD changes to show the recording progress including an active timer in ...

Page 52: ...46 e Digital Corporation Odyssey 200 User s Guide ...

Page 53: ...ion on page 48 Hold Button on page 49 Language Support on page 50 BACKLIGHT OPTION The backlight option illuminates the LCD during low light situations and automatically turns off after a default three seconds To change the backlight option 1 If your are currently listening to music press to stop the player 2 Ensure the player is in Play Mode indicated by the icon ...

Page 54: ...mory on your Odyssey 200 you can extend your player s memory by purchasing an SMC SmartMedia Card Note the SMC must only be the 3 3V version 5V versions will not work correctly with the Odyssey 200 Before you can use the card you must format it refer to the instructions below INSERT SMC 1 Turn off your player 2 With the reflective side of the SMC facing the front of the player insert the card into...

Page 55: ...art the Odyssey Manager software 5 Select the Memory Format Memory Card menu EJECT SMC To eject the SMC 1 Turn off your player 2 Push the Eject switch upward and remove the SMC from the Slot HOLD BUTTON You can lock your player so that it will not respond to accidental button pushes To lock the player slide the Hold but ton downward and Key Hold displays on the LCD when any player button is presse...

Page 56: ...nloading the new one DOWNLOAD LANGUAGE To download language support follow these steps 1 Connect the USB Cable between your player and PC 2 Start the Odyssey Manager software 3 Select Font Download Language Sup port language menu Where language is a selection from the submenu 4 In the next dialog click OK to confirm the download ERASE LANGUAGE To erase language support from your player follow thes...

Page 57: ...ty and service information SAFETY PRECAUTIONS Do not drop your player or leave it under heavy objects Do not allow liquids to come into contact with your player If this happens wipe the player with a dry cloth Do not leave the unit where it will be subjected to prolonged exposure to direct sunlight extreme temperatures such as inside a parked automobile moisture vibration and avoid areas with stro...

Page 58: ...PLAYER ISSUES PLAYER DOES NOT WORK Check that the battery still has power Check that the battery is installed correctly with the positive end to the left For instructions see Battery Installation on page 9 WHY DID MY ODYSSEY 200 TURN ITSELF OFF The Odyssey 200 has an automatic shut off feature to conserve battery power when you aren t using your player and powers off after three minutes However th...

Page 59: ...ensure that the earphone jack is plugged in all the way PROBLEMS CONNECTING TO PC CAN T CONNECT TO PC If the player has powered off power it on Windows 98 sometimes fails to recognize the pres ence of the player To reconnect Windows to the player Disconnect the USB Cable for Windows and then re Connect the USB Cable INSTALLATION CD DID NOT START WHAT SHOULD I DO If you inserted the installation CD...

Page 60: ...yssey 200 conforms to the following speci fications MEMORY 128MB internal flash memory Optional 128MB 3 3V Smart Media Card SMC BATTERY One AA battery for up to 12 hours of playing time LCD FSTN type 3 line LCD 128 x 48 pixels DIMENSIONS Height 3 3 x Width 2 4 Depth 0 7 WEIGHT 2 4 oz without battery CASE Aluminum Plastic FILE TRANSFER SPEED 2 4 Mbps maximum SIGNAL TO NOISE RATIO S N 85dB EARPHONE ...

Page 61: ...enabled APPROVALS This equipment has been tested and found to com ply with the limitations for a Class B digital device pursuant to Part 15 of the FCC rules and regula tions These limitations are designed to provide reasonable protection against harmful interference within a residential installation This equipment generates uses and can radiate radio frequency energy and if not installed and used ...

Page 62: ...r du Canada Products with the CE Marking comply with both the EMC Directive 89 336 EEC and the Low Voltage Directive 73 23 EEC issued by the Com mission of the European Community Compliance with these directives implies confor mity to the following European Norms the equiva lent international standards are in brackets EN55022 CISPR 22 Electromagnetic Inter ference EN50082 1 IEC801 2 IEC801 3 IEC80...

Page 63: ... from repair or replacement of war ranted parts by parties other than an e Digital authorized service provider Damage to or loss of any programs or data Damage resulting from an Act of God OBTAINING WARRANTY SERVICE If you are having technical trouble with your prod uct please contact us at www edig com customer support or customersupport edig com All warranties are tracked through the original or...

Page 64: ...hipping costs are the responsibility of the customer We encourage you to insure the package for full retail value with the carrier when it is shipped and to make sure ade quate tracking is available e Digital cannot be held liable for product damages or losses incurred dur ing transit This warranty expresses specific contractual rights retail purchasers may have additional statutory rights which v...

Page 65: ...2 convert CDs to files 24 Create Voice Recordings 45 customer support contact 58 D delete files see erase 36 Disconnect USB Cable 38 Document Conventions 2 Download Language Support 50 music Files to Player 31 other files 33 E e Digital contacting 58 Eject SMC 49 Encoding Rates 55 Equalizer Options playback state 11 Radio 44 Erase files 36 Language 50 Erase Mode details 36 overview 13 F Favorite R...

Page 66: ...la tion 16 P Pause Playback 41 Play Mode details 40 overview 13 Playback Icon 11 state 40 Player Modes overview 12 Player Overview 5 power turn on off 10 Precautions for safety 51 R Radio Mode Equalizer 44 Joystick controls 42 overview 13 set channels 43 Stereo Mono 44 Record Icon 12 Input is Microphone 45 Mode 44 Mode overview 13 voice 45 Remote Control 9 remove files see erase 36 Repeat Options ...

Page 67: ...Files 33 Troubleshooting 51 turn power on off 10 U Universal Serial Bus connect 30 disconnect 38 Upload Files From Player 33 USB connect cable 30 disconnect 38 V Voice Recordings 45 W Warranty 56 Windows XP Special Procedures 19 X XP Special Procedures 19 ...

Page 68: ...62 e Digital Corporation Odyssey 200 User s Guide ...

Reviews: