Dynamic Projection JCD Manual Download Page 11

11

Copyright © 2014 - 2017 Dynamic Projection Institute GmbH. All rights reserved. http://www.dynamicprojection.com

Weights and dimensions shown are approximate. Specifications and appearance are subject to change without notice. 

Version 1.8

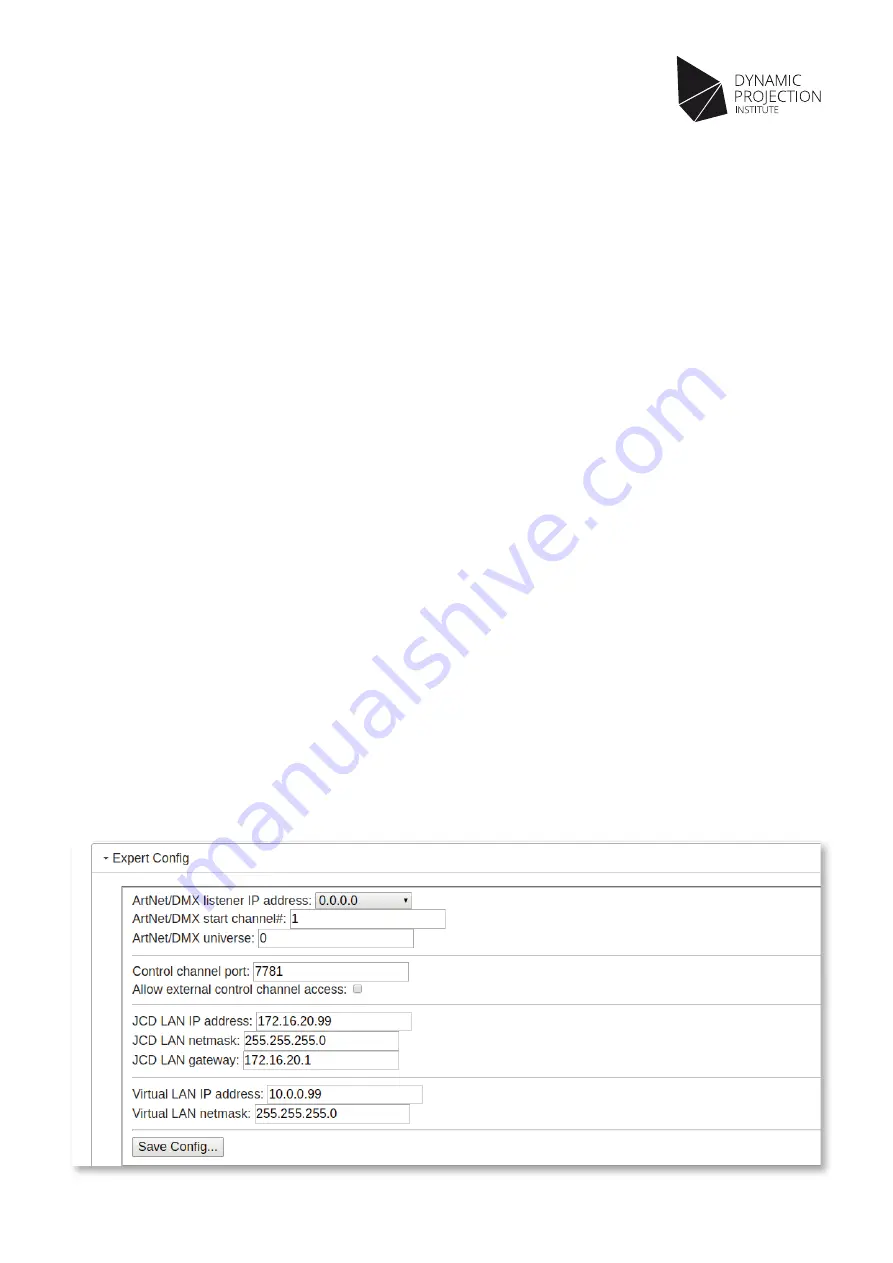
JCD Configuration - Expert Configuration

In addition to the projector configuration, certain network settings may be changed to ease integration with other systems. To change 
these settings, switch to the “System Setup & Calibration” tab and open the “Expert Config” section.

Normally, JCD will accept ArtNet/DMX512 packets on any network interface, this can be changed via the “ArtNet/DMX listener 
IP address” option. You can choose between either all interfaces (0.0.0.0 – which is the default), localhost only (127.0.0.1), Wi-Fi 
(192.168.1.255) or LAN (2.255.255.255, unless you have changed the LAN IP address or configured virtual LAN, see below).

By default, JCD will use the DMX channels in the range #1 - #14, this can be changed via the “ArtNet/DMX start channel#” option. The 
value entered here corresponds to the first of 14 consecutive channels, e.g. setting this to “28” will result in JCD expecting data in 
the channel range #28 – #41. The default start channel is 1.

JCD will normally only react to DMX frames addressed to universe 0. (“ArtNet/DMX Port-Address”) This can be changed via the 
„ArtNet/DMX universe“ setting, the value entered here corresponds to the complete „Port-Address“ in the range 0-32767. Incoming 
DMX data from any other universe will be ignored.

The port which all JCD components use internally for communication (default: 7781) can be configured via the “Control channel port” 
option. Normally, no commands from the outside are accepted. This can be changed by checking the “Allow external control channel 
access” option, the control channel will then be accessible for LAN and Wi-Fi.

The LAN IP address (default: 2.0.0.20) can be changed via the “JCD LAN IP address” and “JCD LAN netmask” options. To allow access 
to JCD from other networks, enter the IP address of the local network router into the “JCD LAN gateway” field – by default, this is empty.
In case of an actual IP address change, JCD will need to be restarted. A message will inform you about the restart, which will take a few 
seconds to finish. Also, if any of the IP address data is wrong/incomplete, an error message will appear and the configuration will not be 
saved.

In some scenarios it may be useful to have a second IP address available on the LAN device (e.g. one for accessing the web interface, 
another one exclusively for ArtNet/DMX). This can be achieved by using the “Virtual LAN IP address” and “Virtual LAN netmask” 
options. The virtual LAN adapter is disabled by leaving both input fields empty, which is the default. As above, any change will require 
a restart of JCD.

NOTE: If you are accessing the web interface via LAN, you will need to direct your browser to the new IP address before you 
are able to use the web interface again.

NOTE: It is recommended to reload the web interface in your browser after any IP related change

.

Summary of Contents for JCD

Page 1: ...oximate Specifications and appearance are subject to change without notice Version 1 8 Version 1 8 JCD Manual VERSION 1 8 JCD 1 Copyright 2014 2017 Dynamic Projection Institute GmbH All rights reserve...

Page 2: ...otice Version 1 8 Table of Content Introduction 3 Warranty 3 Warnings and Safety 4 JCD Control Unit 5 Physical Setup 6 Network Access 7 Web Interface 8 JCD Status 9 JCD Configuration Projector 10 JCD...

Page 3: ...al product keep this manual for the entire service life of the product pass this manual on to every further owner or user of the product download the latest version of the user manual from our website...

Page 4: ...with the relevant provisions of the RoHS Directive for the European Union WEEEdirectivestatementfortheeuropeanunion In common with all Electronic and Electrical products the JCD Raspberry Pi should n...

Page 5: ...1 8 1 2 3 4 JCD Control Unit 1 2GHz Quad Core 64bit control unit with max power 12W 1 JCD Control Unit with internal WiFi accesspoint 802 11 b g n 2 Micro USB power socket 3 Network connector 4 USB 2...

Page 6: ...Flip the power switch to turn the control unit on this will take a few seconds 4 optional For Ethernet connectivity plug in a CAT5 6 cable into the RJ45 jack 3 of the control unit and connect it to yo...

Page 7: ...s as a Wi Fi hotspot you should be able to find a network named JCD xxxxxxxx with xxxxxxxx being a combination of numbers and letters The exact SSID as well as the WPA key can be found on a sticker on...

Page 8: ...access enter the default IP address 192 168 1 1 for Wi Fi 2 0 0 20 for Ethernet in a browser of your choice The JCD splash screen should appear click on the logo to enter the web interface The web int...

Page 9: ...very second On successful setup the system should be in the IDLE state meaning that JCD is ready and waiting to accept commands If the status is ERROR instead the USB to RS232 converter is not connect...

Page 10: ...start the detection The autodetection will take some time information about the progress will be displayed below the button When the process is complete the message Probing finished will appear and t...

Page 11: ...e 0 32767 Incoming DMX data from any other universe will be ignored The port which all JCD components use internally for communication default 7781 can be configured via the Control channel port optio...

Page 12: ...number of steps are saved and displayed above the buttons The actual number of steps used will be slightly lower than the measured number the reduction either absolute number of steps or a percentage...

Page 13: ...can now be controlled using the Focus Zoom Control tab To adjust the lens zoom or focus move and release the Zoom and Focus sliders While the lens Is moving the status will change to BUSY As soon as...

Page 14: ...he Save Memory button and clicking on the button afterwards A confirmation is required to prevent accidental overwriting of already saved positions To move the lens to a previously saved position use...

Page 15: ...ommand button To execute a command simply click on the corresponding button if an argument is available select the desired value by using the spinner buttons or directly entering it first NOTE Not all...

Page 16: ...pt 16 bit arguments which are set by using the channel groups 3 4 5 6 7 8 9 10 11 and 12 13 14 The first channel represents the high byte of the 16 bit value the second channel represents the low byte...

Page 17: ...out all incoming ArtNet DMX data on the selected network interface see the network configuration section for further information Only the last 50 log entries are available For the current universe the...

Page 18: ...for download at http www dynamicprojection com jcd support To install an update simply download the update package named jcd update xxx zip and extract its contents onto an empty USB pen drive Remove...

Page 19: ...TE CHANNEL 0 127 Not used 128 DO NOT USE 192 154 Not used 255 Execute on raise 2 COMMAND CHANNEL 0 254 See Command List in the manual 255 Reserved 3 ARGUMENT 1 HIGH 0 255 High Byte Value 4 ARGUMENT 1...

Page 20: ...Function 1 EXECUTE CHANNEL 128 Instant Mode Commands will execute instantly 2 COMMAND CHANNEL 0 255 See Command List 255 DO NOT USE 3 ARGUMENT 1 HIGH 0 255 High Byte Value 4 ARGUMENT 1 LOW 0 255 Low B...

Page 21: ...ce are subject to change without notice Version 1 8 DMX Fixture Head Personality Easy Mode Channel Value Function 1 EXECUTE CHANNEL 128 Instant Mode Commands will execute instantly 2 COMMAND CHANNEL 2...

Page 22: ...a Email office dynamicprojection com Web www dynamicprojection com Phone 43 1 996 2028 Mo Fr from 9 00 to 18 00h Commercial Register FN400806x YouTube Training channel http www dynamicprojection com t...

Reviews: