background image


7


Programming Instructions 


Important: The UM-600 universal monitor must first be programmed prior to 
operation.


When first powering up the unit, the display will first indicate the firmware version and 
then go to the operational mode. 
 
To configure each input, first go to the main programming screen by pressing the Menu 
/ Escape key: 


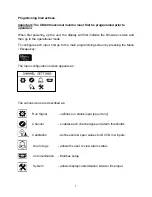
The main configuration screen appears as: 


The various icons are described as: 


    Run Signal  

   – defines run status input type (if any) 


    Channel     

   - enables each channel type and alarm thresholds 


    Calibration 

      - defines zero & span values for DCV & mA inputs 


     Alarm Logs 

   - allows the user to view alarm status 


     Communication     - Modbus setup 


     System     

   - allows display customization & date / time input 


Summary of Contents for UM-600

Page 1: ...nel Monitor Installation and Operation Manual Rev B P N145F 12990 PCO 00007462 c Copyright 2010 Dynalco Controls All Rights Reserved Published June 8 2011 MOD TRONIC Instruments Brampton ON 905 457 6322 or 1 800 794 5883 sales mod tronic com www mod tronic com ...

Page 2: ... Types J or K type thermocouple ungrounded 4 20 mA 0 1 VDC 0 5 VDC 0 10 VDC Digital Input Closure to ground indicates run condition or use pulsed input Pulsed Input Magnetic pickup input for RPM display to indicate run condition Alarm Outputs 2 Digital Outputs rated 0 15 A 48 VDC Input Power 10 36 VDC Display Backlit Graphic Display Data Logging Internal Flash Memory to retain alarm history data l...

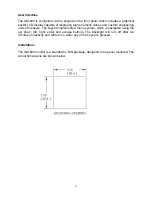
Page 3: ...om engineering units of measure The keypad implements a menu system which is navigated using the up down left right enter and escape buttons The backlight will turn off after ten minutes of inactivity and will turn on when any of the keys are pressed Installation The UM 600 monitor is a standard DIN package designed to be panel mounted The cutout dimensions are shown below ...

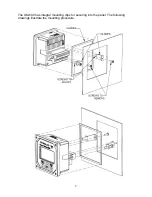
Page 4: ...3 The UM 600 has integral mounting clips for securing into the panel The following drawings illustrate the mounting procedure ...

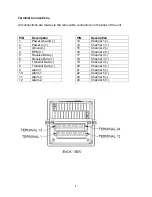
Page 5: ... PIN Description 1 Power Ground 13 Channel 1 2 Power In 14 Channel 1 3 Ground 15 Channel 2 4 RPM 16 Channel 2 5 Receive Data 17 Channel 3 6 Receive Data 18 Channel 3 7 Transmit Data 19 Channel 4 8 Transmit Data 20 Channel 4 9 Alarm 1 21 Channel 5 10 Alarm 1 22 Channel 5 11 Alarm 2 23 Channel 6 12 Alarm 2 24 Channel 6 ...

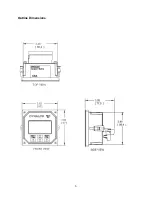
Page 6: ...5 Outline Dimensions ...

Page 7: ...ack one screen Advances to next screen Configuration consists of the following steps 1 Setting current date time 2 Enabling each input 3 Defining each input type 4 Defining min max display values for any current or voltage inputs 5 Defining measurement display units PSI mV F C H20 etc 6 Setting over under setpoint trips 7 Selecting either output 1 or output 2 or both for alarm trips 8 Setting eith...

Page 8: ... each input first go to the main programming screen by pressing the Menu Escape key The main configuration screen appears as The various icons are described as Run Signal defines run status input type if any Channel enables each channel type and alarm thresholds Calibration defines zero span values for DCV mA inputs Alarm Logs allows the user to view alarm status Communication Modbus setup System ...

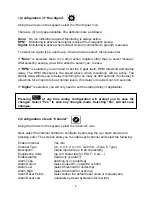
Page 9: ... to be at normal levels If no delay is required set to 0 seconds If Digital is selected you will only need to set the startup delay if applicable Pressing at any time during configuration will prompt you to save the changes Select Yes to save any changes made Selecting No will not save changes 2 Configuration of each Channel Using the arrows on the keypad select the Channel icon Next select the ch...

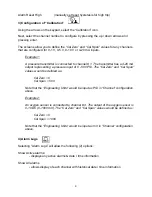
Page 10: ...resenting a pressure input of 0 500 PSI The Cal Zero and Cal Span values would be defined as Cal Zero 0 Cal Span 500 Note that the Engineering Units would be input as PSI in Channel configuration above Example 2 An oxygen sensor is connected to channel 4 The output of the oxygen sensor is 0 1 VDC 0 1000 mV The Cal Zero and Cal Span values would be defined as Cal Zero 0 Cal Span 1000 Note that the ...

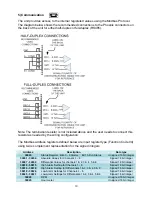
Page 11: ...mplement representation for the signed integers Address Description Data type 30000 Status Register Bits 0 9 Alarms Bit 15 Run Status Unsigned 16 bit integer 30001 30006 Absolute Values for Channels 1 6 Signed 16 bit integer 30007 30009 Differential Values for channels 1 2 3 4 5 6 Signed 16 bit integer 30010 30015 High Alarm Setting for Channels 1 6 Signed 16 bit integer 30016 30018 High Alarm Set...

Page 12: ...efine alarm threshold values for all channels as some may be for monitoring only Alarm Outputs The UM 600 will alarm when channel values or differential values are above or below limits as specified Alarms can be configured as either latching or non latching If an alarm condition is met the red LED on the front panel will blink and the digital output s will trip The alarm point name ch1 ch2 df1 df...

Page 13: ...12 ...

Reviews: