


- 35 -
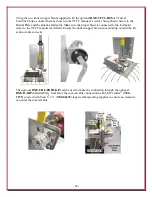
DXE-TB-3P
Tilt Base Mounting Plate to Mounting Pipe
Install the Tilt Base to the 2" mounting pipe using
two
DXE-SSVC-2P
Stainless Steel V-Clamps
allowing approximately 7" clearance between the
bottom of the tilt base plate, to the top surface of
the
DXE-RADP-3
Radial Plate as shown to the
right.
Make sure the Tilt Base and optional
DXE-
RADP-3
Radial Plate are oriented correctly for
the direction you wish to tilt the antenna.
See page 35 which shows the tilt action.
Tighten the clamps evenly so the length of the
exposed threads is approximately equal. Any
clamp should be tightened evenly from side-to-
side with an equal amount of thread above each
nut.
BTV Antenna Base Section to the optional DXE-TB-3P Tilt Base
Using the new hardware included with
DXE-TB-3P
Tilt Base, install the four hex head bolts, four flat
washers, four split washers and four hex nuts in the
BTV Base Section as shown to the right.
Place the BTV Lower Base Section into the holes of
the mounted Tilt Base and loosely install the Tilt Base
mounting hardware shown to the right. Leave the
flange nuts and Nyloc nuts slightly loose.
Using a wrench or nut driver, securely tighten the two
Nyloc Nuts at the bottom of the Tilt Base. Then
loosen them one-half turn each. This will allow
proper movement of the Tilt Base while raising or
lowering the antenna. It is not necessary to tighten
these nuts more securely unless further tilt operation
is no longer required. They should not be loosened
more than one-half turn at any time.


