background image

5 1  

WEBVIEWER* 

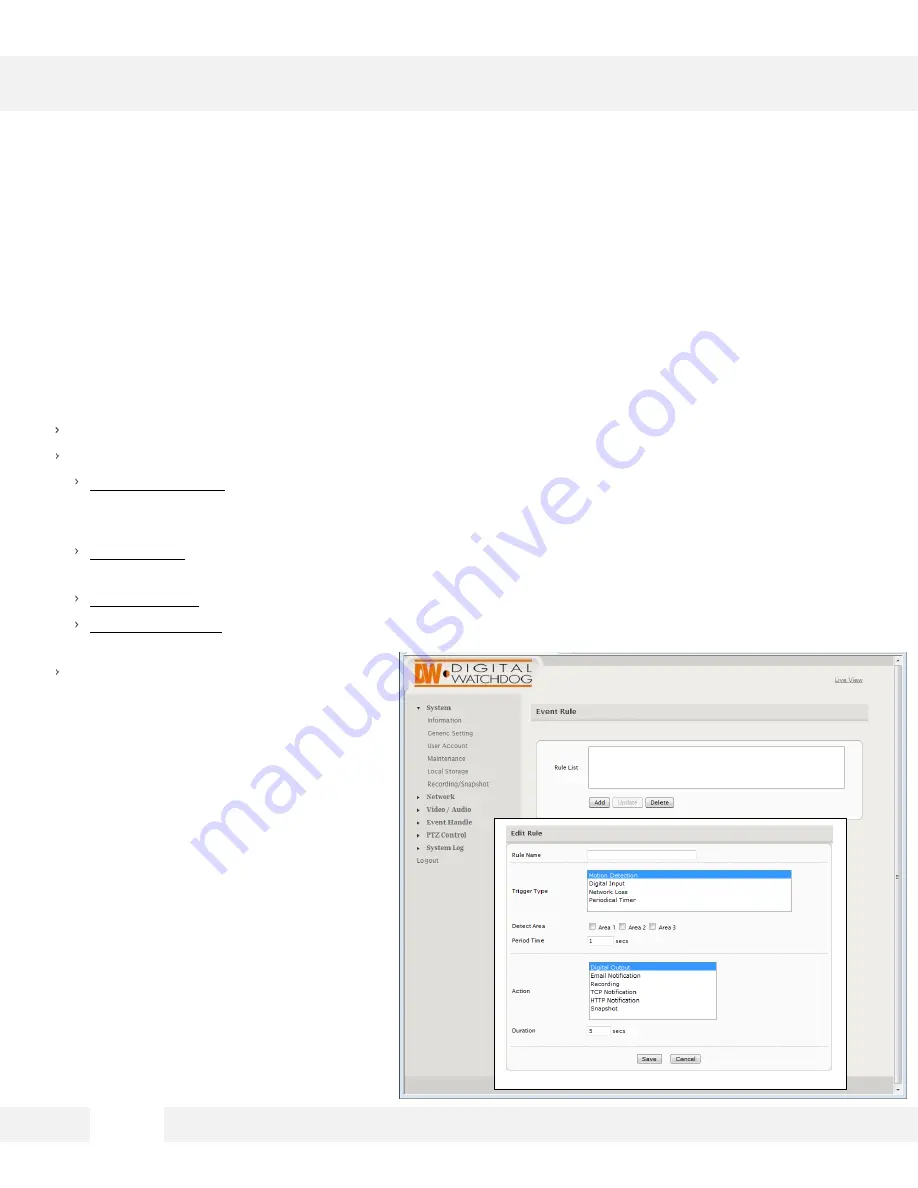
S e t u p  >   E v e n t  H a n d l e >  E v e n t  R u l e  


T h e   E v e n t   R u l e   p a g e   i s   u s e d   t o   d e f i n e   a c t i o n s   ( e . g .   r e c o r d   t o   S D   c a r d )   i n  
r e s p o n s e   t o   t h e   t r i g g e r i n g   o f   a n   e v e n t   ( e . g .   m o t i o n   d e t e c t i o n ) .  
 

Rule Name

 is a user defined name for a user defined trigger/action.  

Trigger Type- select what action will trigger the set command. Select form the available options:  

Motion Detection 

– Set action will be activated when the camera detects motion. If selected, 

check which motion areas will apply to this rule. See page 52 for information on how to setup 
motion detection.  

Digital Input 

–Set action will be activated when the camera detects a sensor is activated. Select 

which sensor you want to setup as the trigger to the rule.  

Network Loss 

– Set action will be activated when the camera detects network loss. 

Periodical Times 

– Set action will be activated every set amount of seconds. Default time is set 

to every 60 seconds. 

Period Time 

is a time interval during  

which an event cannot be triggered. For  
example, if Period Time is set to 60, then  
after a specific event is triggered (e.g.  
motion detection), that event can only be  
triggered after 60 seconds. 
This applies only to a user-defined  
event. If 2 motion detection events have  
been configured (e.g. MD1 and MD2),  
then if MD1 is triggered, MD2 can still be  
triggered 

regardless of MD1’s Period  

Time setting. 

Summary of Contents for megapix DWC-MB950TIR

Page 1: ...ng or operating the camera please read and follow this manual carefully Before installing or operating the camera please read and follow this manual carefully DWC MB950TIR IP 5MP Weather Proof Bullet...

Page 2: ...the temperature may rise to high levels Cleaning To remove dirt from the case moisten a soft cloth with a soft detergent solution and wipe Mounting Surface The material of the mounting surface must be...

Page 3: ...17 Accessing the Web Viewer via Internet Explorer 17 GUI Description 18 Relay Input and Alarm Output Control 19 Digital Zoom 20 First Second Stream 21 Export Image 22 Instant Recording 23 Controlling...

Page 4: ...1 3 CMOS Sensor 3 4 10mm Varifocal Lens 3X Optical Zoom 80ft IR with Intelligent Camera Sync TDN True Day and Night Power over Ethernet PoE 8 25VDC and AC24V Two Way Audio Micro SD SDHC Class 10 Card...

Page 5: ...1 Mounting Bracket 2 Pan Tilt Adjusting screws 3 Lens 4 IR LEDs 5 Sunshield Cover 6 Camera Module PARTS DESCRIPTIONS 5 1 2 6 3 4 5...

Page 6: ...m Output Connect 1 Alarm output control from the camera 4 SD Card Slot Micro SD card slot for local storage not included 5 Network Port RJ45 Cable Connection Port 6 Audio In Out Built in Microphone an...

Page 7: ...7 DIMENSIONS...

Page 8: ...The following items are included with the MEGAPIX camera INSIDE THE BOX MB950TIR 8...

Page 9: ...g a PoE Enabled Switch The MEGApix Camera is PoE Compliant allowing transmission of power and data via a single Ethernet cable PoE eliminates the need for the different cables used to power record or...

Page 10: ...ALLATION 3 Mount the camera s arm support onto the mounting plate 4 To connect all appropriate cables to the camera and complete the installation unscrew the back cover of the camera 2 Fix the mountin...

Page 11: ...connecting the camera module to the mounting bracket by pushing in the spindle 6 Screw the spindle fork on to the camera 7 Set the camera onto the arm by pushing the spindle and placing the fork on th...

Page 12: ...9 To adjust the camera s pan and tilt loosen the pan tilt screw locks and adjust them accordingly 10 To adjust the camera s lens focus and zoom unscrew the front cover by rotating it counter clock wi...

Page 13: ...the front under the lens as shown in the image 15 Screw the front cover back on to the camera 16 If using wide angle shift the camera s hood back to avoid blocking the view Loosen screws and shift bac...

Page 14: ...IP Scan software can be found on the included CD Run IP Scan and install it onto your PC 2 When setup is complete launch the IP Scan software 3 To find your MB950TIR cameras click the Scan button 4 Y...

Page 15: ...mend that you 1 setup the camera to DHCP 2 allow it to configure itself according to your network and 3 change the settings to a static IP address 1 To set your MEGAPIX camera to Static highlight the...

Page 16: ...a u l t P r e v i o u s s e t u p f o r I P d e f a u l t t i m e e t c w i l l b e d e l e t e d I f a s y s t e m s I P a d d r e s s i s l o s t r e s e t t h e c a m e r a b a c k t o f a c t o r...

Page 17: ...fault Username and Password root pass 4 Pop up windows and messages for download run Active X controls examples below will likely be displayed Select Install or Run to all such messages Click on the a...

Page 18: ...WEBVIEWER 1 8 GUI Description...

Page 19: ...ture can be used once one of the zoom view modes is selected See page 20 for more information Record and Snapshot will capture video snapshots to the local hard drive Digital Out will trigger a digita...

Page 20: ...l left mouse clicks will continue to magnify wherever the mouse is placed 3 To zoom out right click the mouse 4 If the mouse is moved to the edge of the image window the mouse icon will change to a wh...

Page 21: ...ion will be displayed in the information section To setup the different streams a Go to Setup at the top right hand corner of the screen The setup menu will appear b Go to Video Audio Video Settings c...

Page 22: ...f the screen 2 Press Select Path to select the directory where all exported images will be saved to Settings will be saved automatically 3 Click on the Live View link at the top right hand corner of t...

Page 23: ...top right hand corner of the screen and press Select Path To Start and Stop Instant Recording To Start press the icon on the control menu bar A window will appear to notify you instant recording has...

Page 24: ...reset 5 Zoom Use the Zoom spectrum to zoom in and out and adjust the camera s field of view Click on the left side of the spectrum line to zoom out of the image Click on the right side of the spectrum...

Page 25: ...g P a t h Recording Path is used to define the directory where snapshot images and video will be stored S t r e a m i n g P r o t o c o l RTP RTSP over HTTP is the default This is the most flexible s...

Page 26: ...n d c o r n e r o f t h e c a m e r a s l i v e d i s p l a y The camera s system information will be displayed including Model name Firmware Version Serial Number WiFi Status MAC Address IP Address I...

Page 27: ...ptions are available Manual insert time manually PC Time set to the current PC time Network Time Server periodically synchronizes with a time server For Network Time Server two standard options are pr...

Page 28: ...he External IR Output Level controls the circuit voltage which is used to turn on off the external IR LED NOTE Refer to the external IR LED manufacturer s recommendation to properly set the External I...

Page 29: ...d e l e t e d v i a t h e c o n t r o l s i n t h e l e f t c o r n e r Users are assigned to a group admin operator or viewer To edit or delete an account highlight the account in the User List windo...

Page 30: ...ActiveX controls and browser cache should be cleaned to prevent old controls pages from being used IP and User Account settings can be preserved by checking the appropriate boxes After selecting the n...

Page 31: ...name the firmware file to ev fw bin and copy the file to the SD card 2 Insert the card into the camera s SD card slot 3 Power on the camera and wait about 1 minute 4 The green power LED will flash qui...

Page 32: ...old pages and controls from being used 1 Close all instances of IE and open 1 IE window 2 In the right corner select Tools Manage Add ons 3 In the Manage Add ons window select All add ons 4 Scroll do...

Page 33: ...e Next click Import to proceed with replacing the current camera settings with the settings in the configuration file Restore Factory Default Replaces factory default settings via the web UI Network a...

Page 34: ...r d i n g t o a m i c r o S D C a r d U s e t h e L o c a l S t o r a g e s e t u p p a g e t o f o r m a t a n d s e t u p t h e c a r d p r o p e r l y Format Format will format the card Note conte...

Page 35: ...ent triggers Record Setting will define how the recording is performed Stream Source will only display currently enabled video profile streams The pre alarm and post alarm buffer are defined in terms...

Page 36: ...aximum value for Pre alarm and Post alarm time is 5 seconds Cyclic Recording The camera can be configured to overwrite the oldest existing recording on SD Card and Network Storage by checking the appr...

Page 37: ...ronment Please confirm all network related settings with the network administrator prior to making any changes a IP Address Enter the static IP Address of the camera b Subnet Mask default is 255 255 2...

Page 38: ...Scan can be used to scan available networks An available network can be selected by clicking the option and entering a password if required Manual can be used to directly configure WiFi settings In t...

Page 39: ...a y b e r e q u i r e d The port settings all relate to camera ports If streaming outside of a LAN e g to the internet then routers on both the camera and client side need to provide necessary access...

Page 40: ...TP RTCP video and audio should use the default values While the RTP RTCP audio video ports by default are 6002 6005 this represents the starting point for client connections If 1 client is connected t...

Page 41: ...P a DDNS service can provide a hostname for use with the IP camera Registration with a DDNS service provider ddns nu dyndns org is required for use of this feature 1 To use DDNS select the Use DDNS ch...

Page 42: ...a l l o w o r d e n y a c c e s s b y I P a d d r e s s e s Set the Filter Type to either Allow All or Deny All Exceptions can be added to the chosen filter type IP addresses can be entered as a sing...

Page 43: ...l be for example the camera can stream up to 10 fps on 5 Megapixel resolution 1 to 5M 2592x1920 with a maximum 10fps for both Stream 1 and 2 The 5M option limits ROI to 2 and recording via the camera...

Page 44: ...provide some options for resolution Settings for specific ROI profiles can be found in the Video Quality Setting section ROI profile 1 2 are preconfigured profiles which have some settings that are c...

Page 45: ...o d e c s Encoder Type Select from the available options NONE AAC G 711 u law default G 711 a law G 726 Bitrate If AAC or G 726 are selected as encoder type setup the bitrate Select form 16 32 or 40...

Page 46: ...ing to Night mode in lighter conditions a lower value requires darker conditions to switch Back to Day also provides a range 2 12 which adjusts the sensitivity of the switch from night to day This val...

Page 47: ...ust the following options Brightness select values from 0 255 Default value is 128 The higher the number the brighter the image will appear Contrast select values from 0 255 Default value is 128 The h...

Page 48: ...Automatic Exposure Control disabling enables Manual Exposure Max Exposure maximum possible exposure time Manual Exposure sets specific exposure time AGC Automatic Gain Control disabling enables Manual...

Page 49: ...o n e o f t h e a v a i l a b l e t i m e s t a m p f o r m a t s a n d e n a b l i n g d i s p l a y o f t h e c a m e r a n a m e Select from the following available text display options yyyy mm dd...

Page 50: ...the Privacy Masking you want to edit 2 Check the Draw button next to the Mask s name 3 Select the color of the mask you want to setup black by default 4 Using your mouse draw the mask on the camera s...

Page 51: ...tup motion detection Digital Input Set action will be activated when the camera detects a sensor is activated Select which sensor you want to setup as the trigger to the rule Network Loss Set action w...

Page 52: ...is detected See page 53 for more information on setting up e mail notifications TCP Notification and HTTP Notification The camera will send a TCP or HTTP Notification to a determined server when a se...

Page 53: ...Enter the SMTP server for Server Address and all additional relevant details The username may only contain alphanumeric characters and the underscore character _ Use the Test button to send a test e...

Page 54: ...vice Server Type Select whether the network storage you want to setup is NFS or Samba Server Address enter the server s URL or IP address Folder Path enter the folder destination in the network storag...

Page 55: ...the Event Rule See page 39 40 for more information TCP Recipient requires an IP address and port for the server which will process the notification via TCP socket TCP Server Address port enter the ser...

Page 56: ...ton Using your mouse draw the zone on the camera s display window Use the block s handles to adjust the size or move the mouse over the area and click drag to move the motion zone You can also use the...

Page 57: ...a p p l i e d i f t h e c a m e r a w i l l i n t e r a c t w i t h a P T Z d e v i c e Pelco P and D and transparent protocols are supported as well as RS 485 and RS 422 communication modes Please r...

Page 58: ...e m a n d e v e n t d e t a i l s The System Log has information specifically related to basic system messages e g startup shutdown Event Log contains information related to events triggered You can c...

Page 59: ...receive messages must have an application which will receive and manage the syslog messages If using Windows an application such as Kiwi Syslog Server or Splunk can be used to receive and manage the...

Page 60: ...o Gain Control 2x 128x Max Gain Manual BLC Back Light Compensation 2 0EV 2 0EV Off WDR Wide Dynamic Range Off Low Medium High Day and Night Auto Day Color Night B W Activate with Digital Input Brightn...

Page 61: ...Micro SDHC Card 4GB 32GB ONVIF Conformance Yes Profile S Web Viewer Supported OS Windows XP Windows Vista Windows 7 MAC OS Supported Browser Internet Explorer 8 or higher Google Chrome Mozilla Firefo...

Page 62: ...o1 4 represent video profiles with different characteristics For more information on video profiles see Video Audio Video Setting Using VLC for example select Media from the menu bar and Open Network...

Page 63: ...arameter should also be included this is discussed below In the browser enter the mjpg cgi call Substitute the camera IP URL for IP ADDRESS http IP ADDRESS stream mjpg cgi The user will be challenged...

Page 64: ...owing or contact your technical specialist D i g i t a l I n p u t E l e c t r i c a l I n f o r m a t i o n Ambient Temperature 25 C TTL signal only External voltage source 3 5Vdc 10 TTL signal high...

Page 65: ...lowing or contact your technical specialist D i g i t a l O u t p u t E l e c t r i c a l I n f o r m a t i o n Ambient temperature 25 C External power input 12Vdc Continuous load current 100mA Peak l...

Page 66: ...ected to a proper internet outlet and operating properly Make sure the PoE Switch is connected to a router modem and the ports that have devices connected to them have a green LED on If Yes is the com...

Page 67: ...d be connected on the same router Contact your network administrator if you have more than one network available If Yes try pinging the MEGAPIX camera s IP address as it appears on the IP finder From...

Page 68: ...on the browser you use If Yes make sure nothing is blocking the MB950TIR camera s lens Are you trying to view the camera s video from a different browser than Internet Explorer ex Google Chrome Mozill...

Page 69: ...55 255 255 0 The MEGAPIX camera can also connect to the web viewer using a static IP address This will allow you to set your own IP address manually Setup the Network Protocol on your PC 1 Go to Netwo...

Page 70: ...pt or other proof of the date of the original purchase is required before warranty service is rendered This warranty only covers failures due to defects in materials and workmanship which arise during...

Page 71: ...clusion or limitation of incidental or consequential damages or limitations on how long an implied warranty lasts so the above exclusions or limitations may not apply to you This warranty gives you sp...

Page 72: ...itos California USA 90703 PH 866 446 3595 FAX 813 888 9262 www Digital Watchdog com technicalsupport dwcc tv Technical Support PH USA Canada 1 866 446 3595 International 1 813 888 9555 French Canadian...

Reviews: