background image

de 

Montage

en 

Mounting

17

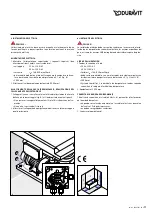
Flügelmutter festschrauben.

Screw into place.  

18

(Siehe Elektroinstallation.)
Netzanschluss herstellen. Potentialausgleich anschließen. 

(See Electrical Installation)
Connect wire from the control unit to the mains connection box and the 
equipotential earth wire to the connection point.

19 achTuNg!

Für Wannen mit Zulauffunktion muss ein Rohrunterbrecher verwen-
det werden. 

aTTENTIoN!

A pipe interrupter has to be used for tubs with water inlet. 

20

Farblichtsteuerung gut erreichbar hinter der Revisionsöffnung posi-
tionieren. Sollte der Platz nicht ausreichen, muss eine weitere Revi-
sionsöffnung vorgesehen werden.

Place the colour lighting control box easily accessible behind the service 
hatch.  If  there  is  not  enough  space,  a  further  service  hatch  has  to  be 
planned.

21

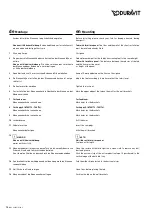
Siphon an Abfluss anschließen.

Connect the siphon to the outlet.

22

Die Wanne bis zum Überlauf mit Wasser füllen, um die Wanne auf 
Dichtigkeit zu prüfen. System 30 Minuten aktivieren.

Fill the tub to check if the outlet and overflow fittings are water tight. 
Activate system for 30 minutes in order to check water tightness.

23

Vor  dem  Einmauern  das  Wasser  ablassen.  Die  Wanne  kann  jetzt 

eingebaut bzw. gefliest werden - Revisionsöffnung nicht vergessen! 

Drain off the water before walling in. The tub can now be walled or tiled 

in - don‘t forget the inspection door! 

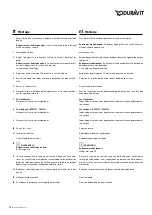
24 achTuNg!

Nach dem Verfliesen diesen Streifen aus der Fuge langsam heraus-
ziehen.

aTTENTIoN!

After tiling, slowly tear this strip from the joint.

25

Die  Wanne  wieder  mit  Wasser  füllen  und  die  entstandene  Nut  mit 
Silikon ausspritzen.

Fill tub and apply silicon to the resulting groove.

26

Das Wasser für 24 Stunden in der Wanne lassen. Revisionspaneele 
einsetzen.

Leave water in the tub for 24 hours. Fix access panels.

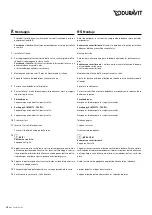
wanne mit Möbelverkleidung:

Tubs with furniture panel:

28

Winkellöcher anzeichnen.
4 Löcher bohren.
Dübel einsetzen. 

Mark the holes for the angle.
Drill the 4 holes.
Insert the raw plugs. 

28

Winkel anschrauben.
Weiter mit Schritt 12.

 Affix the angle.
Continue with step 12.

16 

MAL_53457/01.10.5

Summary of Contents for Combi L Darling New 710238

Page 1: ...ontage baignoires baln o encastrer Montagehandleiding baden whirlpools inbouwversie Istruzioni di montaggio vasche idromassaggio da incasso Instrucciones de montaje para ba eras de hidromasaje empotra...

Page 2: ...ispezione 5 Nota 9 Installazione Idraulica 9 Installazione Elettrica 11 Montaggio 14 en Table of contents Explanations of the symbols 3 Scope of delivery 4 Accessories 4 Access Panels 6 Indications 6...

Page 3: ...di questa avvertenza pu causare lievi infortuni o danni materiali NOTA Indica consigli d uso e altre informazioni utili en Explanations of the symbols Danger Indicates a possible imminent danger Non o...

Page 4: ...on nl optionele it opzionale es opcional de Lieferumfang en Scope of delivery de Zubeh r en Accessories fr Les accessoires nl Toebehoren it Accessorio es Accesorios fr Mat riel livr nl Standaardpakket...

Page 5: ...ure di ispezione es Tama o de los registros 5 0 0 500 1 2 200 2 0 0 500 500 200 2 0 0 1 2 de Einsitzer en Individual seat fr Baignoire simple nl 1 persoon it Monoposto es Monoplaza de Doppelsitzer en...

Page 6: ...ten erlischt die Garantiezusage Es darf auf keinen Fall die Sicherheitsschlaufe des Air Schlauches von der Whirlwanne gel st werden PANELLING OF THE WHIRLPOOL The whirlpool has to be panelled in so th...

Page 7: ...HET BAD Het systeembad dient zodanig bekleedt te worden dat alle belangrijke aggregaten zoals pompen blower en sturing toegankelijk blijven Indien het bad zou ommuurd worden dient men revisieopeninge...

Page 8: ...caso smontare l anello di sicurezza del tubo flessibile dell aria REVESTIMIENTO DE LA BA ERA La ba era de hidromasaje debe tener un revestimiento que permita el acceso a todos los grupos importantes c...

Page 9: ...che con alimentazione integrata si deve installare un tubo fles sibile di allacciamento Per evitare il rischio di rotture tra la vasca idro massaggio e le tubature dell acqua non devono esserci tubi r...

Page 10: ...t de les regrouper l aide d un collier 2 Etablir la liaison quipotentielle de Elektroinstallation en Electrical Installation en Electrical Installation Danger The electrical installation may only be c...

Page 11: ...nire i cavi con dei fissacavi 2 Allacciare il collegamento equipotenziale della vasca idromassaggio a quello principale es Instalaci n Electrica PELIGRO La instalaci n el ctrica debe ser realiza confo...

Page 12: ...n der Wannenanker die Oberkante der Wanne an der Wand anzeichnen Mark the upper edge of the tub on the wall for the wall brackets 7 F r Seadream Wannenankerl cher anzeichnen For Seadream Mark holes fo...

Page 13: ...den op de muur 7 Pour Seadream Marquer les trous pour les appliques Voor Seadream Teken op de muur aan waar de gaten voor de muursteunen geboord moe ten worden 8 Pour Happy D 700172 700174 Marquer les...

Page 14: ...superior de la ba era en la pared 7 Per Seadream Segnare la posizione dei fori per le staffe Para Seadream Marque los taladros para los soportes murales 8 Per Happy D 700172 700174 Segnare la posizio...

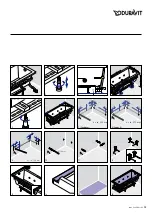
Page 15: ...10 x ca 70 ca 70 ca 70 X X ca 105 mm 10 mm x ca 105 mm x ca 170 mm 1 2 3 4 5 7 8 Happy D 6 9 10 11 12 13 15 16 14 Seadream MAL_53457 01 10 5 15...

Page 16: ...tigkeit zu pr fen System 30 Minuten aktivieren Fill the tub to check if the outlet and overflow fittings are water tight Activate system for 30 minutes in order to check water tightness 23 Vor dem Ein...

Page 17: ...syst me en route durant 30 minute Vul de badkuip helemaal met water om te controleren of het dicht is Het systeem gedurende 30 minuten activeren 23 Evacuer l eau avant l installation d finitive On peu...

Page 18: ...stema per 30 minuti Llenar la ba era hasta el rebosadero con agua para comprobar la estan queidad Activar el sistema durante 30 minutos 23 Prima di eseguire il lavoro di muratura fare defluire l acqua...

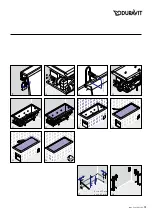
Page 19: ...24h min 150 mm ca 75 ca 75 X y X ca 437 mm y ca 85 mm 17 18 19 20 21 22 23 24 25 26 27 28 MAL_53457 01 10 5 19...

Page 20: ...36 78132 Hornberg Germany Phone 49 78 33 70 0 Fax 49 78 33 70 289 info duravit de www duravit de Best Nr 53457 01 10 5 We reserve the right to make technical improvements and enhance the appearance o...

Reviews: