


de
Montage
en
Mounting
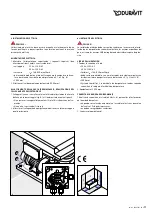
Vor der Installation Wanne auf mögliche Schäden prüfen.
wanne mit Möbelverkleidung:
Boden und Wand am Installationsort
müssen eben und fertig gefliest sein.
Before installing please check your tub for damage (caused during
transport).
Tubs with furniture panel:
The floor and the wall at the site of installation
must be level and already tiled.
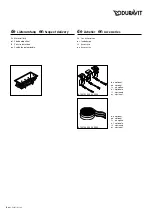
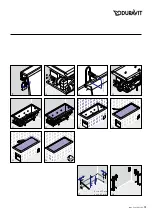
1
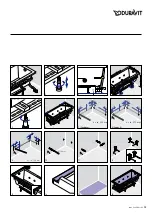
Sifon montieren.
Fit siphon.
2
Die gewünschte Wannenhöhe durch Ausrichten der Wannenfüße er-
mitteln.
wanne mit Möbelverkleidung:
Die Höhe zwischen der Unterkante
der Wanne und dem Boden muss x mm betragen.
x = Höhe der Verkleidung
Find optimum height for the tub by unscrewing feet to the same height.
Tubs with furniture panel:
The distance between the sub rim of the tub
and the floor must be x mm.
x = height of the panel
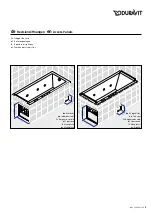
3
Einen Abstand von 10 mm zwischen Boden und Sifon einhalten.
Keep a 10 mm gap between the floor an the siphon.
4
Die Wannenfüße einstellen bis der Wannenrand horizontal ausge-
richtet ist.
Adjust the feet accordingly to make sure that the tub is level.
5
Die Kontermutter anziehen.
Tighten the lock-nut.
6
Zur Installation der Wannenanker die Oberkante der Wanne an der
Wand anzeichnen.
Mark the upper edge of the tub on the wall for the wall brackets.
7
für Seadream:
Wannenankerlöcher anzeichnen.
for Seadream:
Mark holes for the brackets.
8 für happy D (#700172 - 700174):
Wannenankerlöcher anzeichnen.
for happy D (#700172 - 700174):
Mark holes for the brackets.
9
Wannenankerlöcher anzeichnen.
Mark holes for the brackets.
10
Löcher bohren.
Drill the holes.
11
Dübel einsetzen.
Insert the raw plugs.
Wannenanker befestigen.
Affix the wall brackets.
12
hINwEIS!
wanne mit Möbelverkleidung:
weiter mit Schritt 26.
NoTE!
whirltubs with furniture panel:
Continue with step 26.
13
Wannenränder mit einem sauberen Tuch und Haushaltsbenzin von
Schmutz, Staub und Fettrückständen befreien.
Den schmalen Streifen an den senkrechten Wannenrand ankleben.
Clean the surface with white spirit on a clean cloth to remove any dirt,
dust and grease.
Stick the narrow strip of the noise reduction tape (if purchased) to the
vertical edge of the bath tub tray.
14
Den breiten Streifen umklappen und auf den waagerechten Wannen-
rand aufkleben.
Fold the wide strip and stick to the horizontal rim.
15
Stellfläche von Staub reinigen.
Clean floor before placing the tub.
16
Wannenrand auf die Wannenanker auflegen.
Position the tub on the wall brackets.
12
MAL_53457/01.10.5


