


74
1 1 5 0 / 1 1 5 5 H A Y B U S T E R T U B G R I N D E R O P E R A T I N G I N S T R U C T I O N S
5.12 Swinging hammer replacement and maintenance
CAUTION:
Disengage the fluid coupler, shut off the engine and remove the key before working on
the rotor.
When installing or changing hammers, be sure to follow the hammer diagram carefully. Misplacement of the hammers
could cause excessive vibration. We recommend that hammers be balanced in sets according to the rod on which they
are to be installed. Sets of equal weight should be installed 180 degrees apart (See Illustration A). When replacing
a worn or broken hammer with a new hammer always install a second new hammer 180° away from the first (see
Illustration B). When starting the hammermill after installing a new set of hammers or turning corners, watch for
unusual or excessive vibration. If any occurs, immediately shut off the mill. Determine the cause and correct it before
starting the mill again.
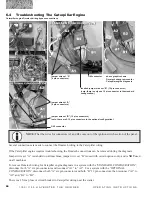
To replace worn hammers on machines with swinging hammers, perform the following steps:
1. Follow the normal shutdown procedure which can be found on page 28 of this manual.
2. Loosen the four bolts at the front of the rotor which holds the hammer rod retainer plate in place.
3. Rotate the retainer plate to align holes allowing the hammer rods to be removed through the front of rotor.
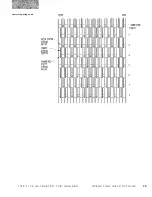
4. Remove one row of hammers and replace individual hammers as necessary. Note the location of any
spacers. See hammer spacing charts.
5. After all the hammers have been replaced, rotate the retainer plate to lock hammer rods in place, and
tighten the four retainer plate bolts.
IMPORTANT:
Care should be exercised when replacing only a few hammers and not the entire
set. If one or more new hammers are inserted on a rod, the same number of new hammers should
be inserted on the rod directly across the rotor. This will maintain a balanced rotor for vibration free
operation.
hammer replacement
illustrations A + B
figure 5.10