background image

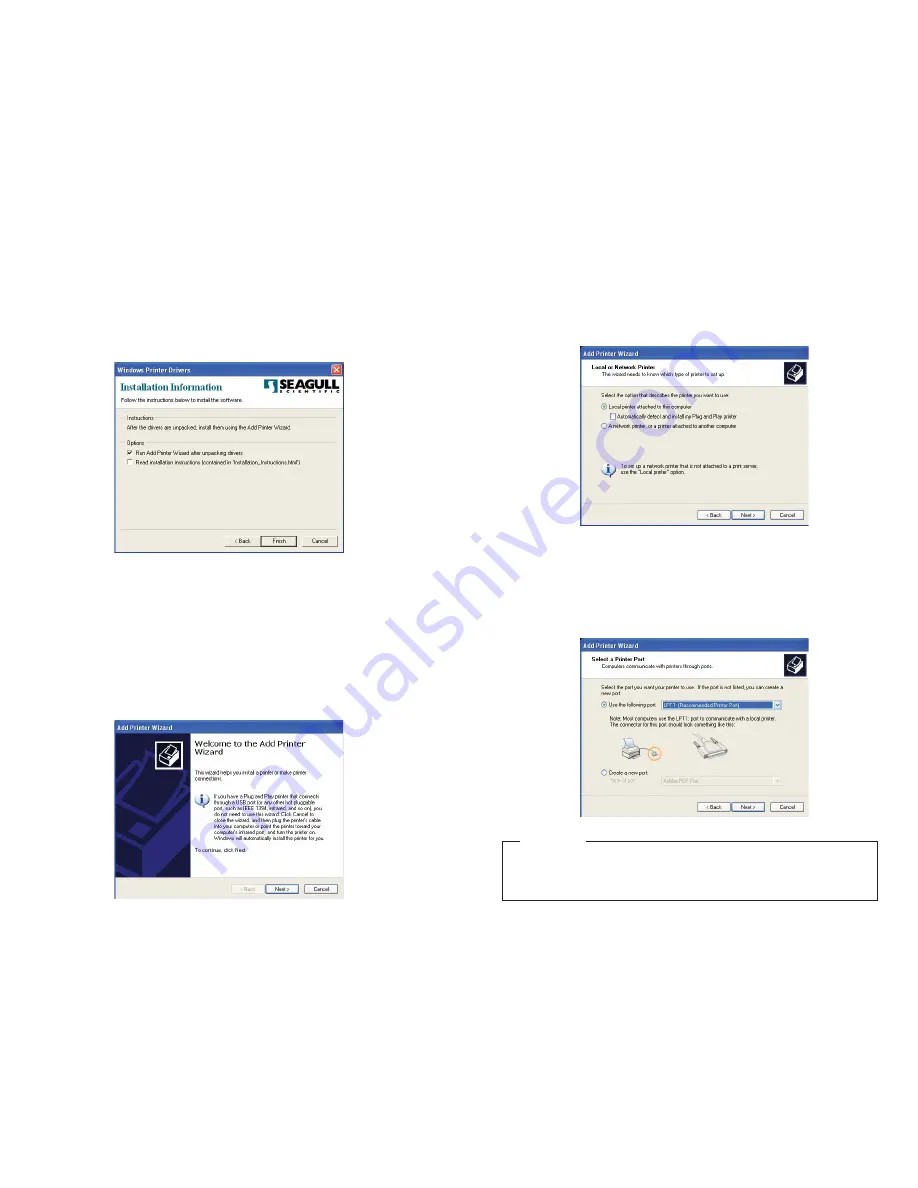
Select either 

Local 

or 

Network

for your printer driver. If you select Local, make sure

the “Automatically detect and install my Plug and Play printer,” is unchecked.

Select the port you would like your printer use. 

If you are going to print RTK labels, see the setup instructions in the RTK software 

documentation.  See 

Introduction

on the 

Help Menu page

.

RTK LABELS

5

Select any options desired on the final screen and uncheck the second option,
“Read Installation Instructions,” then click 

Finish

.

To Add Printer

IIM

MP

PO

OR

RTTA

AN

NTT::

You must have administrative rights in order to add a printer under Windows XP.

An “Add Printer Wizard” window should have appeared on your screen; click 

Next

4

Summary of Contents for 4 TTP

Page 1: ...DuraLabel 4 TTP User s Guide ...

Page 2: ...ave any questions or concerns make sure to give us a call Graphic Products Inc 1 800 788 5572 1 CONTENTS Getting Started Prepare the Printer Install the Printer Drivers Driver Configuration Load Supplies Ribbon Label Media Label Creation Using Templates Setting up the Document Select the Printer Optimize the Print Properties Changing the Page Setup Orientation Label Design Text Graphics Symbols Ba...

Page 3: ...you are ready to install the printer drivers and software When you place the CD in the drive it should autorun within a few seconds When the autorun begins the DuraLabel 4 menu will appear on your screen Click on the button Install Driver The program will now guide you through the installation of your printer driver Note Find out your Windows version by right clicking on the My Computer icon locat...

Page 4: ...els see the setup instructions in the RTK software documentation See Introduction on the Help Menu page RTK LABELS 5 Select any options desired on the final screen and uncheck the second option Read Installation Instructions then click Finish To Add Printer I IM MP PO OR RT TA AN NT T You must have administrative rights in order to add a printer under Windows XP An Add Printer Wizard window should...

Page 5: ...to be set as your default printer then click Next Decide if you would like to share the printer with other network users then click Next 7 IMPORTANT Click on Have Disk not next In the space provided type C Seagull and click OK Select the TSC TTP 342M Plus for the printer and then click Next 6 The listings in these boxes will differ with each user and will not match what you see here ...

Page 6: ...ters folder Right click on the DuraLabel 4TTP and select Printing Preferences from the drop down menu This will bring up the DuraLabel 4 TTP Printing Preferences Click on the Page Setup Tab 9 Choose if you would like a test print to ensure proper installation then click Next Make sure your settings are correct if so select Finish otherwise select Back and change to the correct settings A dialog bo...

Page 7: ...0 in and click Edit This brings up the Edit Stock dialog box Set the Label Width and Label Height to 4 00 x 40 00 Take note of the Exposed Liner Width measurements as they should be set to 0 if printing on continuous rolls of media Click OK when finished You can use this stock when printing any label that is 4 00 by 40 00 in or smaller Since you won t need the other stock sizes select and delete e...

Page 8: ... To set the cutter select the Stock Tab Set the Media Settings Type to Continuous In order for the automatic cutter to cut after each label under Media Handling next to Post Print Action select Cut and then next to occurrence select After Every Page These settings may be later adjusted to your specifications in the Printer Properties as you are printing your labels Select Apply on the bottom of th...

Page 9: ...e right hand side first put the left side of the Ribbon Supply Spindle in the provided spot of the Ribbon Mechanism and then the right side with flange 15 Figure 2 Ribbon Mechanism in open position with a core applied to the Ribbon Rewind Spindle Load Supplies Structure of DuraLabel 4 TTP Figure 1 Interior view 1 Printer Cover in open position 2 Ribbon Mechanism 3 Printer Carriage Release Lever 4 ...

Page 10: ...e Ribbon Supply facing towards the back of the machine and extending over the top of the Ribbon Supply Spindle 4 With the Ribbon Supply facing towards the back of the machine and the flange of the Ribbon Supply Spindle is on the right side first put the left side of the Ribbon Supply Spindle in the provided spot of the Ribbon Mechanism and then the right side with flange Figure 3 Flange of the Spi...

Page 11: ... Spindle 2 Label Roll Mount 3 Label Roll 4 Fixing Tabs 6 Tape the entire length of the end of the Ribbon Supply to the core on the Rewind Ribbon Spindle and roll the Ribbon Rewind Spindle forward a few times to secure the Ribbon Supply around the Ribbon Rewind Spindle and to eliminate any wrinkles fingerprints or flaws The Ribbon Supply should be in place and ready for Label Media to be inserted F...

Page 12: ...g Loading of Label Media Please view our supply loading video online at www DuraLabel com 1 With the lid open and the front of the machine is facing forward open the Ribbon Mechanism 2 pg 14 by pulling the Printer Release Lever Fig 7 1 pg 19 forward if not already opened 2 Load the Label Media Fig 7 3 pg 19 on the Label Supply Roll Spindle 7 pg 14 and center the Label Media using the measuring uni...

Page 13: ...full potential Today s word processors come packed with features and capabilities that far surpass the average users needs Advanced page layouts graphic manipulation and printing options are only the beginning of what most word processors have to offer The DuraLabel 4 TTP operates off of a standard Windows printer driver that makes the printer accessible from a wide variety of software packages Ma...

Page 14: ... Using the Templates Provided on the DuraLabel 4 CD We have provided a variety of templates on the DuraLabel 4 CD to help get you printing labels in no time To get to these templates you should install from the start up screen on your CD This should only take a minute or two Click on Install Templates and Symbols on the start up screen then follow the instructions The Templates will install to you...

Page 15: ...match the width of the tape supply you have loaded in the machine 27 To Change the Automatic Cutter Setting You can change the automatic cutter settings without going back into the printer driver Go to File Print then click on the Properties button next to DuraLabel 4 TTP A new dialog will open which allows you to change the cutter options If you do not want to cut between labels select None under...

Page 16: ...ontains text The box can have borders and can be filled with different colors or it can have no borders and be transparent All of these features make text boxes ideal for label creation In MS Word add a text box with the following steps Click on Insert Text Box Next holding down the left mouse button drag in the document window the square handles on the border of the text box until it is the desir...

Page 17: ...e you desire to insert Insert symbols by browsing to the Symbols folder on the DuraLabel CD The picture is automatically placed in your Word document Change the size by dragging the cor ner of the box to the desired size Format the text inside the box to any size and style then position the box for the desired layout Initially the text box will have a border around it To get rid of the border doub...

Page 18: ...o the My Documents folder If you have already installed the symbols from the CD they automatically install when you install the templates there will be a folder inside your My Documents folder called DuraLabel4TTP You can insert other objects graphics and clip art from the same pulldown menu When working with images it is important to remember the type of printer you are using Images should be for...

Page 19: ... Code 39 Interleaved 2 5 Code 128 UCC 128 Codabar UPC A and E for mats EAN 8 and 13 formats and PostNet Each barcode style supports a different set of ASCII characters and is used for different situations or industrial applications For instance Code 39 supports uppercase characters numeric characters and a few inci dental characters while Interleaved 2 5 only supports numeric data but does so in a...

Page 20: ...Note To force the toolbar to display every time you start Word go to Start Search For Files and Folders and type in BCFONT Click OK Once the file is found right click it and choose copy Next go to the C Program Files Microsoft Office Office Start up folder right click inside of the folder and choose paste Using the dBest Barcodes Toolbar The Barcode String is where you can type in the characters f...

Page 21: ...d drag down over how many cells you want to increment See 5 Example to increment the value 100 times drag the cells down to the 100th row 39 Now that you have the desired label size its time to add the text to it Keeping Word open browse to the pro vided Excel template Number Sequence xls This is a predefined template with the formula already in place to increment a numeric value by one 1 Open the...

Page 22: ...e Word label 41 Once you re satisfied with the amount of increments and cell span its time to copy this into your Word template Go back to the word document that you previously created Remember The page layout of the Word template must match the cell size you specified in your Excel template Select the entire Column you just created by clicking on the top header of the cell In this case the A Go t...

Page 23: ... the field of the document A text box will appear 5 Resize the text box to your preference See Figure 1 below 43 5 Click on column header A right click the mouse and select Copy 6 Toggle Alt T Tab over to the Word document and find the Edit button on the Windows Tool Bar top left of screen and then click and select Paste Special 7 Next select Unformatted Text and click OK 8 The Excel column should...

Page 24: ...ile name of your Excel document 29 Click OK 45 6 When the text cursor is blinking in the text box click on the Insert menu and select Field 7 The box on the left should remain with the blue highlighting of the word All 8 On the right column move the cursor so the blue highlight is over MergeField 9 In the long horizontal box below MERGEFIELD will appear 10 Put a space after MERGEFIELD then type in...

Page 25: ... head exposed 3 Take a cleaning swab in between your thumb and fore finger and squeeze it until it snaps This will release alcohol to the tip of the swab 4 Clean the entire print head thoroughly removing any built up material using the soft end of the cleaning swab Print Head Metal Casing 47 30 Click Merge 31 Click Merge and the document will merge from Excel to Word You are now finished Help is a...

Page 26: ... up and open the cover 4 Pull the Printer Carriage Release Lever towards you to release the Ribbon Mechanism Figure 2 Inside of machine 49 Cleaning the Cutter 1 With the front of the machine facing forward turn the machine OFF and unplug it for safety 2 Take a cleaning swab in between your thumb and fore finger and squeeze it until it snaps This will release alcohol to the tip of the swab 3 Clean ...

Page 27: ...ver of the cutter mechanism Figure 6 Cutter disassembled 51 5 Lift the whole casing of the cutter mechanism straight up and then towards you to detach the cutter mechanism from the 2 hooks that hold it in place Figure 3 Cutter mechanism is dismantled from machine Red circles indicates the hooks in step 5 White circles point out the screws in step 6 6 Take out the 2 visible screws on the inside of ...

Page 28: ...tter Figure 1 CAUTION label on the inside of the cutter Figure 2 Wires correctly in front of the cutter 53 9 Now you are able to clean the cutter from all sides and angles Make sure to clean all visible glue and or vinyl that has built up It s a good idea to clean the Print Head Platen the white roller and the black roller when they are easy to access Print Head White roller Platen black roller 52...

Page 29: ...ng lips of the black bar otherwise it will pinch the wires Figure 5 Wires are in between the 2 protruding lips of the black bar 55 2 Match the holes in the cutter with the holes in the gray casing lid of the cutter mechanism Make sure the wires are not in front of the holes Figure 3 Holes are clear of any wires 3 With the wires and yellow CAUTION label facing down and holes lining up care fully pu...

Page 30: ...k upside down 8 Screw the 2 outside screws back in the appropriate slots on the machine to hold the cutter in place Figure 6 Underside of machine 9 Turn the machine in the upright position plug the machine in turn it on and it s ready to print Figure 7 Machine in upright position with cover closed 56 ...

Page 31: ...503 644 5572 1 800 788 5572 Fax 503 646 0183 Graphic Products P O Box 4030 Beaverton OR 97076 www DuraLabel com Copyright 2007 Graphic Products Inc v 2 10 ...

Reviews: