background image

Installation

8

2.3 Installing the second projector (Set 

B

Connecting projectors

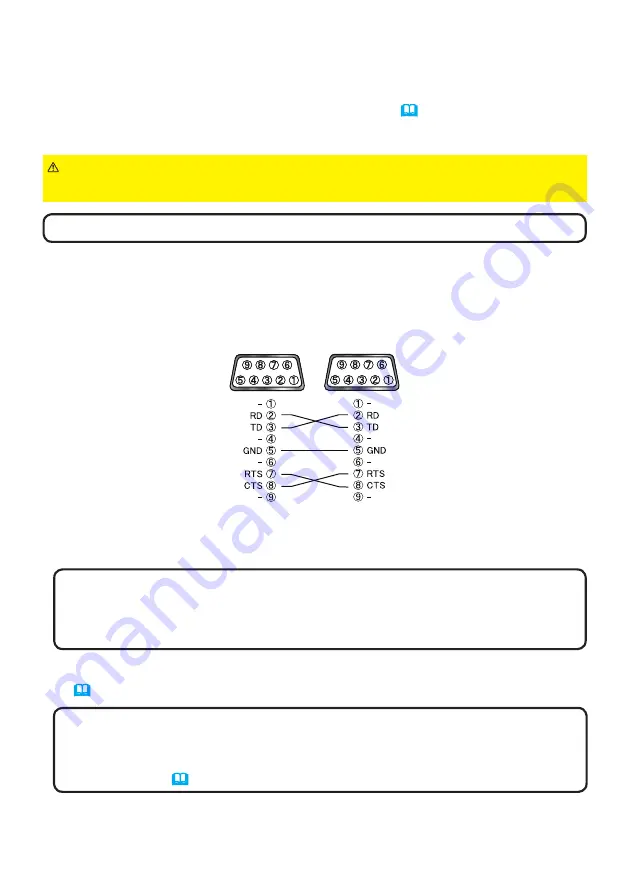
To use Intellectual Stack, connect an RS-232C cross cable between the 

CONTROL


port of Set 

A

 and Set 

B

.

(continued on next page)

NOTE

  • KEYSTONE, PERFECT FIT, or WARPING function cannot be used 

at the same time. Please use an appropriate function.
• Perform the INSTALLATION setting first if necessary as it may change the 

image position. (

Operating Guide


SETUP menu

)

2.

  Reset the adjustment of KEYSTONE

 and 

PERFECT FIT on Set 

B

.  

(

Operating Guide


EASY MENU

 or 

SETUP menu

)

1.

  Turn on 

Set 

B

.

NOTE

  • After turning on Set 

B

, make sure the image of Set 

B

 is not 

significantly tilted compared to the image of Set 

A

. If the image is overly tilted, 

rotate the elevator feet of Set 

B

 to adjust the angle such that the tilt is just 

about right. 

Setting up Set 

B

NOTE

  • Set the tilt angle of Set 

B

 to within 5 degrees from the level line.

Deciding installation position

Decide the position of Set 

B

 and its projection angle. (

User’s Manual (concise)


Arrangement

 and 

Adjusting the projector’s elevator

)

WARNING


►It is possible to install the projector for any direction with specified 

mounting accessories. Consult with your dealer about such a special installation.

Summary of Contents for 8980WU

Page 1: ...ners Various symbols are used in this manual The meanings of these symbols are described below A b out this manual WARNING CAUTION NOTICE This symbol indicates information that if ignored could possib...

Page 2: ...or off 14 3 3 Selecting lamp operation mode 15 3 4 Selecting lamp switching mode 17 3 5 Selecting input source for Sub 18 3 6 Exiting Intellectual Stack menu 19 STACK menu 19 Dialog from STACK menu 1...

Page 3: ...als Operate the projectors from the control panel of the Main projector or with the remote control pointing at the Main projector For details on operating by remote control and from the control panel...

Page 4: ...all the projectors in a stable environment when using Instant Stack If the image positions are shifted readjust the images 6 8 11 The image positions may shift over time due to the tension and the wei...

Page 5: ...but the image positions can shift over time Readjust to superimpose the images 2 1 Preparing for Intellectual Stack When using Intellectual Stack via RS 232C connection ensure the following set tings...

Page 6: ...Guide SETUP menu 3 Adjust the image of Set A to fit the screen with the ZOOM FOCUS and LENS SHIFT features Operating Guide Adjusting the lens Adjust the image position using KEYSTONE and PERFECT FIT i...

Page 7: ...mote control it is recommended to operate with the control panel or a wired remote control KEYLOCK or REMOTE ID function is also available 7 After pressing the button a dialog to confirm whether or no...

Page 8: ...ing Guide EASY MENU or SETUP menu 1 Turn on Set B NOTE After turning on Set B make sure the image of Set B is not significantly tilted compared to the image of Set A If the image is overly tilted rota...

Page 9: ...u ADVANCED MENU OPTION SERVICE COMMUNICATION STACK STACK menu will appear on screen Operating Guide OPTION menu 3 Adjust the image size and position of Set B with the ZOOM FOCUS and LENS SHIFT feature...

Page 10: ...appear on the lower right screen Main Set B Sub Set A 3 If you press the button the dialog closes and the Main Set B menu will appear when MAIN is highlighted If you press the button the dialog close...

Page 11: ...the same way NOTE Refer to NOTES for all users 12 For Intellectual Stack users 1 Press the MENU button on the remote control or the control panel on Main Set B to display the MENU dialog Highlight MA...

Page 12: ...menu and change to the same setting if the setting differs between Main and Sub Operating Guide INPUT menu For Simple Stack users 1 Press the MENU button on the remote control to display the menu on...

Page 13: ...tion skip this chapter If you do not need to change the settings made during the installation explained prior to this chapter go to 3 3 Selecting lamp operation mode 15 Read 3 7 Important information...

Page 14: ...o complete the setting 19 3 2 Selecting Main Sub or off To enable Intellectual Stack select either MAIN or SUB Intellectual Stack starts when one projector is set to MAIN and the other is set to SUB i...

Page 15: ...d the Status Monitor on the Main Projector can be operated When DUAL is selected for LAMP MODE there are operating restrictions as follows AUTO POWER OFF and FREEZE functions on both projectors are di...

Page 16: ...projector will not turn on In cases when PIN LOCK or TRANSITION DETECTOR on both projectors is set to ON Operating Guide SECURITY menu the two projectors will not turn on even if ALTERNATE is selecte...

Page 17: ...e may be turned on even if AUTO is selected 3 4 Selecting lamp switching mode The following setting is necessary only when ALTERNATE is selected in the LAMP MODE dialog 15 Select the AUTO or NORMAL la...

Page 18: ...m the MONITOR OUT port on the Main projector to the COMPUTER IN port on the Sub projector If FIXED COMPUTER IN is selected video signals can be input to the COMPUTER IN port on the Main projector Set...

Page 19: ...s YES key in the dialog saves the setting and closes the dialog The screen becomes black while the setting is being applied Please wait for a while Pressing the button functioning as NO key in the dia...

Page 20: ...not the Sub projector so the remote control should be pointed at the Main projector Each Status Monitor can also be operated individually from the respective control panel of the Main and Sub project...

Page 21: ...FF Operating Guide OPTION menu COMMUNICATION TYPE Operating Guide OPTION menu SERVICE COMMUNICATION SOURCE SKIP Operating Guide OPTION menu LAN port cannot be selected When the projectors are in the P...

Page 22: ...on again If the PIN LOCK or TRANSITION DETECTOR security function on both projectors is set to ON both projectors will turn on Enter the security code for Main first then followed by Sub If ALTERNATE...

Page 23: ...ad as one projector and Sub as the other projector For details on the specifications of the input ports refer to Connecting with your devices Operating Guide Setting up and Connection to the ports Ope...

Page 24: ...of the input ports on Main 4 2 Connecting signal cables There are two methods to input image to the Sub projector 18 19 Inputting image from the MONITOR OUT port on Main to Sub Inputting image to Sub...

Page 25: ...ctor Before operating the menu for Intellectual Stack check if the Main projector is functioning 1 Press the MENU button on the remote control 2 If the MENU dialog as shown on the right appears on the...

Page 26: ...projector with the least lamp usage is turned on Therefore the Main projector may not be turned on even if you restart the projectors Follow the procedures below to turn on the Main projector 1 Use th...

Page 27: ...MUNICATION STACK STACK menu will appear on screen Operating Guide OPTION menu 3 Use the buttons to highlight SUB INPUT SOURCE and press the button to display the SUB INPUT SOURCE dialog 4 Use the butt...

Page 28: ...el on the Main projector Use the buttons to open the COMPUTER IN dialog Operating Guide INPUT menu 3 To input component signals to COMPUTER IN set the port to AUTO Then use the buttons to highlight EX...

Page 29: ...SOURCE dialog will be displayed on screen Use the buttons to highlight the port to which the signal cable is connected and press the button to complete the setting NOTE If FOLLOW MAIN UNIT is selected...

Page 30: ...o the following for the restrictions concerning Intellectual Stack If you are using Simple Stack skip this chapter continued on next page This Schedule can be input to Projector Web Control and be exe...

Page 31: ...n the remote control or STANDBY ON button of the Main projector The projectors cannot be turned on by the Schedule function on the Sub projector Set it on the Main projector if necessary When the Sub...

Page 32: ...tual Stack feature connect an RS 232C cross cable between the Main and Sub projectors If the cable is not connected the Main projector cannot control the Sub projector 8 The menu settings for Intellec...

Page 33: ...imposed The two images are not superimposed correctly Adjust to superimpose the images with the ZOOM FOCUS and LENS SHIFT features If necessary adjust PERFECT FIT and KEYSTONE as well 6 11 The images...

Reviews: