background image

51

 About warning indicators

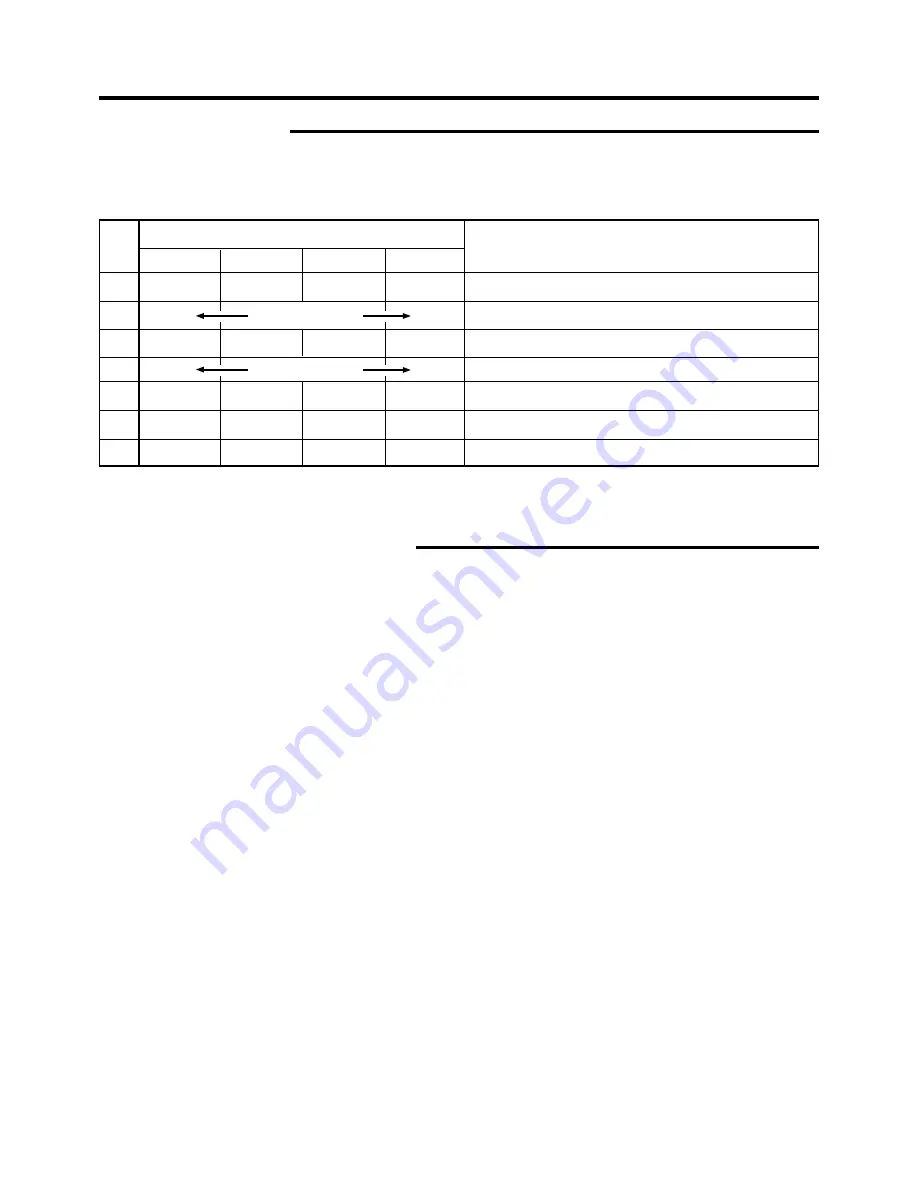
If something abnormal has occurred in the projector, the warning mode sets in and the type of abnormality will be indicated by a
combination of indicators displayed on the control panel as shown in the following table.
The projector will then automatically stop projection and run the cooling fan for about 90 seconds.

Warning Indication

 Action to be taken upon warning indications

Please follow the procedures below.

For No.1-3

No.1 : Unplug from the main power outlet and restart according to the basic operation procedures.
No.2 : After checking if a shock (such as from knocking) has not ocurred during operation, unplug from the main power outlet

and restart according to the basic operation procedures.

No.3 : Unplug from the main power outlet and restart according to the basic operation procedures.

For No.4-7

After the STAND BY indicator lights up, pull out the power cord and check the following items one-by one.
No.4 : Ensure that the lamp is correctly set in place. Restart according to the basic operation procedures.
No.5 : Check that nothing is blocking the air inlets, and wait until the inside cools down. Restart according to the basic operation

procedures.

No.6 : Check the ambient temperature. If it is normal, leave the projector until it cools down. Restart according to the basic

operation procedures.

No.7 : Leave the projector until it cools down. Restart according to the basic operation procedures.

If the same warning indication is observed again despite the instructions above, wait for the cooling fan to stop, check that the
STAND BY indicator on, then unplug the power cord and call your dealer for repair.


Indicator

LAMP

TEMP

STAND BY

OPERATE

1

Blink

Blink

The light-source lamp does not light up and projection cannot be done.

2

Blink

Blink simultaneously

Blink

The light-source lamp suddenly goes off during projection.

3

Blink

Blink

Circuit operation is abnormal.

4

Blink

Blink alternately

Blink

The light-source lamp is misfitted.

5

Blink

The internal temperature is abnormally high.

6

Blink

Blink

The temperature at the air inlets has risen abnormally high.

7

Blink

Blink

Blink

Blink

The cooling fan has stopped. (Fan locked)

* For details on individually blinking indicators, please see page 43.

Warning

No.

Summary of Contents for 28A9017

Page 1: ...User s Manual D ILA Multimedia Projector Model 28A9017 Audio Visual Products ...

Page 2: ...sive force and uneven surfaces which may cause the product and cart to overturn damaging equipment or causing possible injury to the operator PORTABLE CART WARNING symbol provided by RETAC S3126A IMPORTANT INFORMATION WARNING TO PREVENT FIRE OR SHOCK HAZARDS DO NOT EX POSE THIS APPLIANCE TO RAIN OR MOISTURE CAUTION To reduce the risk of electric shock do not remove cover Refer servicing to qualifi...

Page 3: ...nce this indicates a need for service When replacement parts are required be sure the service technician has used replacement parts specified by the manu facturer or with same characteristics as the original part Un authorized substitutions may result in fire electric shock or other hazards Upon completion of any service or repairs to this product ask the service technician to perform safety check...

Page 4: ...upply If a new main plug has to be fitted then follow the instruction given below POWER CONNECTION United Kingdom only WARNING Do not cut off the main plug from this equipment If the plug fitted is not suitable for the power points in your home or the cable is too short to reach a power point then obtain an appropriate safety approved extension lead or adapter or consult your dealer If nonetheless...

Page 5: ...th a neutral detergent Since the cabinet may in time get damaged or deteriorate in condition eg peeling paint Do not wipe with a stiff cloth Do not wipe with force Do not wipe with thinner or benzene Do not spray chemicals like insecticide Do not allow it to come into contact with rubber or vinyl ma terials for an extended period of time Cleaning the lens Please use lens cleaning paper of the kind...

Page 6: ...g the Quick Alignment function 31 Selecting the Screen Size 31 Adjustments and Settings Using Menus 32 The Menu Structure 32 The Menu Operation Buttons 35 The Procedure for Menu Operation 36 The Menu Configuration 37 1 Image adj menu 37 2 Color temp menu 37 3 Set up menu 37 4 Position menu 38 5 Decoder menu 38 6 Logo menu 38 7 Capture menu 38 8 Capture start 39 9 Option menu q 39 p Color profile m...

Page 7: ...te Sensor Front When operating with the remote control aim it towards this sensor page 18 A remote sensor is also provided at the rear of the projec tor 9 Focus Ring Used to manually focus the projected image on the screen p Zoom Ring Used to manually zoom the projected image on the screen 1 Control Panel For details See Control Panel on the Projector page 10 11 2 AC Power Input Terminal This is w...

Page 8: ... replacing the lamp page 43 r Exhaust Vents Warm air is expelled through these vents to keep the sys tem cool Please do not block the exhaust vents t Remote Sensor Rear When operating with the remote control aim it towards this sensor page 18 A remote sensor is also provided at the front of the projec tor y Front Adjustable Foot for adjusting the height and angle It is set at the lowest position w...

Page 9: ...dge of the image may appear to bow if the sync signal input is a composite sync Cs or G on sync signal In this case please use separate sync signals for vertical sync V and horizontall sync H 3 PC 3 input terminal DVI D Dual Single 24 Pin This is an input terminal dedicated to computer signals DVI D Terminal Dual Single Connect the display output terminal of the computer to this terminal 4 DC OUT ...

Page 10: ...n mode when cooling lamp LAMP blinking 1 Lamp life has expired Lamp time over 2000hours LAMP light on 1 The time to replace the lamp is near Lamp usage time over 1900hours LAMP and STAND BY blinking 2 Lamp does not light up and projector is unable to project LAMP and OPERATE blinking simultaneously 2 Lamp has turned off during projection LAMP and TEMP blinking 2 Circuits are not functioning proper...

Page 11: ...utton to select a device connected to the PC1 PC2 or PC3 terminals page 26 w H KEYSTONE button Use this button to remove the horizontal trapezoidal distor tion of the image projected on the screen page 30 e V KEYSTONE button Use this button to remove the vertical trapezoidal distortion of the image projected on the screen page 30 r MENU button Use this button to enter or exit the menu mode When th...

Page 12: ... 2 OPERATE button q VIDEO button w PC button e H KEYSTONE button r V KEYSTONE button 3 SCREEN button 4 DIGITAL ZOOM button 5 FREEZE button QUICK ALIGN quick alignment button 7 EXIT button p CURSOR button 8 ENTER button 9 HIDE button t VOLUME button u MENU button FOCUS button Only for Fixed Lens Models i PRESET button y 6 Remote Control Unit Controls and Features ...

Page 13: ...When the main menu is displayed pressing this button will cause the menu to disappear page 35 8 ENTER button Press this button to show the next hierarchical menu For example from main menu to sub menu It is also used when ENTER is displayed against the item on the menu screen or to select the Reset menu page 35 9 HIDE button Use this button to temporarily halt the audio and visual out put Press ag...

Page 14: ...ew and old batteries Do not mix different types of batteries as they are differ ent in characteristics Place batteries so they match the polarities indicated on the cartridge Be sure to insert the minus end in first to avoid short circuiting Do not put batteries into a fire or try to recharge them Use only designated batteries Remove the batteries if the remote control is not to be used for a prol...

Page 15: ...eratures when projecting Please DO NOT use it in the following ways as doing so may result in fire or malfunction Projecting images while the projector is on its side Projecting images outside the specified angle Do not use the projector while it is set more than 5 horizontally left right or more than 25 vertically up down This could cause color variation or shorten the lamp life Use while blockin...

Page 16: ...d and downward from the vertical line Mounting the Projector When mounting of the projector is required do it using the embedded three screw holes M6 nuts at the bottom of the projector Precaution for ceiling mount To ceiling mount and adjust the projector special exper tise and techniques are necessary Be sure to ask your dealer or specialist to perform the work Do not mount on places that will b...

Page 17: ...approx 3 99m approx 5 20m Model 120 approx 304 8cm approx 4 80m approx 6 25m Model 140 approx 355 6cm approx 5 61m approx 7 31m Model 160 approx 406 4cm approx 6 42m approx 8 36m Model 180 approx 457 2cm approx 7 22m approx 9 41m Model 200 approx 508 0cm approx 8 03m approx 10 46m Model 220 approx 558 8cm approx 8 84m approx 11 51m Model 240 approx 609 6cm approx 9 65m Model 260 approx 660 4cm app...

Page 18: ...re exhausted improper functioning will occur Please replace with new batteries When either the remote control unit or projector alone is connected to the remote cable the item connected will not be able to work Please check the cable connection The operable distance of the remote control unit is about 7m for direct reception The remote control unit can be used by having the transmission signal ref...

Page 19: ...TV format signals DTV format signals 480i 480p 720p 1080i can be input to the Y PB CB PR CR 10 input terminals 10 To use these signals it is required to set the PC2 BNC item in the menu Option to YPBPR page 39 Computer signals Computer signals can be input to the PC1 PC2 G B R H Cs V or PC3 DVI D terminals Scanning frequencies in the following ranges can be inputted Horizontal scanning frequency 1...

Page 20: ...02 68 68 46 43 63 98 79 98 91 15 64 02 75 00 35 00 49 73 60 24 68 68 33 75 33 72 31 47 45 00 44 96 33 75 33 72 28 125 33 750 28 125 27 000 15 734 15 625 15 625 84 13 56 42 59 94 72 81 75 00 85 01 56 25 60 32 72 19 75 00 85 06 43 48 60 00 70 07 75 03 85 00 43 44 60 02 75 03 85 02 60 00 60 00 66 67 74 55 74 93 75 06 60 00 59 94 59 94 60 00 59 94 60 00 59 94 50 60 30 50 25 48 24 60 50 50 VIDEO system...

Page 21: ...C2 input terminal is used the PC2 BNC item in Options menu must be correctly set page 39 Sound input Connect to AUDIO IN terminal Connecting to Various Devices Before connection be sure to turn off both the projector and the device Connecting to Video Devices Thoroughly read the manual that comes with each video device Use the supplied AV connection cable S video Y C cable BNC cable and PC Audio c...

Page 22: ...o work if an external display device is connected With such computers the LCD display and external display output need to be switched Connecting to Various Devices Connecting to Computers Thoroughly read the manuals that come with the computer used Use the supplied computer connection cable Also prepare cables for connecting the devices When the PC2 input terminal is used PC2 BNC must be selected ...

Page 23: ...controlling more than one projector By using the CONTROL terminal more than one projector can be controlled simultaneously by one computer Connect these projectors in series by connecting the OUT terminal of the first projector to the IN terminal of the second projector then the OUT terminal of the second projector to the IN terminal of the third projector etc Connecting to Various Devices Control...

Page 24: ...er plug directly into a wall outlet When not using devices remove the power cords from the wall outlets Do not use power cords other than those supplied Do not use a power voltage different from that which is indicated Do not cut tear or modify the power cords Also do not put a heavy object on heat or stretch the power cords otherwise they may be damaged Do not insert or pull out the plugs with a ...

Page 25: ...Y indicator lights up when the power cord is connected 2 Press the OPERATE button on the projector or the OPER ATE button on the remote control unit for one second or more The OPERATE indicator lights up and the projected image slowly appears 2 Selecting the image to be projected Press VIDEO to select which of the image devices of those connected to the VIDEO IN VIDEO or Y C terminals is out put E...

Page 26: ...follows PC1 Projects image from PC1 input terminal on the right hand side of the projector PC2 Projects image from PC2 input terminal on the right hand side of the projector PC3 Projects image from PC3 input terminal on the right hand side of the projector When Line display page 39 is set to 5 sec after changing an input the new selection will appear on the screen for about 5 seconds Notes Sound i...

Page 27: ...n to immediately re move the Audio vol display Note When the sound volume is displayed on the screen pressing the PRESET button will reset the set value to 0 Power Off 1 Press the OPERATE button on the projector or the OP ERATE button on the remote control unit for 1 second or more The OPERATE indicator will disappear the STAND BY indicator starts to blink and the projector goes into the cool down...

Page 28: ...s 2 Level Display Level shown is based on selected magnification Enlarging the Image We can zoom in while not changing the size of the projected image After zooming the position of the image displayed can be moved This cannot be done using the projector buttons Please use the re mote control unit 1 Press DIGITAL ZOOM ª The Digital zoom display appears on the screen and the projector changes to the...

Page 29: ...s operation cannot be operated by the projector buttons Please use the remote control unit Press the FREEZE button The image pauses after the FREEZE button is pressed for a few seconds and a message is shown in the center of the screen An icon indicating FREEZE mode will be displayed on the top right corner of the screen To de freeze the image When you press the FREEZE button again the image de fr...

Page 30: ...r when rein stalling in other rooms etc Keystone adjustments need to be made to remove trapezoid distortions Press V KEYSTONE to adjust in the vertical direction A Vert Keystone display appears on the screen and the projector goes into the KEYSTONE MODE Press button in the direction that corrects the trapezoid form Notes The range where the trapezoidal distortion can be rectified is 30 vertically ...

Page 31: ...gnment Quick Alignment appears on the screen and disappears after alignment is complete Notes The Quick Alignment function only works when computer signals are input into either the PC1 or PC2 input terminal It does not work when signals are input via a VIDEO IN terminal The VIDEO or Y C input terminal The Quick Alignment function This automatically adjusts Horiz disp pos Vert disp pos Phase Track...

Page 32: ...12 G B R Image adj Set up Logo Options Language Information A GB R 12 15sec ON OFF ON OFF ON 4 3 16 9 5sec OFF ENTER ENTER sRGB MacRGB Color profile Adobe EBU EXIT Image adj Set up Logo Options Language Information A GB R Image adj Set up Logo Options Language Information A NTSC Source 1234 h Lamp time CH 0 Switcher VIDEO Input Image adj Set up Logo Options Language Information A 0 GREEN 0 BLUE 0 ...

Page 33: ...ture menu Image adj Set up Logo Options Language Information A ENTER 12 12 G B R Capture menu Menu pos Horiz move Vert move Horiz size Vert size Capture start Capt in prog approx 2min Signal can not be captured Reduce capt size Image adj Set up Logo Options Language Information A GB R 12 15sec ON OFF ON OFF ON 4 3 16 9 5sec OFF ENTER ENTER Color profile Menu display Line display Flip H Flip V Scre...

Page 34: ...on Input Switcher Lamp time Image adj Set up Logo Options Language Information A G B R ENTER ENTER ENTER ENTER Blue Black OFF ON Logo disp Logo pos Back color Logo delete Capture menu Image adj Set up Logo Options Language Information A ENTER ENTER 12 12 G B R Capture menu Menu pos Horiz move Vert move Horiz size Vert size Capture start Capt in prog approx 2min Signal can not be captured Reduce ca...

Page 35: ...menu on the screen When the main menu is displayed press to exit the menu mode Select an item while the main menu hierachy1 is displayed the submenu hierachy 2 corresponding to the item selected will be displayed on the screen Press to shift to the Set up screen hierachy3 of the selected item against which ENTER is displayed Press to return to the previous menu While the main menu is displayed pre...

Page 36: ...at procedures 2 to 6 to set other items After all adjustments are done Press the MENU button The menu will disappear from the screen The menu item that has been se lected is displayed The icon of the selected menu item will be highlighted The submenu is displayed 2 Press the CURSOR buttons 䊱 䊲 to select a submenu The Image adj Set up Logo Options and Language submenus are displayed When Informatio...

Page 37: ...el Aspect Aspect 1 Image adj menu Image adjustment You can adjust the following items on the image adj menu The items displayed differ depending on whether Video input or PC input is selected There is no display when no image signal is inputted Adjustment item press 䊱 䊲 Adjustment content press 䊴 䊳 Contrast Adjusts the contrast of the picture image Range of values 30 30 0 Brightness Adjusts the br...

Page 38: ...ion well select the appropriate decoder accordingly Values AUTO NTSC NTSC4 43 PAL SECAM AUTO 6 Logo menu Adjustment item press 䊱 䊲 Adjustment content press 䊴 䊳 Logo disp Sets whether to indicate the user set logo captured image Logo disp when the projector starts up ON Logo pos Sets the position of the user set logo cap tured image Logo disp when the pro jector starts up Re setting can be per form...

Page 39: ...nal input Values sRGB MacRGB Adobe EBU Adjustments and Settings Using Menus q Page 2 Adjustment item press 䊱 䊲 Adjustment content press 䊴 䊳 Sleep time min Sets the length of sleep time which when lapsed automatically puts the projector into stand by state if no signal is input ted Setting value 15 30 60 OFF OFF Menu color When ON menubecomestransparentand the background can be seen through it Sett...

Page 40: ... not being used 1 10 switcher number For details please check with your au thorized dealer Resolution Displays the resolution of the inputted sig nal Horizontal x vertical Some inputted signals cannot be dis played correctly Frequency H Displays the horizontal frequency of the inputted signal Frequency V Displays the vertical frequency of the in putted signal Lamp time Displays the number of accum...

Page 41: ... images to be included in your logo 2 Press the MENU button The main menu appears on the screen 3 Select Logo with the CURSOR buttons 䊱 䊲 4 Press the ENTER or the right CURSOR button 䊳 The Logo menu appears on the screen 5 Select Capture menu with the CURSOR buttons 䊱 䊲 and press ENTER 6 The captured picture appears on the screen The captured picture i e your logo with a frame appears on the scree...

Page 42: ...䊲 Move the menu display position with the CURSOR buttons 䊴 䊳 while viewing the projected image 2 Select Horiz move with the CURSOR buttons 䊱 䊲 Move the logo left or right with the CURSOR buttons 䊴 䊳 while viewing it on the screen 3 Select Vert move with the CURSOR buttons 䊱 䊲 Move the logo up or down with the CURSOR buttons 䊴 䊳 while viewing it on the screen 4 Select Horiz size with the CURSOR but...

Page 43: ...and lift up the handle Loosen the two screws with a ª screwdriver 䡵 When the lamp time exceeds 2000 hours The lamp indicator on the projector blinks Warning and Lamp replacement appear on the screen the word Warning blinks To cancel the message press the EXIT button However the same message will appear again every one hour Once the lamp time exceeds 2000 hours and the projec tor is either put into...

Page 44: ...t side with the two claws in first and then ensure that the protruding part found on the reverse side of the cover fits snugly into the hole of the main unit As this protrusion acts as a switch misfitting leads to power not being able to flow in Caution Neither touch the glass surface of the lamp directly with your hand nor stain it If you touch it with a bare hand oil or other substances on your ...

Page 45: ... resets and the projector returns to the stand by state STAND BY indicator lights up Resetting the lamp time After installing a new lamp reset the Lamp time counter inside the projector When this is done a new count will start If the display of the accumulated lamp time has reached 2000 hours the projector will not work lamp does not light up unless the lamp time is reset To ensure the lamp time h...

Page 46: ... about the filter please consult the authorized dealer where you purchased the projector The air inlet filter on the right side cannot be removed Please clean this filter regularly using for example a vacuum cleaner 1 Pull out the power cord from the wall outlet After the projector goes into the stand by state with the STAND BY indicator on pull out the power cord from the wall outlet 2 Remove the...

Page 47: ...ng pressed Insert the power cord plug firmly After the projector goes into the stand by state with the STAND BY indicator on un plug from the main power outlet close the light source lamp cover correctly and plug in again After the projector goes into the stand by state with the STAND BY indicator on un plug from the main power outlet insert the filter properly and plug in again After the projecto...

Page 48: ...ontrol held too far from the sensor Adjust focus with the focus ring of the lens Set the projector at the correct distance Adjust Tracking and Phase using the menu Adjust Brightness using the menu Adjust picture quality using the menu Set the Decoder to AUTO or the correct dedicated decoder If the problem is not rectified after setting to AUTO set to forced dedicated mode Check if the signal is ap...

Page 49: ... from the connected device The selected input mode input terminal name is shown above the mes sage Check the input image signal source The frequency of the input video signal is out of range Please ensure the frequency level of the input video signals is within the projector s specifications What to do when these messages are displayed Message Cause Contents ...

Page 50: ...rs The message can be cleared by pressing the EXIT button However the same message will re appear every hour Once the projector is turned off it cannot be turned on again if the accumu lated lamp time has exceeded 2000 hours When the accumulated lamp time reaches 2010 hours the projector shuts down and cannot be turned on again Replace the light source lamp and reset the Lamp time page 43 45 Messa...

Page 51: ...e basic operation procedures No 5 Check that nothing is blocking the air inlets and wait until the inside cools down Restart according to the basic operation procedures No 6 Check the ambient temperature If it is normal leave the projector until it cools down Restart according to the basic operation procedures No 7 Leave the projector until it cools down Restart according to the basic operation pr...

Page 52: ...signal PC3 1 line DVI D single 24pin terminal AUDIO 1 line RCApin X 1 Y C VIDEO PC1 PC2 PC3 0 5V rms high impedance CONTROL RS 232C 2 lines D sub 9pin x1 External controller IN 1 system OUT 1 system REMOTE 1 line stereo mini jack x1 remote control Output terminals DC OUT 5V 1 5A DC Power Jack Power requirements AC 100V 240V AC 50Hz 60Hz Power consumption 3 4 A 100V AC 1 42A 240V AC Operation envir...

Page 53: ...6M Depth 10mm Attachment screw should be more than 6mm but less than 10mm in length Center of lens 181 20 67 5 298 2 7 298 300 360 A 89 267 115 9 65 4 15 20 56 292 B L D L D A B 8 2 92 5 38 2 36 2 11 0 79 2 41 0 39 0 Front Bottom Top Side ...

Page 54: ...d 2 Green 3 Blue 4 N C 5 N C 6 GND Red 7 GND Green 8 GND Blue Pin number Signal name 9 N C 10 GND SYNC 11 GND 12 N C 13 H SYNC 14 V SYNC 15 N C Pin number Signal name 1 TMDS data 2 2 TMDS data 2 3 TMDS data 2 4 shield 4 N C 5 N C 6 DDC clock 7 DDC data 8 N C 9 TMDS data 1 10 TMDS data 1 11 TMDS data 1 3 shield 12 N C Pin number Signal name 13 N C 14 TMDS 5V power supply 15 Earth 5V 16 Hot plug det...

Page 55: ...rer set value 1 SP Designates the delimiter for ID Command and Parameter 20h CR Designates the terminal of the data 0Dh is not necessary for Asking command 2 2 Response data format Upon executing a control command it has received the projector sends back the following response data to the computer Header ID SP Parameter Normal Termination Status SP CR Header Designates the head of data 40h Fetches...

Page 56: ...h 30h 31h Power on mode 0002 30h 30h 30h 32h Cool down mode 0004 30h 30h 30h 34h Emergency mode Function Command Asking Data type Power on ELSE NumericValue ON OFF Special Data OPERATE U0F X X X 嘷 X HIDE U00 嘷 X X 嘷 X Right Left reversal U17 嘷 X X 嘷 X Top Bottom inversion U18 嘷 X X 嘷 X Input switch U1A 嘷 X X X Y C Operation mode Z03 嘷 嘷 X X Stand by Operation mode Only Asking command is possible 3...

Page 57: ...oration disclaims all liability for incidental or consequential damage of any kind including all damages arising out of any interruptions in operation of the product and all damages to software No person firm or representative is authorized to assume any obligation or to make any warranty on behalf of the Dukane Corporation other than as stated above THIS LIMITED WARRANTY IS VALID FOR U S A AND CA...

Page 58: ... Division 2900 Dukane Drive St Charles IL 60174 3395 E mail avsales dukane com Phone 630 762 4040 Orders 800 676 2485 Information 800 676 2486 Fax 630 584 5156 Parts Service 800 676 2487 Fax 630 584 0984 Audio Visual Products Part 401 602 00 ...

Reviews: