background image

16

Programming

Your new settings have been installed.

NOTE: Width refers to channel spacing. 12.5 kHz =

Narrowband. 25 kHz = Wideband

1

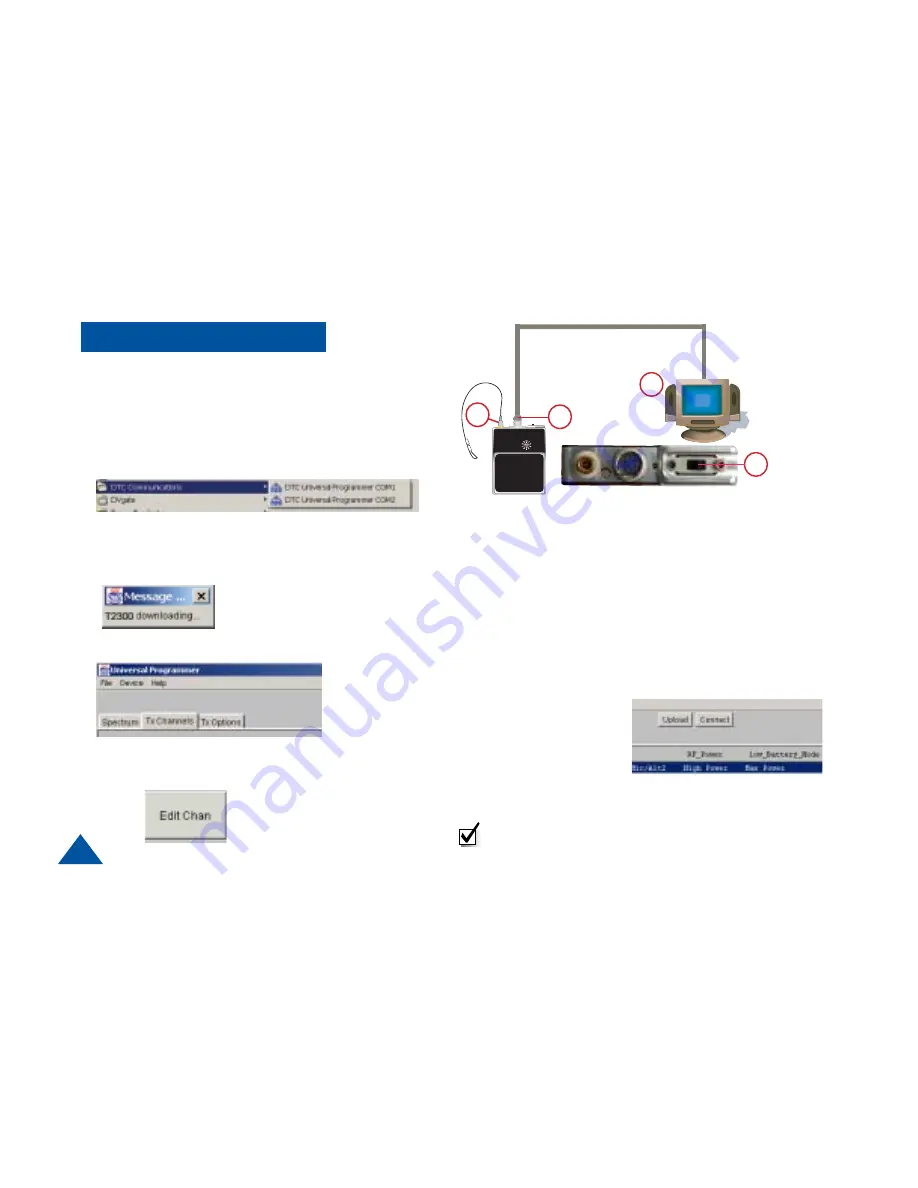
Connect the antenna to the T-2350 transmitter.

2

Install the programming cable into the connector on
the T-2350.

3

Plug the serial cable of the programming cable into
the COM1 or COM2 port of your computer.

4

From the Start Menu, Select Programs>DTC
Communications>COM1 or COM2 on your computer.

5

The cycle power screen displays.

6

Slide the power switch to the ON position and click OK.
A message screen displays T-2350 downloading.

7

Click on the TX Channels Tab.

6

9

Enter your new settings and click OK. (See Programming
Options pages 18-21) You can change the frequencies,
mode, key ID, misc source, AGC, and bandwidth
The programming software returns
to the TX channels screen with
your new settings displayed, and
an asterisk (*) beside the channel
that has changed.

10 Click on the upload button.

A message screen displays the new settings being
uploaded to device.
A message screen
displays that your
settings have been
successfully uploaded.

8

Click on the channel you need to change and click on
the Edit Channel button

1

2

3

Summary of Contents for T-2350

Page 1: ...aft T 2350 1Watt Audio Transmitter Pr Pr Pr Pr Project 25 Digital Analog oject 25 Digital Analog oject 25 Digital Analog oject 25 Digital Analog oject 25 Digital Analog Users Manual Users Manual Users...

Page 2: ...or fitness for a particular purpose DTC reserves the right to revise this publication and to make changes from time to time in the content hereof without obligation of DTC to notify any person of suc...

Page 3: ...implemented but in which operator safety is not a factor TIP Describes application hints Manual Conventions Table of Contents Overview 4 Connections 5 Quick Start Option 1 6 Quick Start Option 2 7 mi...

Page 4: ...mission is either duplexed on the mic antenna cable meaning the microphone is the antenna or transmitted on a stand alone noodle antenna in which case the internal microphone or remote microphone must...

Page 5: ...ugh the internal battery compartment which holds six AAA batteries Sliding the switch to the green dot turns the power ON Sliding the switch to the red dot turns the power OFF CHANNEL SELECT SWITCH Ro...

Page 6: ...illustration on page 12 2 Ensure that the power switch on the transmitter is set to OFF Red dot is OFF 3 Slide the battery door to the right and install six fresh AAA batteries being careful to observ...

Page 7: ...frequencies See example on Page 22 NOTE This is a push on push off locking connector The connector will rotate 360 in the transmitter without disconnecting Use extreme caution when connecting or remov...

Page 8: ...the transmitter will provide well over 8 hours of recording time Generally speaking 1 MB of memory will provide about 1 minute of recording Every new miniSD must be properly formatted before it can be...

Page 9: ...en Format WARNING Do not perform this function on any drive whose name or type is LOCAL DRIVE Doing so could permanently harm your computer 6 Ensure that the Quick Format and Enable Compression boxes...

Page 10: ...he door closed 2 Set the channel switch to a channel with recording enabled 3 Turn on a radio reciever tuned to a matching frequency 4 Turn on the T 2350 First a message broadcasting Media Present Wit...

Page 11: ...11 Trouble Shooting...

Page 12: ...not predictable Always start an operation with a fresh set of batteries Audio Circuit and Body Mounting Tips All body worn transmitters are susceptible to clothing noise Reducing this rubbing effect...

Page 13: ...ti pin connector Frequency Stability Within 2 5 ppm over 30 C to 65 C Channel Capacity 10 User programmable with DTC Universal Software Frequency Range 150 174 MHz VHF High 138 150 MHz Option VHF Low...

Page 14: ...variations you might encounter in the field The configuration of each channel is managed with DTC programming software The programming software included with your T 2350 allows you to do all of the fo...

Page 15: ...run 2 Click on the Browse button 3 Click on or find your CD drive 4 Install the JAVA Runtime Environment Application first CD provided 5 Follow the install wizard screens 6 Install the Universal Prog...

Page 16: ...switch to the ON position and click OK A message screen displays T 2350 downloading 7 Click on the TX Channels Tab 6 9 Enter your new settings and click OK See Programming Options pages 18 21 You can...

Page 17: ...the on screen instructions Uploads new channel information to the unit Click this button when all of the necessary configuration changes are complete Global transmit options See Page 20 Individual ch...

Page 18: ...18 Programming Options Click on the channel of interest then click this button to edit individual channel settings Refer to Page 19 Figure 2 Repeats channel settings from previously set channel...

Page 19: ...ar connector In both settings an external source will automatically be selected when connected When selecting Antenna Mic ALT2 you must have either the Antenna Mic DTC PN 7011149 or an external input...

Page 20: ...cast during operation but NOT on power up All Record status and warnings will be broadcast during operation AND on power up Figure 4 Turns low battery Warnings On Off Turns external status LED On Off...

Page 21: ...ng parity entered and the KeyID Key will have to be re entered To protect the Key it will not be shown or displayed once it is entered Associating a Key KeyID pair with a Channel For each channel with...

Page 22: ...f 138 MHz to 225 MHz by adjusting the amount of wire that is folded back along side the end of the antenna The total length may be calculated by the following formula Length inches 2950 FreqMHz MICROP...

Page 23: ...to its satisfaction that such defects exist and have not been caused by misuse misapplication neglect improper installation improper storage alteration physical damage or accidents The warranty shall...

Page 24: ...486 Amherst Street Nashua New Hampshire 03063 603 880 4411 www dtccom com...

Reviews: