
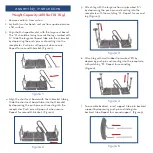
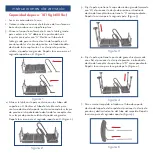
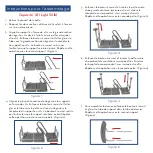


8. Insert backrest into base by depressing push pins and
sliding support tubes through both receptacles. Note:
Backrest must go through both sets of receptacles to
become secure. (Figure 6)
NOTE: Back support is reversible to accommodate left
or right tub entry. You can also change the seat depth of
your transfer bench by pushing the pins under the seat
and sliding the tubes forward until the pins lock
into place.
figure 6
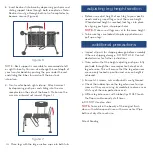
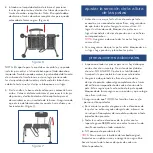
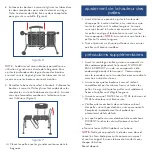
9. Turn transfer bench right-side-up. Attach armrest
by depressing push pins and sliding into the arm
receptacle on the side of the bench. Make sure the
arm arcs outward, not inward. (Figure 7)
figure 7
10. Place legs with the large suction cups into bath tub.
1. Inspect all parts for shipping damage before assembly.
If there is shipping damage - DO NOT USE. Contact
dealer/carrier for further instructions.
2. Make certain that the height adjusting push pins fully
protrude through the same respective hole of each
leg extension. This will ensure that the leg extensions
are securely locked in position and an even height is
achieved.
3. Ensure ALL screws, nuts and/or bolts are tightened.
4. Check the rubber tips on the leg extensions for rips,
wear or if they are missing. Immediately replace any or
all if any of these imperfections exist.
5. All four leg extensions with rubber tips MUST touch
the floor simultaneously at all times.
6. DO NOT stand on chair.
NOTE:
To maintain the beauty of the original finish,
clean with mild soap and rinse with warm water. Wipe
bath seat dry after each use.
Patent Pending
additional precautions
adjusting leg height section
1. Before use, adjust height of each leg to your specific
needs, making sure all legs are at the same height.
When desired height is reached, lock legs into place
by aligning push pins into proper holes.
NOTE:
Make sure all legs are set to the same height.
2. To be sure legs are locked into place, push down or
pull up on legs.