

1. Remove contents from carton.
2. Lay both transfer bench seat sections upside down on
a flat surface.
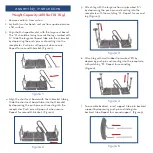
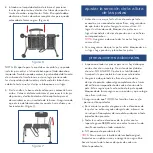
3. Align the U-shaped bracket with the large seat board.
The “U” should be facing towards the legs marked with
“A”. Slide the large seat board tube into the U-bracket
by depressing the push pins and inserting into the
receptacles. Push pins will pop out when secure.
Repeat for second U-bracket. (Figure 1)
assembly instructions
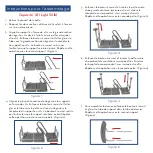
4. Align the short seat board with the U-bracket tubing.
Slide the short seat board tube into the U-bracket
by depressing the push pins and inserting into the
receptacles. Push pins will pop out when secure.
Repeat for second U-bracket. (Figure 2)
figure 1
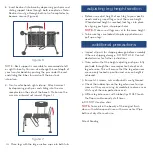
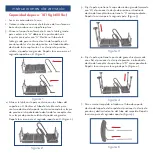
figure 3
figure 4
figure 5
Weight Capacity: 400 lbs (181 Kg)
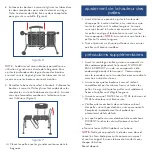
5. Attach leg with the large suction cup (marked “A”)
by depressing the push pin and inserting into the
receptacle with the matching “A”. Repeat for second
leg. (Figure 3)
6. Attach leg with small rubber tip (marked “B”) by
depressing push pin and inserting into the receptacle
with matching “B”. Repeat for second leg.
(Figure 4)
7. To assemble backrest, insert support tube into backrest
support by depressing push pin and sliding into
backrest tube. Repeat for second support. (Figure 5)
figure 2


