5.
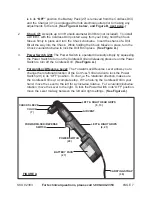
Left & Right Grips (4, 21) / Left & Right Head Grips (5, 13) : The Left & Right
Grips
and Left & Right Head Grips allow for safer and easier operation of the Cordless
Drill. IMPORTANT: When operating the Cordless Drill, hold the tool with both hands
by its Grips
only. Do not cover the Vent of the tool with your fingers or hands.
Doing so will cause the Motor to overheat, causing damage to the tool.
(See Figure A.)
TO CHARGE THE CORDLESS DRILL
1.
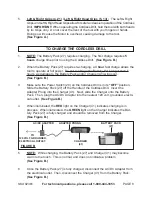
NOTE: The Battery Pack (27) requires charging. The first charge requires 5
hours charge time prior to using the Cordless Drill. (See Figure B.)
2.
When the Battery Pack (27) requires re-charging, a 3 hour fast charge allows the
tool to operate at full power. Do not re-charge the Battery Pack longer than 5
hours, as damage to the Battery Pack and/or Charger (41) will occur.
(See Figure B.)
3.
Make sure the Power Switch (20) on the Cordless Drill is in its “OFF” position.
Slide the Battery Pack (27) off the Handle of the Cordless Drill. Insert the
Adapter Prong into the Charger (41). Next, slide the Charger onto the Battery
Pack. Then, plug the AC/DC Adapter into the nearest 120 volt, grounded, electri-
cal outlet. (See Figure B.)
4.
When illuminated, the RED light on the Charger (41) indicates charging is in
process. When illuminated, the GREEN light on the Charger indicates the Bat-
tery Pack (27) is fully charged and should be removed from the Charger.
(See Figure B.)
SKU 92383 For technical questions, please call 1-800-444-3353 PAGE 8
5.
NOTE: While charging, the Battery Pack (27) and Charger (41) may become
warm to the touch. This is normal, and does not indicate a problem.
(See Figure B.)
6.
Once the Battery Pack (27) is fully charged, disconnect the AC/DC Adapter from
the electrical outlet. Then, disconnect the Charger (41) from the Battery Pack.
(See Figure B.)
CHARGER
(41)
AC/DC ADAPTER
TO
120 VOLT, GROUNDED,
ELECTRICAL OUTLET.
BATTERY PACK
(27)
ADAPTER PRONG
FIGURE B


