


4.0 MENU OPTIONS
22
R699751 - DreamScaler3 User Manual
•
VCR mode
•
Film mode
•
HDCP Mode
•
Auto Priority
•
Audio Input
•
AV Lip Sync
Deinterlacing
You can choose between seven different deinterlacing methods that better suits your need:
•
Auto:
This setting is to be used with when the content may be a mix of film and video based content.
•
Film Bias Mode:
This mode is intended for use on content that is known to be film-based
•
Video Mode:
This mode is intended for use on content that is known to be video-based.
•
2:2 Even:
This mode should be used when the user knows that the source is high-quality 2:2 pulldown (i.e. film-based
content played back in a country with a 50Hz video standard) and wants to avoid any loss of cadence lock while
watching that source. This mode weaves two adjacent fields together starting with an even field and combining it
with the following odd field. This will provide a higher quality overall signal than the ‘Auto’ or ‘Film Mode’ settings,
providing that the source really is 2:2 pulldown and does not have bad edits. Only one of the ‘2:2’ Deinterlacing
settings is correct for any given source and the correct mode can be chosen by simply trying both of them and
selecting the one which does not result in combing artifacts.
•
2:2 Odd:
This mode is very similar to ‘2:2 Even’ except that this weaves two adjacent fields together starting with an odd
field and combining it with the following even field.
•
Game Mode 1:
This mode gives you minimal latency with edge-adaptive processing. The total amount of delay with source-
locked output mode set on the DreamScaler3 is about half a frame of delay. Unlocked frame rates will increase
this delay.
•
Game Mode 2:
This mode gives you minimal latency with both motion and edge-adaptive processing. The total amount of delay
with source-locked output mode set on the DreamScaler3 is about one and a half frames of delay. Unlocked
frame rates will increase this delay.
PReP™
PReP™ stands for ”Progressive ReProcessing“. This is the first video processing method that significantly improves
progressive video signals and removes artifacts caused by inferior interlaced-to-progressive conversion. Video
signals that originate in an interlaced format are often degraded by artifacts incurred when the signal is converted
from interlaced to progressive formats by general purpose chips in DVD players, AV receivers, and set-top boxes.
Poor interlaced-to-progressive conversion is especially problematic with large-screen HDTVs, as upscaling to
higher resolutions often amplifies artifacts created in the conversion process, making them more noticeable.
Turning on PReP™ video processing will improve images on high-resolution displays and give access to the
Precision Deinterlacing menu. PReP™ should be activated only with progressive video input known to be originally
interlaced.
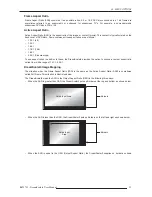
Overscan
The Overscan function scales the input image proportionally in both vertical and horizontal dimensions by the user-
specified overscan factor. The purpose of Overscan is to remove unwanted image portions around the perimeter of
the image. The default overscan value is 0, which means 100% of the input image is shown. The maximum
overscan value is 20 which means the input image is scaled up by 120%.
To adjust the overscan level:
1) Push the Up or Down button. The current level is shown.
2) Push the Up or Down button to decrease or increase the amount of overscan. The Overscan value is applied to
all input aspect ratios and is independent of the Zoom value.
Line Offset
The image can be adjusted vertically when an SDI or HDMI (480i/576i) input when you use the Line Offset function.
This function can be set independently for both 480i and 576i input formats.