DREAMVISION DreamScaler3 User Manual Download Page 20

4.0  MENU OPTIONS

20

R699751 - DreamScaler3 User Manual

below.

Panorama

The Panorama feature is a non-linear stretch that can be applied only to a 4:3 video source. The panorama
stretches the picture with minimal perceptual distortion in the center of the screen. This mode can be turned ‘On’ or
‘Off’. Additionally this feature can be accessed in the IAR presets and it is titled ‘4:3 Stretch’.

Zoom

The Zoom function zooms in on or magnifies the image on your display. The minimum zoom is 100%, (no zooming);
the maximum zoom is 150% (zoom magnification factor of 1.5X).

Horizontal Zoom Control: Push the Enter button to show the current Zoom setting. Push the Up and Down
button to increase or decrease the zooming factor.

Vertical Zoom Control: Push the Enter button to show the current Zoom setting. Push the Up and Down button to
increase or decrease the zooming factor.

Pan

The Pan function allows the image to be shifted up, down, left and right. Note that the Pan function can only be used
after the image has been zoomed to any value greater than 100%.

Horizontal Pan Control: Push the Enter button to show the current Pan setting. Push the Up button to pan to the
right. Push the Down button to pan to the left.

Vertical Pan Control: Push the Enter button to show the current Pan setting. Push the Up button to pan up. Push
the Down button to pan the image down.
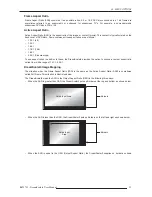
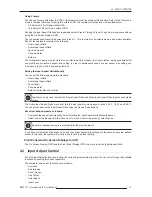
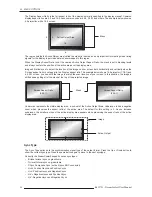
Borders

The Borders function allows you to add horizontal and/or vertical borders around the image. These borders obscure
part of the input image. Certain input-to-output aspect ratios already result in left/right or top/bottom border being
added. This control allows the system-generated borders to be extended, or for borders to be added when none
exist. As the borders are adjusted (see below) theDreamScaler3 temporarily increases the gray level of the borders
so that they are visible during the adjustment process. The level will return to normal after the adjustment has
ceased.

Horizontal Border Control: Push the Up button to move the left and right borders towards the middle of the
image, increasing the border width and cutting off the sides of the input image. Push the Down button to move
the left and right borders away from the image and decreases their width. If there are system-generated left/right
borders already present (for example, when the input aspect ratio is 4:3 and the output aspect ratio is 16:9), the
border width cannot be decreased beyond the base width created by the aspect ratio conversion.

Vertical Border Control: Push the Up button to move the top and bottom borders towards the middle of the
image, increasing the border height and cutting off the sides of the input image. Push the Down button to move
the top and bottom borders away from the image and decrease their height. If there are system-generated top/
bottom borders already present (for example, when the input aspect ratio is 16:9 and the output aspect ratio is
4:3), the border height cannot be decreased beyond the base height created by the aspect ratio conversion.

Borders are automatically added by the system when the Active Input Aspect Ratio is not the same as the Output
Aspect Ratio as explained earlier in this guide. However you can add more borders using the Borders menu.

Presets

You can specify the Input Aspect Ratio by using the Presets or Manually.

Summary of Contents for DreamScaler3

Page 1: ......

Page 2: ...curred during transport as well as for material and manufacturing faults DreamVision must be informed immediately in writing of any complaints If the purchaser or third party caries out modi cations o...

Page 3: ...Button 11 3 0 SETUP 12 3 1 Initial Set Up 12 STEP 1 Power Up 12 STEP 2 Connect the scaler to your display 12 STEP 3 Connecting your Sources to the DreamScaler3 13 3 2 Audio Operation 17 4 0 MENU OPTIO...

Page 4: ...on 37 5 3 Troubleshooting 38 My DreamScaler3 shows an error message 38 The picture has horizontal lines with the Output set to 1080p60 or 720p60 38 The picture is green when I use the analog output of...

Page 5: ...tors Flexible Digital and Analog Audio Switching Precision Audio Video Time Delay Synchronization Timebase Correction Fully Programmable Framerate Conversion Input and Output Aspect Ratio Controls Fle...

Page 6: ...rd NTSC PAL or SECAM interlaced signal and will not function correctly with the DreamScaler3 Component video inputs that are not capable of accepting a 480p signal should be labeled 480i NTSC or 576i...

Page 7: ...essive dust Avoid installing the DreamScaler3 near radiators and other heat producing appliances Install the DreamScaler3 near unshielded TV or FM antennas cable TV decoders and other RF emitting devi...

Page 8: ...p 50Hz 720p 50 60Hz 1080i 50 60Hz Component RGBS 2 480i p 60Hz 576i p 50Hz 720p 50 60Hz 1080i 50 60Hz When navigating the OSD the FPD always shows the current selection on the bottom line and the menu...

Page 9: ...ly to the HDMI video signal connected on the same input The DreamScaler3 accepts digital audio sourced from DVD players satellite receivers digital set top boxes game consoles or other digital audio d...

Page 10: ...age is paused on a display susceptible to burn in Remote Control Battery Installation The remote control for the DreamScaler3 requires two AA batteries These should be replaced as needed ABT recommend...

Page 11: ...as follows From the front panel controls From the remote control From a programmed universal remote control Using the serial connection on the back panel The menu navigation controls on the remote co...

Page 12: ...ld power on and display DreamVision Powered by ABT on the FPD STEP 2 Connect the scaler to your display Displays with a DVI or HDMI Input The default output on the DreamScaler3 is digital RGB 4 4 4 DV...

Page 13: ...DreamScaler3 s on screen Display OSD on your screen STEP 3 Connecting your Sources to the DreamScaler3 Up to 12 video sources can connected to the DreamScaler3 Use the following suggestions for conne...

Page 14: ...g an extra digital to analog D to A and analog to digital A to D step for a picture with even more detail then a component connection With a component connection set the player s output to 480i minimi...

Page 15: ...at if you are watching an HD channel you must manually switch the output resolution to 720p 1080i p or if you are watching an SD channel you must manually switch the output resolution to 480i or 480p...

Page 16: ...V DC In 6V 5A POWER Y G Pb B Pr R 1 2 1 2 1 2 1 2 S VIDEO VIDEO C O M P O N E N T L R A N A L O G V I D E O OUTPUT SDI INPUT I N P U T S SYN C I N P U T O U T P U T Proprietary HDTV AV Pack Optical Au...

Page 17: ...udio assignment is as follows Audio 1 optical none Audio 2 optical none Audio 3 coaxial none Audio 4 coaxial none Stereo analog none Note The HDMI audio inputs can only be assigned to the same HDMI vi...

Page 18: ...to the selected output aspect ratio Push the Aspect button once to show the current input aspect ratio control function To cycle through the available functions push the Aspect button repeatedly For t...

Page 19: ...se aspect ratio s in addition to these the DreamScaler3 provides the option to choose a custom aspect ratio called User with a range of 1 01 1 3 00 1 DreamScaler3 Image Mapping The situation when the...

Page 20: ...right or top bottom border being added This control allows the system generated borders to be extended or for borders to be added when none exist As the borders are adjusted see below theDreamScaler3...

Page 21: ...pect Ratio Active Input Aspect Ratio Zoom factor Pan parameter Borders horizontal and vertical The Active Input Aspect Ratio menu item lists the most common movie aspect ratios 1 33 1 1 85 1 and 2 35...

Page 22: ...The total amount of delay with source locked output mode set on the DreamScaler3 is about one and a half frames of delay Unlocked frame rates will increase this delay PReP PReP stands for Progressive...

Page 23: ...amScaler3 continuously looks for a HDCP source on its HDMI input Auto Aspect Ratio Off The Aspect Ratio is determined by user On The DreamScaler3 reads the video aspect ratio contained into the Info F...

Page 24: ...e as the Tint control found on most TVs and controls how colors are displayed in the image The Hue control is not available for Component or PAL SECAM inputs The default setting is 0 midrange Sharpnes...

Page 25: ...d parameter adjusts the brightness of the Front Panel LED during normal usage when the menu is not being navigated User Mode You have limited access to the output timing controls in Normal mode In Adv...

Page 26: ...our computer with the RS 232 cable 3 Change the software update value to Yes to begin the update process Information This setting shows information about the system including Input Status Video Source...

Page 27: ...Signal Type Colorspace 720 480 P Y Bi level YPbPr 1920 540 P Y Tri level YPbPr 720 576 P Y Bi level YPbPr 1280 720 720p 50 P Y Tri levle YPbPr 1280 720 720p 60 P Y Tri level YPbPr 1920 1080 1080i 50 I...

Page 28: ...mage to match the exact location of your screen In this situation the image is shifted down putting all of the mask at the top of the projected image Underscan represents the visible display area a su...

Page 29: ...Note that regardless of what number the unlocked output frame rate is set to it will never be identical to the input rate in this mode as the output signal timing is independent of the input timing T...

Page 30: ...Selecting and Saving a Display Pro le Use the following procedure to select and save a display pro le 1 Set up the pro le by making changes to the output setup menu items If you make custom settings...

Page 31: ...quarter gray HDMI Input Input mode is automatic Power LED On Off or Auto Test Pattern Generator Current selected test pattern SDI Line Offset One for 50Hz input and one for 60Hz input Serial Port Bit...

Page 32: ...GA 47 HDMI 3 480i NTSC 48 HDMI 3 576i PAL SECAM 49 HDMI 3 480p NTSC 50 HDMI 3 576p PAL SECAM 51 HDMI 3 720p ATSC 52 HDMI 3 1080i ATSC 53 HDMI 3 VGA 54 HDMI 3 SVGA 55 HDMI 3 XGA 56 HDMI 3 SXGA 57 HDMI...

Page 33: ...resolution The following is an example of speci cations from an LCD TV Diagonal Screen Size inches 32 Display Capability 480p 720p 1080i p Aspect Ratio 16 9 Widescreen Resolution Number of Pixels 128...

Page 34: ...ect View 1024x768 1280x720 720p 1366x768 1920x1080 1080p LCoS Rear Projection 1280x720 720p 1366x768 1920x1080 1080p Front Projection 1280x720 720p 1920x1080 1080p CRT Rear Projection 480p 540p 1080i...

Page 35: ...native resolution of your display and that you are bypassing any internal processing in your display They are the checkerboard vertical lines and horizontal lines test patterns When the checkerboard...

Page 36: ...rs One is 4 IRE below black blacker than black one is 1 IRE above black and the third is 2 IRE above black Embedded in the white blocks are 3 bars One is 1 IRE above white whiter then white one is 1 I...

Page 37: ...n has been included speci cally designed for this application On some displays these settings may not be available unless you get into the service menu DreamVision recommends that you hire an certi ed...

Page 38: ...you have adjusted brightness and contrast go back to the Video Test Patterns menu and select Color Adjustment 7 From the Color Adjustment menu select Special Color Bars Use the Full Bars test pattern...

Page 39: ...king blue light on the DreamScaler3 means that the scaler is processing an HDCP protected signal but is unable to authenticate with the display Verify that your display is HDCP compliant If it is not...

Page 40: ...the Anamorphic lens is placed in front of the projector beam the projected picture would have the same width Mode 1 Auto this option triggers 3 simultaneous actions 1 Apply the Mode1 video processing...

Page 41: ...ion and input Con gure the DreamScaler3 into THEATRE Mode to have it set automatically upon changing the Input Active Aspect Ratio Output Setup Aspect Ratio Lens Mode 1 Auto Input Aspect Ratio Frame A...

Page 42: ...TRE System during calibration only Once the THEATRE System is properly calibrated the DreamScaler3 controls the Lens position with the RF Emitter supplied with the THEATRE System connected to the 12V...

Page 43: ...g an Input Active AR greater than 2 33 1 the DreamScaler3 con gured in THEATRE Mode will command the Anamorphic Lens to moves in front of the projector beam and apply the correct vertical picture stre...

Page 44: ...the RF Emitter is connected to the DreamScaler3 press sequentially Viewing Mode button to control the Anamorphic Lens position Output Setup 12V Trigger 2 OFF the Lens moves out of the projector beam...

Page 45: ...AR Quick Access Aspect button on RCU 1 33 1 Quick Access 4 3 button on RCU 1 55 1 1 66 1 1 78 1 Quick Access 16 9 button on RCU 1 85 1 2 35 1 User Range 1 01 3 00 Panorama ON OFF Zoom Horizontal Range...

Page 46: ...ace RGB YPbPr YCbCr 4 2 2 YCbCr 4 4 4 Auto Input Level Video PC VCR Mode ON OFF Auto HDMI Con g HDCP Mode OFF ON Auto Aspect Ratio OFF ON Auto Color Space OFF ON Auto Priority Range 1 12 Audio Input O...

Page 47: ...ow IRE20 Window IRE30 Window IRE40 Window IRE50 Window IRE60 Window IRE70 Window IRE80 Window IRE90 Window IRE100 Gray Ramp Xhatch Coarse Xhatch Fine Focus Half B W H Clr7 Bars75 H Clr7 Bars100 H Clr8...

Page 48: ...DMI Digital Format 480p 540p 576p 720p 50 720p 60 1080i 50 1080i 60 1080p 24 1080p 25 1080p 50 1080p 60 800x600 SVGA 1024x768 XGA 1280x1024 SXGA 848x480 852x480 1366x768 852x576 1366x768 1 1366x768 2...

Page 49: ...Range 1 01 3 00 Lens Mode 1 Mode 1 Auto Mode 2 None Screen 4 3 16 9 2 35 1 User Range 1 01 3 00 Image Shift Vertical Range 30 30 Horizontal Range 30 30 Underscan Range 0 100 Sync Type Bi Level Tri Le...

Page 50: ...lock Range 24 120 Border Level Range 0 100 Gamma Correction OFF ON Red Range 0 50 2 50 Green Range 0 50 2 50 Blue Range 0 50 2 50 HDCP Mode OFF ON 12V Trigger 2 Quick Access Viewing Mode button on RCU...

Page 51: ...Contact Information TEC DreamVision 7 rue La Caille 75017 Paris FRANCE E mail sales dreamvision net www dreamvision net Part No R699751 with DreamScaler3 Theatre addendum...

Page 52: ......

Reviews: