


Copyright © 2014, Dr Robot Inc. All Rights Reserved. www.DrRobot.com V.04.11.14
- 12 -
You could use the vertical track bar to zoom in or out.
When the GPS-IMU module is presented, this program will connect and display the GPS information on Google
Earth and IMU raw data on the 6 chart boxes.
When camera is presented, the video and AV control buttons will be shown in the video window.
You could use the included Gamepad controller to navigate the robot. When used outdoor, especially under direct
sun lights, head-mounted display (optional accessory) will provide clear and large display with excellent outdoor
experience.
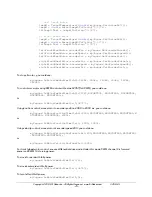
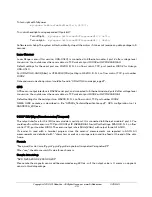
Gamepad Controller
Note: when using Gamepad controller, you need to make sure the program window is in “focus”.
Initializing or resetting arm-track position:
After powering up the robot, or when the actual arm position is different from the arm position window (shown on
the right), you should reset the arm-track position as following:
drive the arm forward and being flat on the ground (as shown below), we call this initial or “0”
position (extend forward)
then, click the “X” button on Gamepad to save this value and to set initial position.
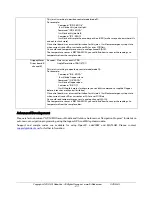
Manipulator
arm Gripper
open
Manipulator Arm Gripper
close
Set Flipper Arm initial
position
Manipulator
Arm/Flipper Arm
control switch
Jaguar Forward
/ Backward
Control
Manipulator Arm
Joint3 turn to left
Jaguar Turning Control
Front Arm Up /Manipulator
Arm Joint1 Up
Reset Flipper Arm to initial
position
Reset Manipulator Arm to
initial position
Front Arm down
/Manipulator Arm Joint1
Manipulator Arm Joint3
turn to right
Rear Arm Up
/Manipulator Arm Joint2
U
Rear Arm Down /Manipulator
Arm Joint2 Down
Front Light
On/Off
Set Manipulator Arm Initial
position


