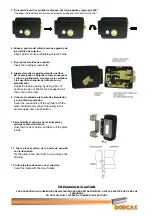
5. Si necesita invertir el sentido de bloqueo, tire del picaporte y luego gire 180º.
If needed, the lock direction can be reversed by pulling the latch and turning 180º.
6. Alinee el agujero del cilindro con los agujeros de
los tornillos de sujeción.
Align cylinder’s hole and holding screw’s holes.
7. Fije con los tornillos de sujeción.
Insert the holding screws to fix.
8. Ajuste el muelle de presión usando una llave
No.12 apretando o aflojando la tuerca hexagonal
y cubra a continuación el cuerpo de la cerradura
y la superficie alrededor del cilindro con el
embellecedor.
Adjust the loading spring by using a No. 12
spanner to ease or tighten the hexagonal nut,
then cover and screw.
9. Conecte el cableado a la fuente de alimentación
y a un botón de pulsación.
Cover the surrounding of the cylinder with the
plate included and connect the wiring to the
power supply and a push button.
10. Desatornille el cobertor de la contraplaca y
extraiga la placa del interior.
Unscrew the door holder and take out the plate
inside.
11. Fije la placa al marco de la puerta de acuerdo
con la ilustración.
Fix the plate to the door frame, according to the
drawing.
12. Cubra la placa de nuevo con el cobertor.
Cover the plate with the door holder.
PRECAUCION / CAUTION
PARA GARANTIZAR LA DURABILIDAD DEL MECANISMO NO DEBE ESTAR SOMETIDO A PULSOS ELÉCTRICOS DE MÁS DE
8 SEGUNDOS.
DO NOT ELECTRIFY THIS DEVICE LONGER THAN 8 SECONDS.


